|
Theory | |
Exercises | |
|
Lecture 2.1 Voltage Part 2
In this lecture, Kirchhoff's voltage law is further studied.
Goal: The goal of this lecture is to be able to apply Kirchhoffs second rule to more complex circuits.
|
In the last chapter, Kirchhoff's voltage law was introduces. The key message of this law is that in every loop in an electric circuit, the sum of all generated voltage has to be equal to the sum of all consumed voltage. But so far, we have only seen circuits with one loop. So in this chapter, circuits with more loops are introduced and examples are given on how to calulate with Kirchhoff's voltage law. |
|||
|
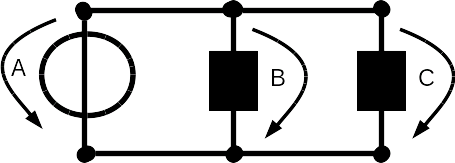
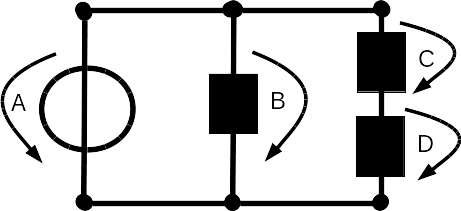
To the left is a circuit with more than one loops depicted. It is very important to know how to use Kirchhoff's law in this case because circuits like this (or even more complex) are very common. Kirchhoff's voltage law states, that in a loop, all voltage that is produced has to be consumed again. So the first thing to do is to identify all the loops in this example to the left. A loop is just a path that starts and ends at the same point. Remember at the end of the last chapter, I mentioned the direction of the arrows, which indicate the voltage. Have a look at the example here. The arrow over the voltage source is pointing downwards and if you look at it like a clock, it is pointing into counter clockwise direction. The arrow over resistor B is pointing in clockwise direction with respect to the voltage source A. The arrow over resistor C is also pointing in clockwise direction with respect to the voltage source A. |
||
|
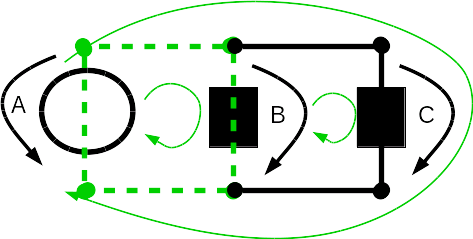
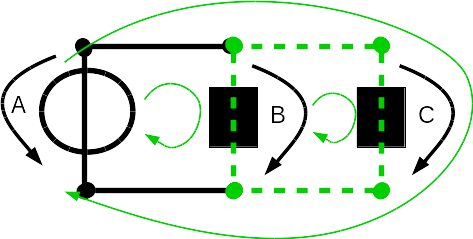
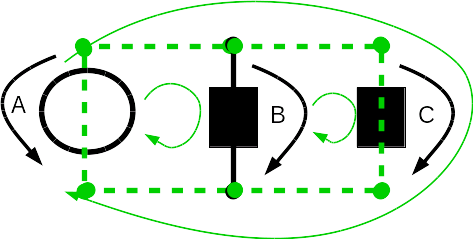
On the left are the three possible loops in this electric circuit. The green arrows are there to show the three loops. The first loop starts at the voltage source A and then goes to the resistor B and back to the voltage source A. The second loop starts at the resistor B and goes to the resistor C and then back to resistor B. The third loop starts again at the voltage source A and then goes to the resistor C and back to the voltage source A. A loop starts and ends at the same place and never visits a path twice. This means we can not have a path that starts at source A, then goes to resistor B then goes to resistor C and then back to voltage source A. You can not draw a loop like this without visiting one of the lines twice, so it is not a loop! Now let's apply Kirchhoff's voltage law. We are given: UA = 5 V. We look at the first loop and only consider this. We ignore the other parts of the circuit completely. So have a look at the first of the three pictures on the left. The loop starts at votlage source A and goes to resistor B. Kirchhoff's voltage law for this loop is:
The next step is to calculate the voltage of the resistor C. So again we first write down Kirchhoff's voltage law:
|
||
|
Let's have a look at another example To calculate all the voltages we first state all of Kirchhoff's loop laws:
|
||
|
We need to calculate UB and UC. So let's start with the first equation: UA - UB = 0 We first reformulate this equation so that it is now: UA = UB. Now we can enter the value we know and get the result: 12 V = UB Next we take the second equation: UA - UC - UD = 0 In this equation, we know the values for UA and UD. So we reformulate this equation: UA - UC = UD. Now we can enter the values we know: 12V - 4V = UC. This gives us the result: UC = 8V. It is also possible to do it in a different way. First, we use the second of the equations, that we have written above: UA - UC - UD = 0 Here we know the values for UA and UD so we reformulate this equation: UC = UA - UD We can insert the values we know and get the result: UC = 12V - 4V = 8V. Now we use the third equation to calculate the last missing value: UB - UC - UD = 0 So again we reformulate this equation: UB = UC + UC We enter the missing values and get the result: UB = 8V + 4V = 12V So you see, it does not matter in which order you do the calculations. All will lead to the same results. If the results are not the same, then you know thet either you have made a mistake or maybe the exercise was wrong somehow. Go now to the exercises and train Kirchhoff's voltage law with more than one loop. |
|||