10. Networking
A system of tubes and pipes
10.1. Review
You’ve seen some network basics and are aware of your network setup. You can control a computer from the terminal. You know how to navigate and move files across the file tree. You’ve learnt about file systems and how to change the file tree at will. You’ve learnt about users and how to log in.
10.1.1. Test questions
- What’s an IP address?
- What hardware do you need to connect two computers?
- What is a network protocol? Why do you need one?
- How do you find out your user name?
- How do you start graphical programs?
- Give two methods to copy a file. What’s the synopsis of the most common one?
10.2. Knock, knock
If you’re part of a network, you can communicate with other machines. Otherwise you mainly talk to yourself. And only crazy people do that. Let’s see if you can reach another computer.
ping -c 4 localhost
Actually, localhost is your own machine. Hey, you really do talk to yourself. So you are crazy!? I only wonder if you were crazy in the first place or became mad while reading this tutorial [1]. To be fair, I kind of tricked you into this. So let’s give it another shot.
ping -c 4 127.0.0.1
Alright, that was more talking to yourself. Which basically proves my point about your mental health. Yeah, I know, I’m becoming mean. But on the other hand, it’s funny. Yes, yes, it sure is funny.
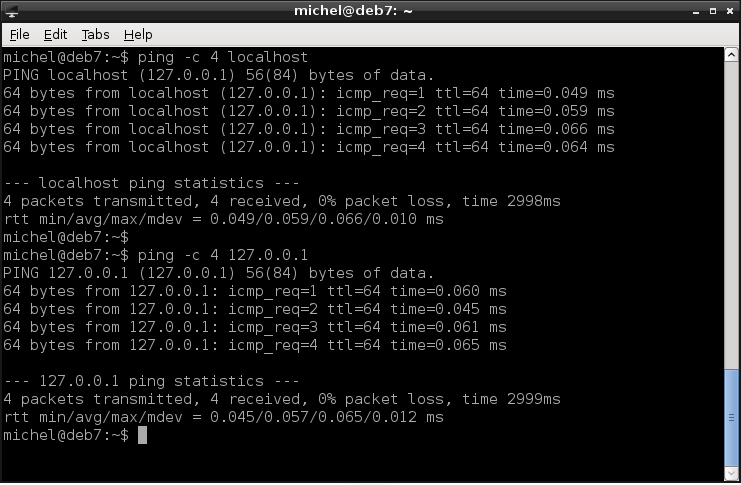
OK, let’s be serious again. ping a very simple test to see if a machine is up and running. More precicely, to test if there’s a computer at a specific address. Imagine a long street with many houses, each one having its own address. With ping you go to some address and knock on the door. If someone’s home, they’ll respond somehow (probably throw water from the top window). If no one lives there, there’s simply no response. The result of this investigation is reported back to you. Note that actually you only know that the place is occupied, not by whom.
The -c specifies how many pings should be sent out. If you omit this option, it will send ping requests until you abort with Ctrl-c. When you do (or the count was reached), a summary is displayed. It shows you the overall statistics, i.e. how many requests have been answered and how many were lost. It’s also interesting to have a look at time of each ping and rtt in the statistics. The latter stands for Round Trip Time and means the time it took from sending a request to receiving the corresponding answer. These two measurments show you how long it takes until you get an answer. A higher time means the network is slow. The beahviour will be similar if you access the network with other means, like a web browser. So you can quickly check if slow surfing is because of bad network.
So 127.0.0.1 is a network address (IP address). Commonly, you’re assigned an address when you join a network. In case of a private network, it will probably look like 192.168.0.XXX or 192.168.1.XXX. But right now you don’t really care about what exact address you get. So if yours is different, it doesn’t matter. But let’s check.
sudo ifconfig
This lists you quite some information, while we’re only interested in a single line. Look for lines containing inet addr:, then possibly an address similar to the ones listed above. You should at least see the line with the 127.0.0.1 address, but also another one. If you don’t find such a line, you’re probably not connected to a network.
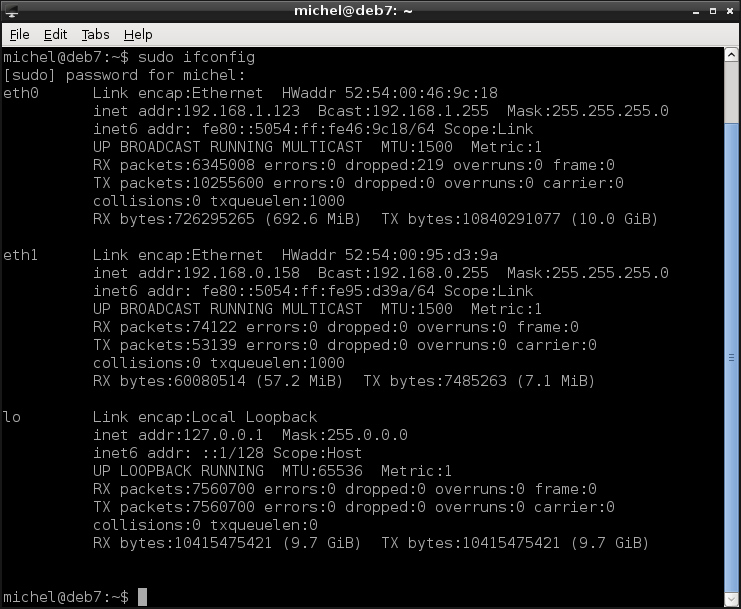
You see that ifconfig‘s output is structured into blocks, with a name on the very left at the top of each block. That’s the network interface, which roughly corresponds to the network adapters you have in your computer. Plus the lo interface, which is the loopback and should always be present. The non-loopback interface will probably be called eth0 or something similar. If you’re connected to multiple networks you’ll find several interfaces with different IP addresses.
If you know which interface you’re dealing with you can have ifconfig display only the information about one interface.
sudo ifconfig lo
The loopback interface always has the address 127.0.0.1. It is used to simulate network communication, even if you’re not really connected to another computer. Unlike stated above, this is a quite common case [2]. So the ping test was done with this address because it doesn’t fail. If you want to do the test for real, you’ll first have to find out the address of another computer in your network.
10.2.1. Exercises
Look up the IP address of your own computer.
What is the localhost? What’s its address?
Go to another computer and look up its IP.
From your own machine, ping the other IP you know.
List the configuration of (only!) your loopback interface.
Ping the following addresses. What do you observe? Discuss the results with fellow students or a teacher.
- 123.456.789.012
- 127.0.0.1
- 0.0.0.0
- 192.168.0.255
- 192.168.0.254
- 10.0.0.1
10.3. Hosts and names
Computers are very good with numbers, but humans usually less so. That’s why you can use names instead. You’ve seen the concept before: For every user, you have the name as well as the UID. You’ve already used this trick in the ping example before. There, you’ve used localhost as well as 127.0.0.1. Both are identical and both exist always and on every (unix) system. But you can just as well use domain names, as you already know them from the internet.
ping -c4 www.igsor.net
Most commands accept an address as well as a name, just like ping. However, if you specify the name, the computer somehow has to find out at which address that host currently resides. Because addresses in a network can change this is no trivial task [3]. The first place to look for an address is /etc/hosts. This file contains a simple table, translating names into an address.
cat /etc/hosts
There you see the line mapping your localhost to the loopback address.
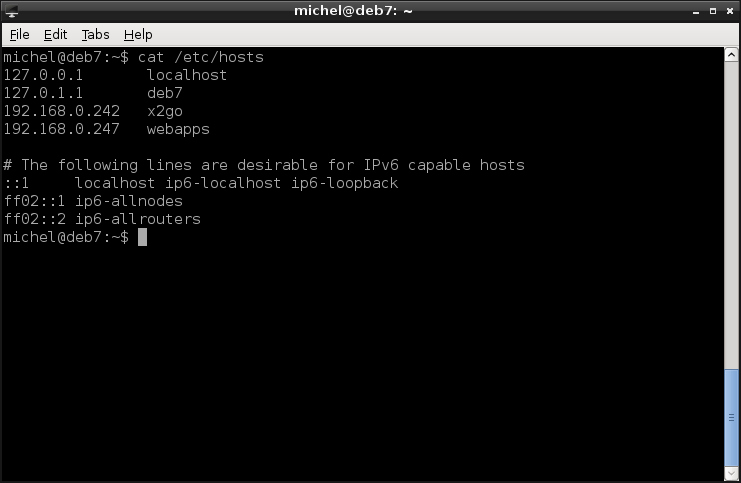
But how about www.igsor.net? If it’s not listed in /etc/hosts, the address is looked up through the domain name system (DNS). Without going into detail, this is the system which creates addresses like www.example.com and maps them to an IP address. It also solves the problem with changing IP addresses, so you can reach the same service under the same name even if it moves around [4]. The /etc/hosts mechanism is much simpler and if the host changes its address, you have to adapt the file manually. But it’s also way simpler and usually suffices in a local network with fixed addresses.
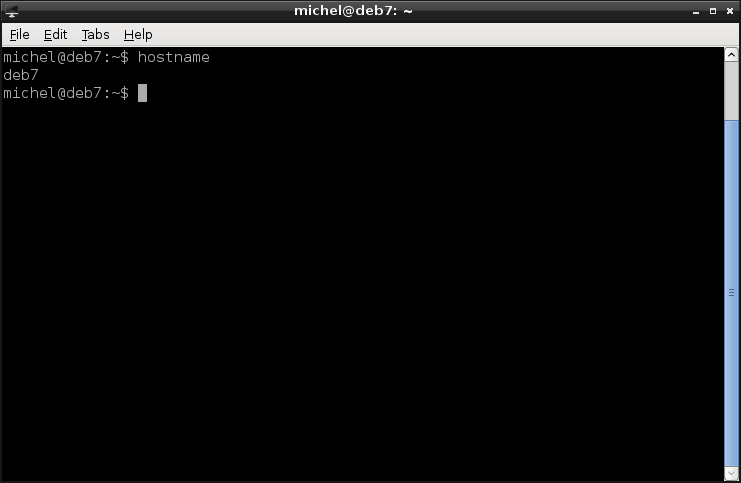
Considering the /etc/hosts file again, you’ll notice that there’s another entry mapping to 127.0.0.1. That would be your hostname. Each machine has its own, individual name besides localhost. Let’s check it out.
hostname
You change the hostname with the same command (run as root). The hostname is present on all unix-like systems, although normally not advertised (so you still need an entry in /etc/hosts). But it’s an excellent way to find out if you’re working on the right machine.
10.3.1. Exercises
State two different ways to find out the hostname.
What’s the IP address of google.com? Use ping to find out.
Enter the IP address of google.com in firefox as address. What do you observe?
Ping example. What do you observe?
Check out /etc/hosts.
- Open /etc/hosts, add the line 127.0.0.1 google.com
- Ping google.com. What’s the answering IP?
- Ping www.google.com. What’s the answering IP?
- Remove the line from /etc/hosts again.
- Discuss your results with a fellow student or a teacher.
10.4. Working with remotes
Soon, you’ll be working on different machines, so let’s get some terminology straight.
| Term | Meaning |
|---|---|
| Host | Any computer which is part of a network. Because you always have the loopback network, it’s really any computer. |
| Local | That’s the computer you’re working on currently. The one from which you are executing a command. |
| Remote | This may be any other machine to which you can connect. So when you connect from one computer to another, the other one is the remote. Essentially any computer in the network except the one you’re working on. |
So when working with two computers, the terms local and remote depend on where you sit. Let’s make an example. When you use ping, you make send a ping request from your local machine (host) and the remote one answers. If you move yourself to the other machine and do the same over again, still the local one sends the request and the remote answers. But now the local machine is the one which was the remote before. Confused? I do hope so [5].
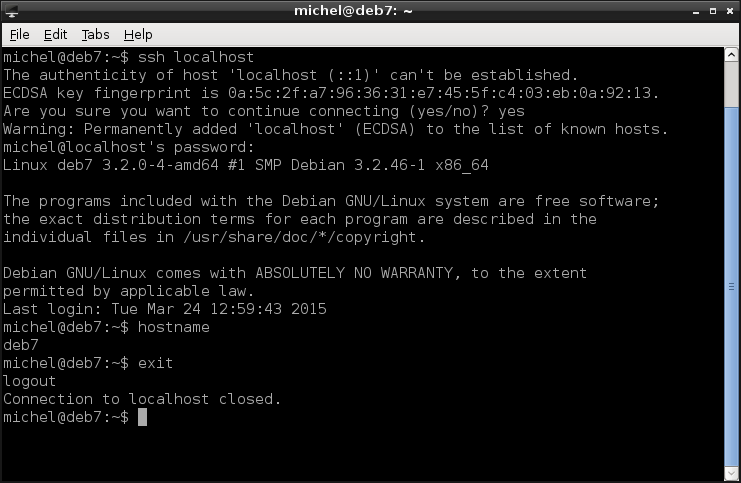
You know the powers of the terminal already. So you actually don’t need anything besides a terminal on the remote host. And in fact, that’s easy enough. Because I don’t know your network setup, let’s do a little sandbox experiment. You’ve already seen the loopback mechanism and know that we can use it in the same way as any other host. If you’re prompted about authenticity, type yes.
ssh localhost
hostname
exit
The Secure SHell is a program which opens a connection to a remote machine and let’s you execute stuff there. If you write it as above, it simply opens a shell for you. When you run exit, the remote terminal exists (as your local one would), the connection is closed and you return to the original (local) terminal again. As you’ve seen before, you can specify a host name. The address would work as well.
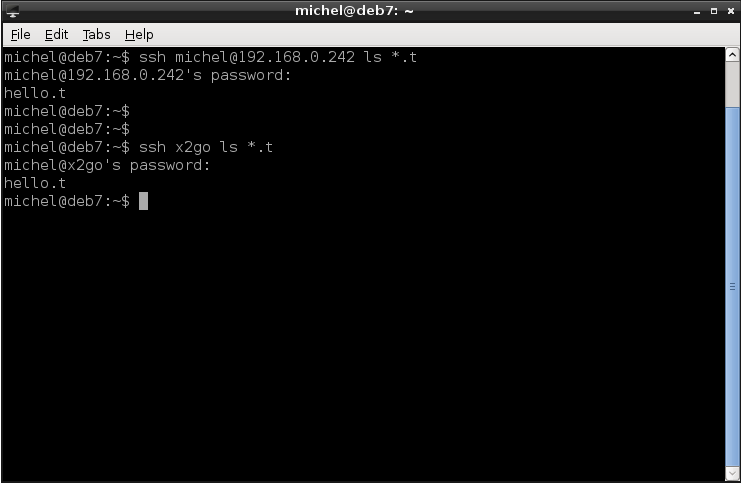
In our case, the remote host was localhost, so we end up at our own host again. So far so good, but let’s actually connect to a remote machine. First, you need to assure you have access to two machines in a network. Ask a teacher or network supervisor if you’re troubled [6]. Find out the IP addresses of both machines and check with ping if you can reach the other. I assume that the remote machine is located at the address 192.168.0.242 and the login user name (to which you know the password) on the remote system is michel. You can omit the user name (michel@) if it’s the same as on the local host. This time, we also explicitly state the program we want to run.
ssh michel@192.168.0.242 ls *.t
The program name has to be stated as it looks on the remote machine’s file tree. Also, be careful when using ~ or *. These are two evaluated before the command is run, so with respect to your local environment. However, that’s not the case for *.t. This one is run in the context of the remote machine. So in this example, the program is ls and will see the contents of the michel’s remote home, specifically all files ending with .t. After the command is executed, you automatically return to the local terminal and the connection is closed.
Note that we can write this much shorter. As the user name of the local host is michel aswell, we can leave it out. Furthermore, instead of the IP address we can use a name, if one is defined in /etc/hosts. In my setup, this is indeed the case. If you have a look my settings in /etc/hosts, you’ll see that this address can be used as x2go. So the command above does exactly the same as the next one. Modify your /etc/hosts accordingly if you want to do the same.
ssh x2go ls *.t
ssh is an extremely versatile command to connect two computers. And the best part is that all data which is sent over the network is encrypted, so completely secure. Which makes the program well suited for use in the (hostile) internet.
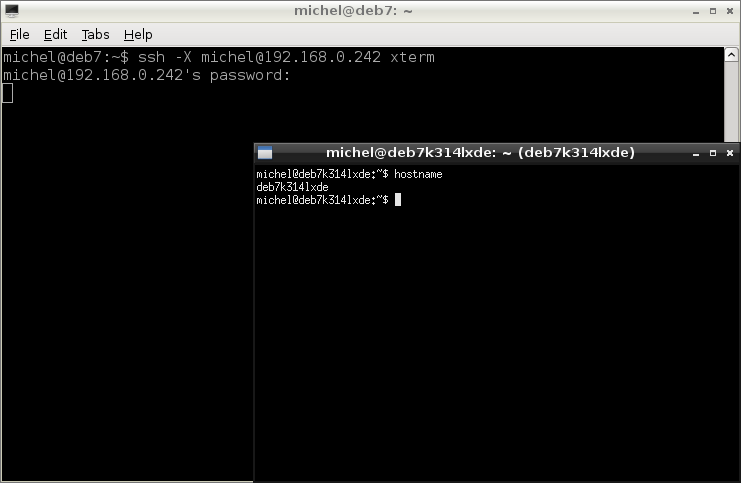
Because we’re not going into networking we’ll just leave it at what you’ve seen... Plus one extra feature. You can also start graphical programs. For example xterm with the following command
ssh -X michel@192.168.0.242 xterm
Although it will probably be slow, it has its uses in a local network.
Instead of going into more details about ssh, let’s show two more commands. In fact, they also come with ssh and use the same underlying code but you use them very differently: to copy files.
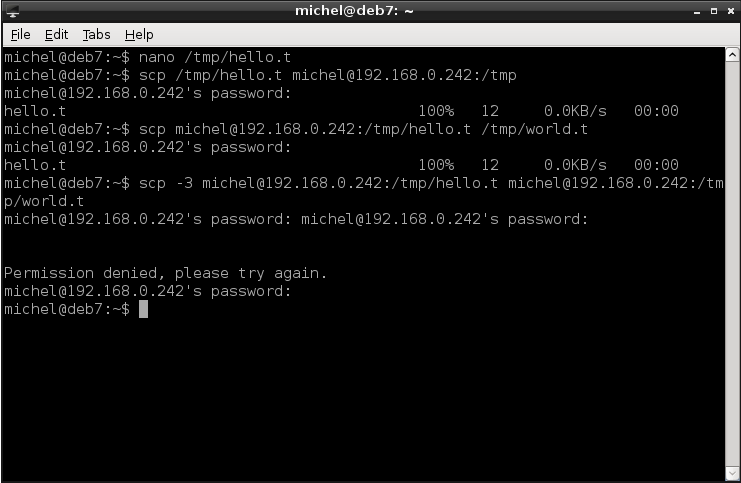
First, creat a file you can copy around.
nano /tmp/hello.t
The scp command resembles the syntax of the well-known cp: You specify a source and destination. For scp, any of those can be on a remote system. If so, you write the user (if different than the local one) and the host prior to the path.
scp /tmp/hello.t michel@192.168.0.242:/tmp/
scp michel@192.168.0.242:/tmp/hello.t /tmp/world.t
scp -3 michel@192.168.0.242:/tmp/hello.t michel@192.168.0.242:/tmp/world.t
The first command copies the local file /tmp/hello.t to the remote machine. The seond one copies the same file back to /tmp/world.t.The third command copies a file on a remote system to another remote host (even though it’s the same in the example). Yes, even that works, although it’s a bit messy. As with cp, you can copy directories by adding the -r option (before stating the files).
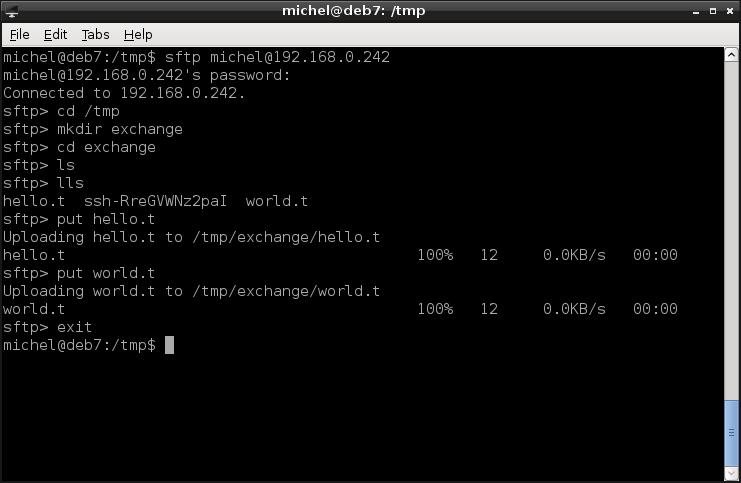
If you’re after more comfort or want to look around prior to copying files, you might be interested in sftp.
sftp michel@192.168.0.242
It’s also for file transfer but uses an interactive interface known from ftp clients. Just look at the example and read the chapter INTERACTIVE COMMANDS in the man page, if you’re into that.
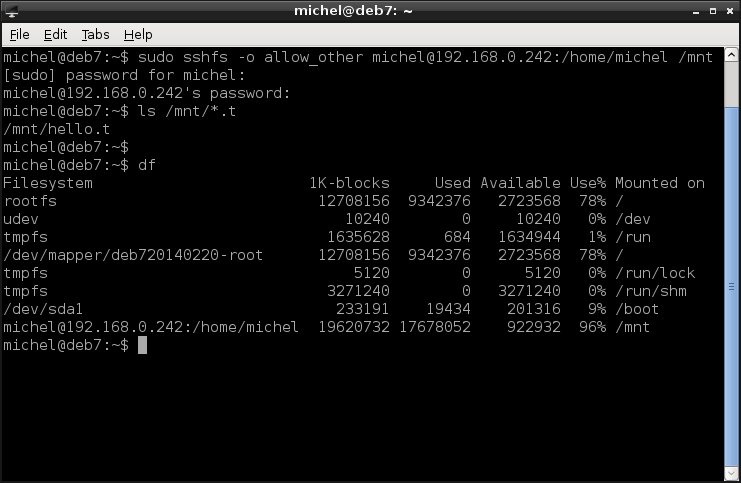
Last but not least, let’s discuss sshfs: A filesystem built on top of ssh. You know already how mount works and how it binds a file system into your file tree. sshfs does the same, only that the file system is actually a remote directory. See for yourself.
sudo sshfs -o allow_other michel@192.168.0.242:/home/michel /mnt
ls /mnt/*.t
df
So we’re mounting the directory /home/michel on the host 192.168.0.242. It will be available in the folder /mnt on our local machine. You can verify by looking at ls and df. The -o allow_other option allows non-root users to access the mountpoint also; otherwise you’d need to be root to run the ls command.
The same rules as with the other ssh commands apply here: The user can be omitted if it’s the same on both hosts, the address can be replaced by the host name and the default directory would be the home anyways. So, I could alternatively write
sudo sshfs -o allow_other michel@x2go: /mnt
The user must still be stated because the command is executed as root (due to the sudo), so it would be root.
Since we’re at it, also take a note if ~/.ssh/config. You can put ssh configuration there. Which is very helpful if you connect often to the same remote host. For example, we could write the following three lines
Host x2go
HostName 192.168.0.242
User michel
and from now on log into the machine via:
ssh x2go
Consult man ssh_config if you want to know more. If so, it’s probably also a good idea to read about ssh in general, especially keys are a very interesting topic and can make your workflow even more comfortable.
10.4.1. Exercises
Note
For the exercises to work, you possibly have to replace the user name and IP address of a remote system with a valid one.
Ping 192.168.0.242. Make sure there’s an answer.
Try the command ssh michel@192.168.0.242 ls ~. What do you observe?
What does scp‘s argument -3 achieve?
Research on the internet how to use sshfs in /etc/fstab
Create a directory on your /tmp and put some files there. Then copy the whole directory with a single command to your remote machine.
Use sftp in the following exercise.
- Log into 192.168.0.242.
- Go to any directory and download a file.
- To which directory is the file downloaded?
- How can you change the directory where your downloaded files are stored?
Consider the command ssh michel@192.168.0.242 ping localhost: Which machine answers the ping?
10.5. Summary
You can talk about computers in networks. You’ve learnt how to search and find other machines. You know how to address them and how to translate addresses. You got to know a powerfull network tool to manage numerous computers from a single machine.
10.5.1. Exercises
- Why is it advantageous to use names instead of IP addresses?
- How do you find out the IP of a host?
- Name three ways to address to your local machine.
- In your own words, explain why you need a loopback interface.
- Can and should you use ssh in the internet? Why / why not? How about other tools, like ftp?
- Give three scenarios where you would use ping.
10.6. Cheatsheet
- ping [-c COUNT] ADDRESS
- ifconfig [INTERFACE]
- hostname [NEW_HOSTNAME]
- ssh HOST
- ssh [OPTIONS] [USER@]HOST [COMMAND]
- scp [OPTIONS] [-r] [[USER@]HOST:]SOURCE_FILE [[USER@HOST:]DESTINATION_FILE
- sftp [OPTIONS] [USER@]HOST
- sshfs [-o allow_other] [USER@]HOST:[DIRECTORY] MOUNTPOINT
| [1] | If you followed the guidance what to read from the tutorial, then yes, you are crazy. You even admitted yourself. And only a crazy person would do that. |
| [2] | Many applications designed such that they run in a network. For example your graphical interface, your internal mail system, the system logger and many more. Not all require a network address but if they do, they can always rely on 127.0.0.1 |
| [3] | For example, the addresses might be handed out in a first come first serve fashion. Then your address is dependent in what order the machines entered the network. |
| [4] | Not really solved, DNS is an incredibly insecure and error-prone network protocol (that’s what we call computer-based communication). It has its elegance, however, and is widely distributed and hence a standard. |
| [5] | Local and remote depends on your perspective. If you didn’t understand it, draw a picture. Or execute the example with two actual computers and you moving around. |
| [6] | If you don’t really have two computers, maybe you can read the next chapter about virtualization and work with two virtual machines. However, network troubleshooting may be very complicated there so if it doesn’t run out of the box it will be even more troublesome. |