2. How computers are organized
Bow before me for I am root
2.1. Review
In the last chapter, you were introduced to what makes your computer and what an operating system is. You know that we’re focussing on the essential components: CPU, memory, hard disk and keyboard.
2.1.1. Test questions
- What operating system are you running? Be specific!
- Which device stores your data?
- What’s the difference between Unix and Linux?
2.1.2. Introduction
If you ever used a computer, you’ve surely come across files and very likely also folders (also called directories). That’s no coincidence but these are the most fundamental concepts of a computer. Everything stored on a computer or other electronic system is organized with files and directories.
Generally speaking, a file holds some data we want to store now and access somewhen later on. We could store all of our files in the same place but that would be a horrible mess. You’d have to remember all file names you’ve ever used in order to find your specific file again. When searching for a file, you’d have to scroll through thousands of files before you find yours. So that’s why we organize files in directories. With this, we can seperate documents from videos, images, applications or system files by putting them in respective folders.
We start by introducing how files and directories are organized, in a general manner. You’ll learn the purpose of paths and how to write them. And put theory to practice with your first steps on the terminal.
2.2. Roots and Trees
In unix systems (like Linux), the topmost directory is called the root. As each directory, it contains some more (sub)directories and files. Computer engineers like to have metaphors for terms they use, to the file structure is usually depicted as a tree.
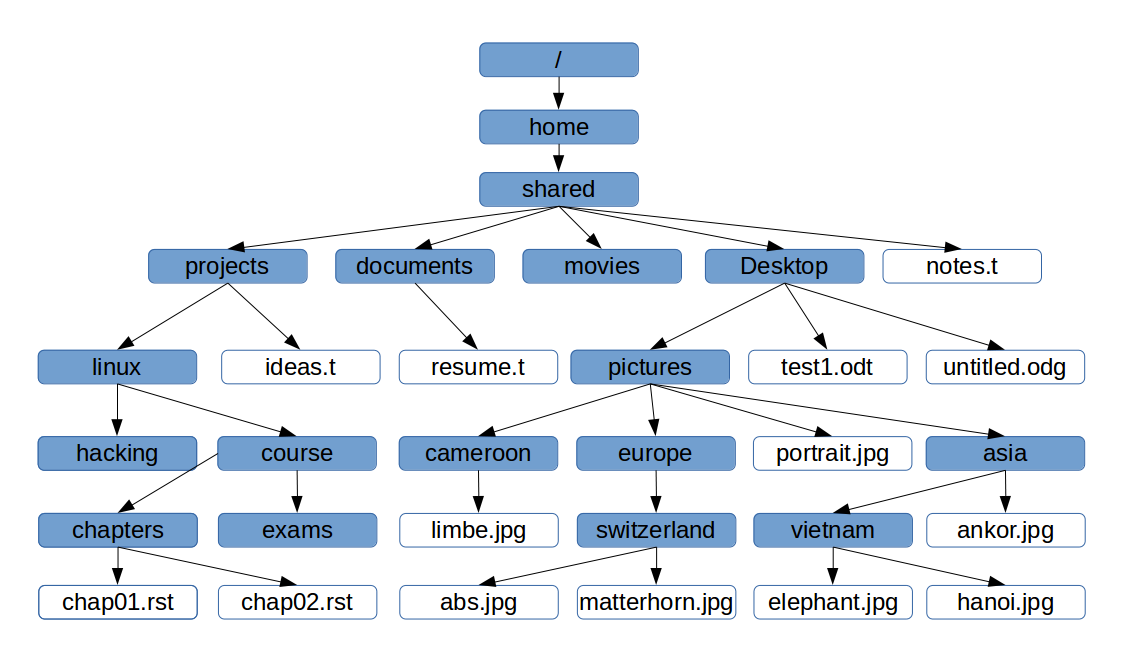
Like this, the root directory really is the root of the tree from which everything grows. Each directory creates a new branch, like you see in the picture. But because computer engineers are funny guys, usually the file tree is displayed upside-down, with the root directory on top [1]. Each block is a directory and on the bottom you see some files as text without borders.
2.2.1. Paths
Paths are something like addresses or way descriptions in the file tree. Let’s say you want your friend to look at a file you wrote. You’ll have to tell him which file and where to find it. Let’s say you’re sue and want to show fred a picture of your mother. So you tell him through which directories he must go, beginning at the root, to find the image mom.jpg. The path simply states all the directory and file names on the way and seperates them with a slash (/) character.
/home/shared/documents/resume.t
You can follow this path in the image above. To show that we start from the root directory, we start with a slash (/). Then come all directories and the last part of the path is the file name of the image. We call this kind of path an absolute path. The path either ends at a file, as in the example, but can also do so at a directory (there are no other choices anyways). Don’t let the file extension (.jpg) fool you! Unlike other systems, unix doens’t really require file extensions and you mostly put it there to see what you’re dealing with. So you don’t know from the path if it ends at a file or a directory.
Let’s say you’re currently residing on his the Desktop (/home/shared/Desktop - note that this is a directory!). Instead of beginning our way description at the root directory, we can also start it from your current residence. For this, we need one more thing: to somehow specify to go one directory up, towards the root directory (also called the parent directory). This is done by using double period (..). See the example:
../documents/resume.t
This path reads like this: From the current directory (which we know to be /home/shared/Desktop), go one level up. There you’ll see a directory called documents, so follow it to get to the document resume.t. This kind of path is called a relative path.
Note
When working with the diagram, you always have to go along the arrows. If you move in arrow direction, you add the directory name to the path. If moving against the arrow direction, you only add .., not the name of the directory! Also, you don’t start the path with the current directory but with the first item you move to.
The difference between these two types of paths is that the relative path depends on where you start (your working directory), while the beginning of the absolute path is always fixed to the root directory. You can easily identify if you’re dealing with an absolute or relative path. The absolute path always starts with the slash (/) character. The relative path never does.
2.2.2. Exercises
Use the diagram to solve the following exercises.
Give an absolute path to the following locations
- ideas.t
- resume.t
- portrait.jpg
- asia
- course
- exams
- home
- projects
Give a relative path
- From cameroon to movies
- From pictures to europe
- From shared to exams
- From exams to hacking
- From cameroon to europe
- From switzerland to matterhorn.jpg
- From home to limbe.jpg
- From asia to hanoi.jpg
- From linux to movies
- From hacking to notes.t
- From switzerland to abs.jpg
- From exams to course
- From movies to portrait.jpg
- From pictures to europe
- From home to hacking
- From switzerland to home
- From asia to chap01.rst
Start at the given directory and follow the relative path. Then give an absolute path to the location you ended up at.
- Starting from asia, follow ../europe
- Starting from cameroon, follow limbe.jpg
- Starting from course, follow ../../../
- Starting from pictures, follow ../../documents/resume.t
- Starting from vietnam, follow ../../europe/switzerland
Given the relative paths below, what were your possible starting points (list all if there’s several!)
- europe/switzerland/abs.jpg
- ../ankor.jpg
- course/exams
- ../exams
- hacking
- ../../cameroon/limbe.jpg
- projects/ideas.t
- ../../../test1.odt
- test1.odt
- ../../movies
- linux/course/chapters/chap01.rst
2.2.3. More paths
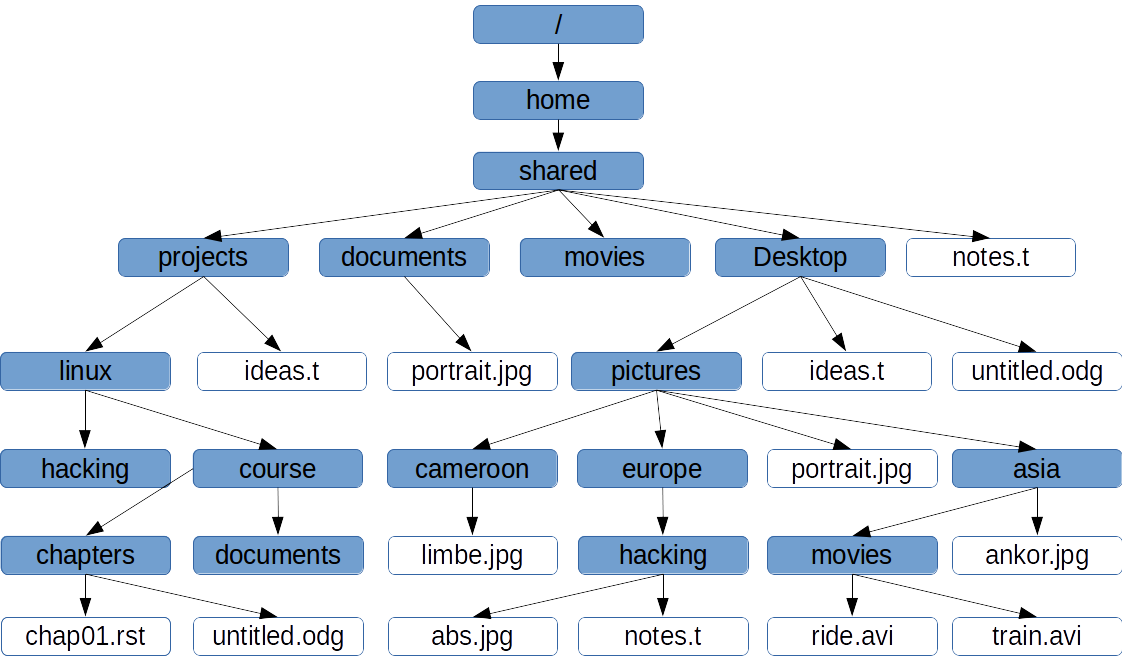
Now file and directory names can be ambiguous. Two files can have the same name, as long as they are not in the same directory. The same goes for folders itself, they can have the same name if they are not in the same directory.
Here’s a new scheme for you to solve the exercises.
- Give a relative path
- From Desktop to /home/shared/Desktop/ideas.t
- From Desktop to /home/shared/projects/ideas.t
- From projects to /home/shared/Desktop/ideas.t
- From projects to /home/shared/projects/ideas.t
- From /home/shared/Desktop/pictures/europe/hacking to /home/shared/projects/linux/hacking
- From /home/shared/documents to /home/shared/Desktop/pictures/portrait.jpg
- From /home/shared/documents to /home/shared/projects/linux/course/documents
- From /home/shared to /home/shared/projects/linux/course/documents
2.2.4. MORE PATHS!!
So far, you always had the diagram to work with. It is very handy but in everyday work you won’t have the diagram at hand. So you’ll have to work with raw paths.
But don’t worry, it’s not more difficult than working with the scheme. The method you use is count and copy. Let’s say we start at /home/shared/something/different and want to give a path to /home/shared/projects/anything/else. First, you compare the two paths. You’ll see that they start (from left to right) with the same directories. Specifically, both of them begin with /home/shared. After that, they deviate.
So first, you count the number of directories in the first path after they begin to differ. It’s 2 in this case (something and different). If the paths ends at the file, you don’t count the file! Your relative path starts with as many ../ as the number you just came up with.
The second step is copy. Copy everything from the second path, starting at the first directory it differs from the first path, until the very end. Add this to your relative path and you’re done. Here, that would be projects/anything/else.
Putting the two together gives you the relative path ../../projects/anything/else. Voila, that’s the right solution. Now it’s your turn!
- Give a relative path
- From /home/shared/documents/public to /home/shared/projects/personal
- From /home/shared/documents/public to /home/shared/documents/personal
- From /home/shared/projects/fun to /home/shared/projects/personal/fun
- From /home/shared/projects/ideas.t to /home/shared/Desktop/ideas.t
- From /home/franz/kuuhl.jpg to /tmp/foobar/kewl.jpg
- From /home/shared/foo/bar to /home/shared/foo
- From /home/shared/projects/ALF/course to /home/matthias/projects/completed
- From /home/shared/documents/resume.t to /home/shared/Desktop/
- From /home/shared/temp/ to /tmp
- From /bin/ls to /tmp
- From /home/shared/private/ to /home/shared/private/movies
- From /home/matthias/Desktop/foo.t to /home/shared/Desktop
- From /home/shared/personal/projects/ideas.t to /home/matthias/private/projects/notes.t
- From /tmp/hello/world to /tmp/world/hello
- From /home/matthias/forall to /home/michel/forall
- From /home/matthias/pictures to /home/matthias/Desktop/copy/shared
- From /home/michel/courses/linux/remarks.t to /home/matthias/linux/exercises/chap-05.rst
- From /home/matthias/Desktop to /home/matthias
- From /home/michel/forall/exercises to /home/michel/forall/exercises/linux
- From /home/shared/notes.t to /home/shared/documents/notes.t
- From /tmp/sys/linux/important-files.t to /home/matthias/linux/course/paths.t
2.3. Terminal basics
In this section, you’re going to make your first steps with the terminal. With the terminal, everything on the computer can be controlled. So it’s an extremely powerful tool and very well suited to learn how the computer works. It will need some time to get used to it as it’s purely text based. But people who got know it won’t miss it.
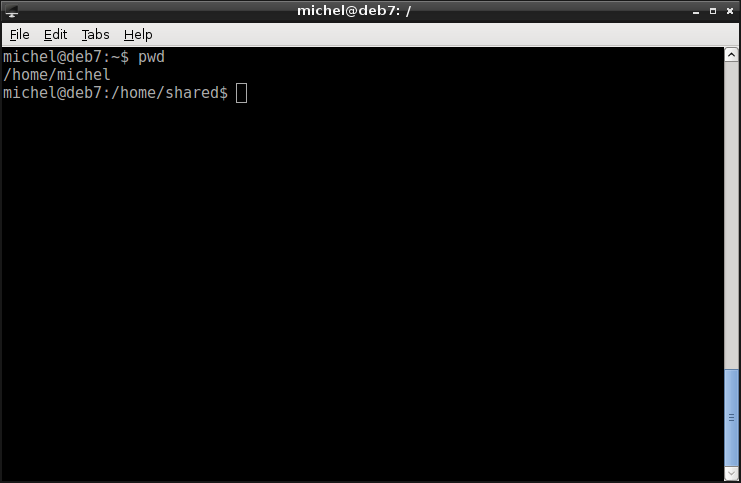
Open the terminal through the main menu: Main Menu -> Accessories -> “LXTerminal” or “Terminal Emulator”. You’ll see something like the following:
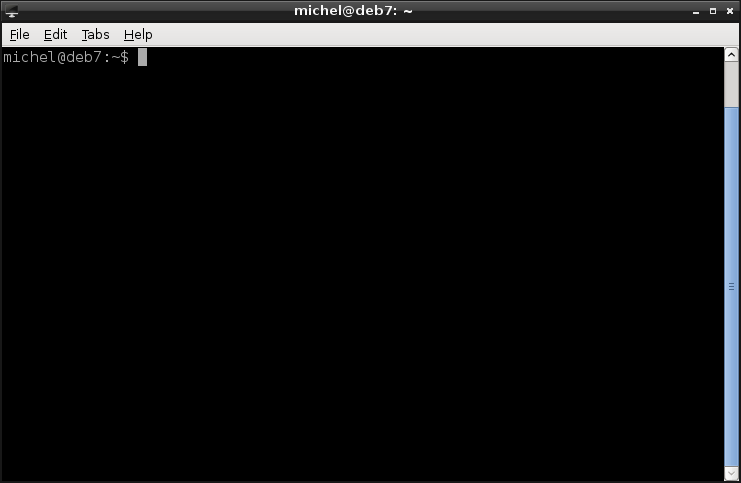
First, let’s explain what you see. All the text until the dollar sign ($), so all text visible now, we call the prompt. Its first word, before the at (@) is your user name. If you started the system yourself, that’s the name you entered to log in. After the at (@), until the colon (:), that’s the hostname. It’s basically the name of your computer. So you see two names, your own and the computer’s. After the colon (:) comes a path. That’s the directory you’re currently residing in. In the example, you see the tilde (~). This is a placeholder for your home directory, the default starting place when you open the terminal, more about this later. Finally, you see the dollar ($) sign and a space until the grayish block. This block is called the cursor. It shows where text is put if you type something.
2.3.1. First step
Let’s do something! Before, you’ve learned about paths and the file tree. In the terminal, you are always positioned at some location in the file tree. We call this location the working directory. You can of course change it. In fact, one of the most important tasks in the terminal is to navigate on the file tree. First, let’s find out where you are currently located. Do so by typing the line below. Make sure you’ve typed exactly what’s written here. Use the backspace key if you mistyped.
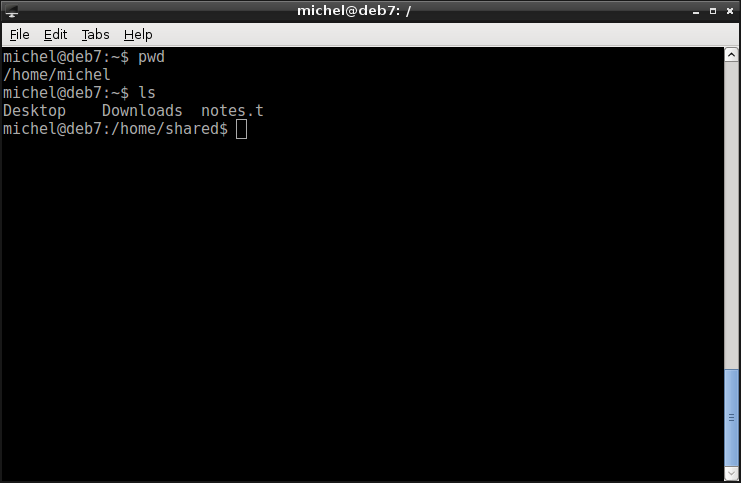
pwd
When you made sure you’ve typed the right thing, press the enter key and observe the result. You should see something like this:
What you see will probably be different. But you should at least see some text after the line you’ve typed. Now if this didn’t work out, check again if you did as asked. If so, call a teacher to look into your problem.
So, what did that do? The thing you typed (pwd) is a command. It tells the computer to do something for you. In this case, to show your current location. Typing text on the command line has no immediate effect. Only when you press the enter key, the command will be executed. A command is often an abbreviation for what it does. For example, pwd stands for Print Working Directory - and indeed, it shows you at which directory you’re currently looking.
When you’ve just opened the terminal and not done anything yet besides the pwd above, the working directory will be your home directory. That’s where all your personal documents are stored on default. Every user gets its own individual home directory.
Note
The terminal is a completely text based program. That makes it very important to read. Always read what you type. Do so before pressing enter (some commands cannot be undone). Always read a command’s output. This may be the requested information, but also errors or warnings from the computer!
2.3.2. Looking around
After knowing the working directory, maybe let’s see what’s inside. Type the next command ls. Then confirm (and execute) again by pressing the enter key.
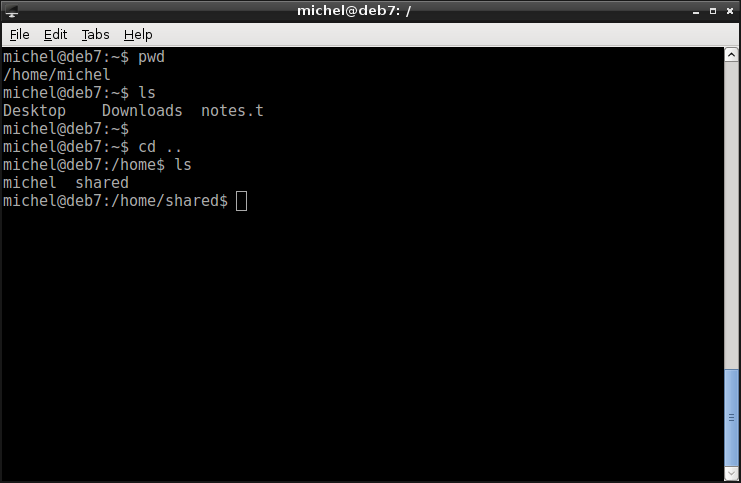
ls
Just like pwd was an abbreviation, ls stands for LiSt - and indeed, it lists files and directories at a certain location. What you see on the terminal, after the ls, is all items in the current working directory. Some of them are files, some of them are directories. On most systems you can easily distinguish them because of the coloring. Relating it to the paths scheme before, you sit in a directory (pwd tells you which) and with ls see at all its files and subdirectories - all items directly connected downwards by an arrow.
2.3.3. Moving on
Now, that was spectacular but we learn quickly and just looking at files and knowing where you are is not so satisfying in the long run. I fear to to set on rust by staying in the same place for too long, so let’s move on. It’s not that hard, actually. Type:
cd ..
ls
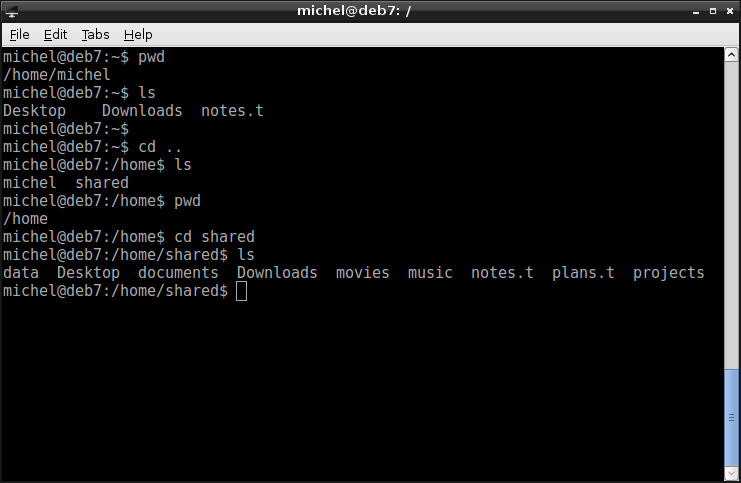
With the cd command you can move to a directory (Change Directory). The thing you put after cd is a path - the target directory. Do you recall what .. stands for? Yep, one directory up.
After that you write ls, just like you did before. But now, the text after ls is different from the first time you ran it. How is that so? Well, with cd you change your working directory. In the example, you change it to one directory upwards, towards the root directory. Type pwd to confirm that you’ve actually changed the directory and are now located in a different directory than before.
pwd
Changing to the directory upwards also implies that your previous working directory is a subdirectory of where you are now. Meaning you should see its name after the second ls.
In my case, the working directory was /home/michel at first - I was told so by pwd. Moving up leads me to /home. The difference in these two paths being michel, that’s one of the directories shown by ls.
Let’s move further on. Well, from ls you already know the directories you can reach from your current position. Of course we can not only go towards the root directory, but also away from it, into another directory. So let’s move into the folder shared.
cd shared
ls
Note
For these exercises to work, the shared home directory has to be copied to your machine. Ask a teacher to do this for you.
Can you relate what you see to the previous section? ls should show you the same directories and files you’ve seen in the path scheme! Actually, there might be some more directories than listed in the drawing, but some similarities should arise.
Note
You have to read the text in the terminal. Especially you have to note whether a command worked or not. In general, if the computer complains if you did a mistake. If it doesn’t complain, your command worked (at least, the computer could process it). If however you see some error, the command did not have the desired effect. Sometimes the order of commands matters, so you cannot continue until you’ve found your original mistake.
2.3.3.1. Exercises
Let’s exercise this a couple of times. You’re still in /home/shared, right? Check it with pwd!
1. 2. 3. 4. 5. 6.
2.3.4. Jumper
Now, all the commands you’re ever going to type work with both, absolute and relative paths. It’s up to you which one to use. If you decide on a relative path, the starting point is your current working directory. For the absolute path, your current location does not matter anyhow. For the operating system it doesn’t matter which of the two variants you use, as long as they lead to the right file or folder.
The last section moved one directory at a time. But you can write longer paths to jump from one location to another in a single command. Observe:
cd /home/shared/projects/linux
pwd
ls
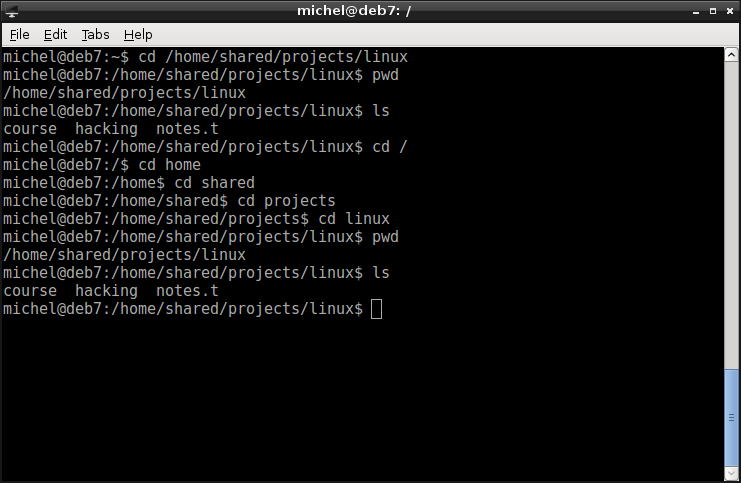
Instead of writing only a directory name (present in the working directory), you can give a full absolute path to the location of your dreams. It’s really the same as writing the following, but simpler and quicker in a single command.
cd /
cd home
cd shared
cd projects
cd linux
pwd
ls
Similarily, it works the same way for relative paths.
cd ../../Desktop/pictures
pwd
ls

cd asia/vietnam
pwd
ls
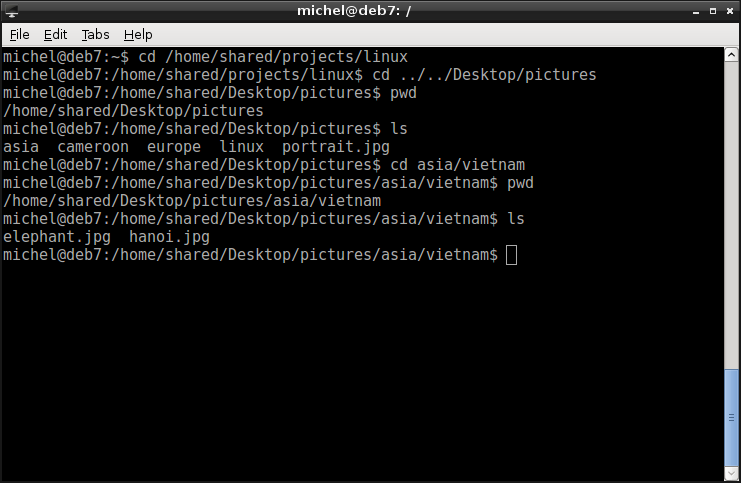
The first example moves you two steps up, leading you to /home/shared. From there you continue down into /Desktop/pictures. The second example moves you further down into to asia, then vietnam. Again, you could have written this as
cd ..
cd ..
cd Desktop
cd pictures
pwd
ls

cd asia
cd vietnam
pwd
ls
2.3.4.1. Exercises
2.3.5. Peek-a-boo
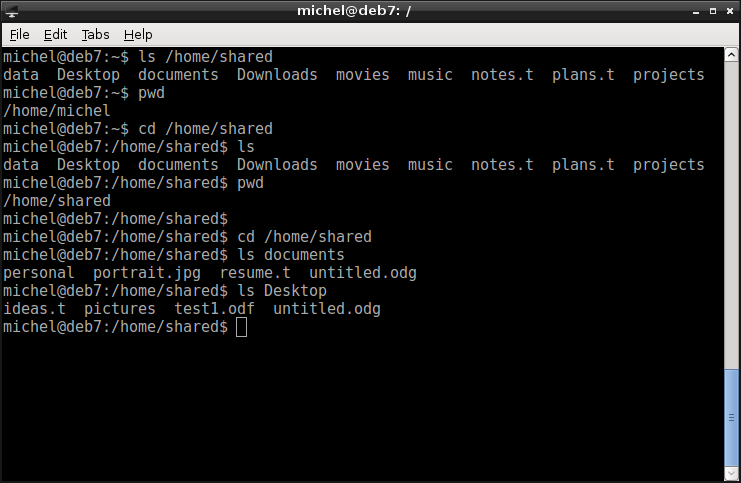
As with cd, you can use paths with ls. Put a path after ls to see what’s inside the folder. You’ve already seen the first command sequence.
cd /home/shared
ls
So let’s have something similar without changing the directory.
ls /home/shared

But there’s a difference between the two. While in the first one, you change the directory to /home/shared, using ls as in the second example does not change your working directory. In fact, no command except cd changes the working directory! Consider this when writing relative paths.
ls /home/shared
pwd

cd /home/shared
ls
pwd
And obviously, you can use ls with relative paths as well.
cd /home/shared
ls documents
ls Desktop
Note
Why are there relative paths anyway? Essentially you save time. Let’s say you work with many different files in the same directory. With absolute paths, you’d have to specify the directory every time. With relative paths you can first navigate to the directory, writing it once. Then you only have to write the filenames, not the directories anymore - given the directory, the relative path to the file is just the filename. Less typing means less typing mistakes, so it’s easier, faster and less error prone.
2.3.5.1. Exercises
Without changing the directory (i.e. no cd), do the following:
- Use ls to display the contents of the root directory.
- Use ls to display the contents of your /home
- Use ls to display the contents of your Desktop. The desktop is just a subdirectory of your home directory - so check the output from the last exercise!
- Use ls to display the contents of /foobar Type the command as you’d expect it to work and observe the result.
- Discuss the results (especially No 4) with a fellow student or your teacher. Tell if it worked as you expected it or not and if you understood the result.
2.3.6. No mouse
So, you’ve already realized that you won’t use the mouse in the terminal. It will take some time to get used to this but isn’t all that bad after a while. After you open the terminal, put your hand on the keyboard and leave them there. What took me the longest to get used to is that you cannot move the cursor with the mouse and copy/paste doesn’t work in the same way. The table below shows you the most important keys and their meaning.
| Symbol | Key | Effect |
|---|---|---|
| Left | The cursor moves one letter to the left. | |
| Right | The cursor moves one letter to the right. | |
| Home | The cursor jumps to the beginning of the line. | |
| End | The cursor jumps to the end of the line. | |
| Backspace | The letter left to the cursor is deleted. | |
| Delete | The letter under the cursor (inside the box) is deleted. | |
| Enter | Execute the command line. | |
| Ctrl + c | Abort anything and everything. |
2.3.6.1. Exercises
In the opened terminal, try out the following:
- Type ‘Hello world’
- Move with the cursor to the w character
- Delete the w character
- Retype the w character
- Move to the front
- Move to the back again
- Delete ‘world’
- Abort
2.3.7. Wrapping up
That’s pretty much the end of this chapter. Let’s wrap things up by closing the terminal window. But wait, don’t use the mouse yet, we can also do this with a command:
exit
Poof and the terminal’s gone again. But you already know how to start it again...
2.3.8. Exercises
Open a terminal and answer the questions below.
- What’s your user name?
- What’s your computer’s name?
- Name two ways to identify your working directory.
- List all home directories.
- Find out your user’s home directory.
- Navigate to your user’s Desktop directory.
- From your own Desktop, use a relative path to navigate to /home/michel/forall/students
- List the directory’s contents.
- Close the terminal.
2.3.9. Summary
You’ve learnt about the file tree and how to navigate through it. You know what an absolute and a relative path is, how you can seperate them and how you use them in the terminal. You’ve seen the terminal and have tried your first commands. Congratulations! So far, you cannot do any harm, so play around and get used to this new environment.
2.3.9.1. Exercises
Take a minute to think about the following concepts try to formulate them in your own words. Explain their meaning to a friend.
- File tree
- Root directory
- Absolute path
- Relative path
- Command line
- Cursor
2.4. Terminal Cheat Sheet
| Command | Example | Description |
|---|---|---|
| ls | ls / | List directory contents. |
| pwd | pwd | Show the working directory. |
| cd | cd / | Change directory. |
| exit | exit | Close the terminal. |
2.5. Cheatsheet
- pwd
- ls
- cd ..
- cd [DIRECTORY]
- cd [PATH]
- ls [PATH]
- exit
| [1] | The tree is a general concept in computer science, and one of the most important ones. That’s because its a very general model (we can express any sequence or hierarchy as tree) and doing stuff with trees is relatively easy from a programmer’s point of view. Trees are often used in databases for storing and quick retrieval of data. In operating systems, dependencies between installed applications are also stored as trees. |