6. User management
I’m sorry Dave, I’m afraid I can’t do that
6.1. Review
You still know the concepts of files and directories and can use the terminal to navigate to any path you want. You can look at files and know how to edit them. You can now easily run commands and pass any argument you like. You know how to read man pages. You know the keys to scroll up and down in your terminal.
6.1.1. Test questions
- Name the path where system-wide configuration is stored.
- How is a program and a command related?
- Find out what ls -d does.
- State the command to delete a file.
- How do you see the size of a single file?
- How can you distinguish two instances of the same program (run with the same arguments)?
6.2. You sir?
Let’s consider Kiki’s friendly mail service. It’s a small e-mail service which offers the unique feature that mails can be marked public. Here’s two example inboxes:
| User: Linus Torvalds | User: Michel Pauli |
|---|---|
|
|
First of all, mails are a personal matter. Only the recipient should be able to read the mails. And not just any mail but only his/her mail. In the example, only Michel should be able to read the Secret account information, sent by his bank. If you can find a way that any other user (like Linux or someone from the public) can read this mail, the system is broken.
The first measure to prevent public access to the mail is to have users log in. That’s to check the identity of the person on the computer, to check whether he is authorized to see a message or not. For this, you have passwords. The password is secret, only you know it. Hence if you are able to give the correct password, the computer knows it’s actually you. Otherwise, it can deny you access.
After login, our system has to make sure it only shows the mails of the given user. And that there’s no way that you can somehow (e.g. through manipulating the URL) read other user’s mails.
Then, the question arises, who should be able to change the public status of a message? Quite obvious in the example, but let’s do the reasoning none the less. Let’s say any user can change the public status. Then anyone could make Secret account information public, breaking the system. So how about people with a user account? Again, if Linus could change the public status of Michel’s mails, he could make the Secret account information public, reading the text, breaking the system. If only the user itself can change the public status if his mails - well it’s up to Michel to not publicly announce his banking information.
Reasoning in security matters goes exactly like this. If you find a way to access personal data of a different user, the system is broken. As Linux creators and administrators, we need a working system. Because your computer offers the same features as our little example - it can hold several users (proving identity by a password) who must not be allowed to tamper with other’s personal documents.
6.3. Who are you?
Did you ever wonder who you are? Not to trigger an identity crisis, but for the computer you need to identify. Unlike other operating systems cough, Linux knows proper user management. You noticed that you always have to log into the system before you can do anything? Do you remember the login name you used? Well, let’s look it up:
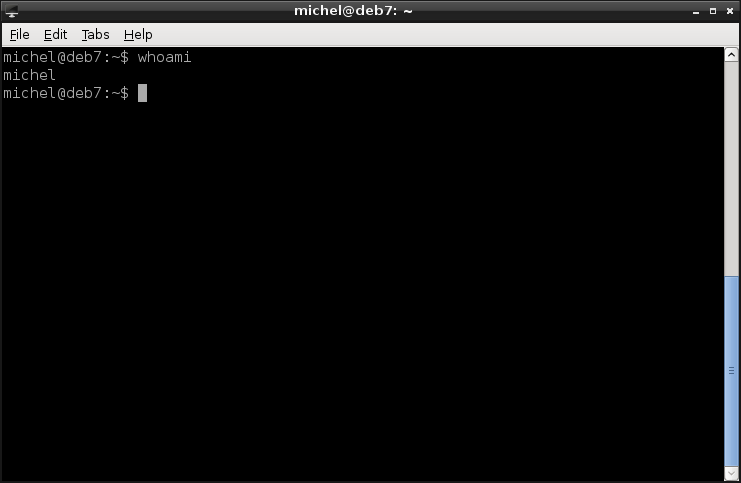
whoami
This shows you what user you currently use.
So what makes proper user management? Well, there’s of course the users. Then, they need to be somehow isolated from each other. Otherwise user management is somewhat futile. OK, so there’s users and permissions, what else? Not much, really [1]. Linux also uses groups to share permissions between users but that’s basically it. Oh yes, of course there’s lots of commands to actually perform user management.
6.3.1. First contact
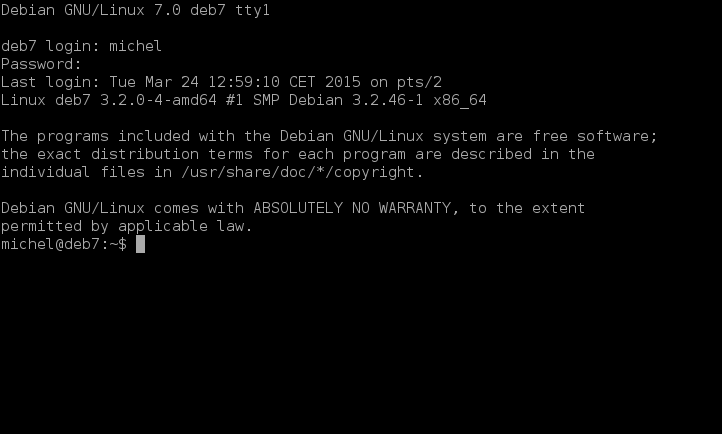
The first time you get in touch with user management is right after your system starts up. Usually, the first screen you see requires you to enter a username and password. That’s to identify yourself and ensure your proclaimed identity.
Let’s do some terminal magic. Read the instructions before doing anything! Pressing the key combination Ctrl + Alt + F1 brings you to a not so usual login screen. You can continue with Ctrl + Alt + F2 and the other F-keys until you see your current screen again. It’s usually Ctrl + Alt + F7. When you’re at the login screen, try to log in with your normal user and password and see what happens.
Note
Login only works on standalone machines. If you’re working in a LTSP or X2GO setup you won’t be able to log in with your normal user account.
What you see is actually the original form of the terminal. In ancient times, computers didn’t have a graphic system at all. So no login screen, no lxterminal, not even a mouse. Only the keyboard and the terminal. That’s why these tools are still so strong today, because they’re at the very foundation of the operating system. Even today, some systems don’t come with a graphical system. For example on webservers, it’s often unnecessary so none is installed to save resources. You’ve already seen the process getty?! That’s the program which provides you the login screen. It’s started several times, in fact as often as you have F-key terminals. After login, the familiar bash is started, so you should now how to continue from then on. Because of its simplicity, this terminal is often restricted to 80x24 characters, and we sometimes still see these dimensions in other places.
6.3.2. Exercises
Tip: Read all the exercises before you start, so you don’t have to switch back and forth.
- List all running processes. Observe how many bash and how many getty processes you have.
- Get to the first login terminal with the Ctrl-Alt-FX keys and log in.
- Go to the next terminal and log in as well. Continue until you’ve logged in on 4 terminals
- In any terminal, list the running processes. Again observe the number of bash and getty processes.
- Discuss these numbers with a collegue or a teacher.
6.4. Who’s there?
So there’s users and passwords. As with everything in computers, this data has to be somehow stored in a file. Let’s look at it.
cat /etc/passwd
Now, there’s a lot of clutter. Let’s first look at the part before the column (:). That’s the user name. Probably you haven’t ever seen most of the users. That’s because these are system users not directly used for login. Check out the last couple of lines. That’s probably the user(s) you use to log in. Do you see your current user in the list (check with whoami)?
Also check the very beginning of the file. You should see a user root. This is a special user, because it exists on every Linux system and is the administrator. It’s the most powerful user you’ll have on the system. Like the ultimate system administrator account. She can do everything there is to do. She’s lord almighty of your system. And you’ll need it quite often because all other users are untrustworthy and thus not allowed the interesting stuff.
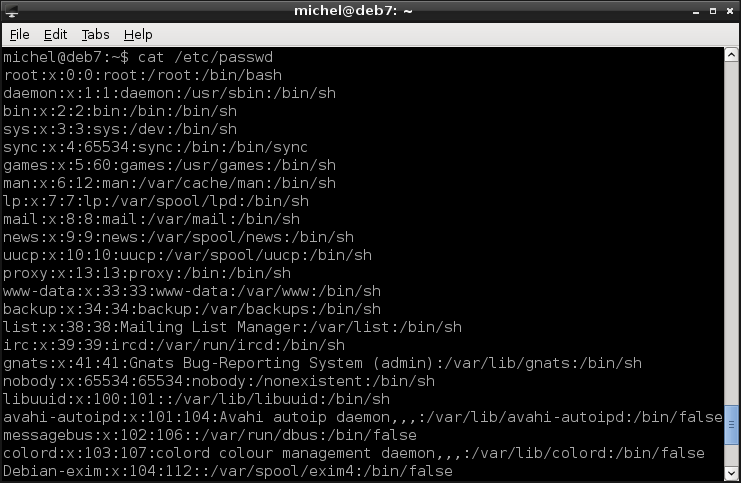
Since we’re at it, have a look at /etc/passwd again, now the part after the user name. You’ll see an x, then a number. The x is a placeholder for the password. In early days, it used to be there, now it was moved to a different place for security reasons. The number is more interesting, as it’s the user id UID. Similar to the PID you’ve already seen, the UID is a number to uniquely identify the user. Internally, the number is used instead of the name, because computers are better with numbers than text. You can easily distinguish system users from login users by looking at the PID. If the PID is smaller than 1000, it’s a system user. If it’s at least 1000, it’s a login user. Technically, system users are no different from login users except that they are created by installed programs or during operating system installation. Only the root user is special, because she’s basically god of your machine. Login users are created afterward installation for actual human users (the login name often being your real name). At least one login user is usually created when the operating system is installed (check for UID 1000).
You can check your complete user id, with name, UID and groups with the command id. If you call id with a user name, it will show you the information for that user instead of your current one.
id

6.5. Flocks of users
As hinted and shown by id, there’s also groups. Each user can be part of several groups and each group can contain multiple users. The groups are used to share privileges across users, as you’ll see later on. Let’s find out of which groups you’re part of.
groups
You get the same information as with id before (hopefully!) but more nicely formatted and without numbers. Similar to the users, also the group information is stored in a file. Let’s have a look at it.
cat /etc/group
You’ll see a list of groups, in a format similar to /etc/passwd. The first part before the column (:) is the group name. The x again stands for a group password (usually none is set), followed by the group id, GID. The GID is again a number representation of the group name. The last part of a line is the list of users belonging to this group.
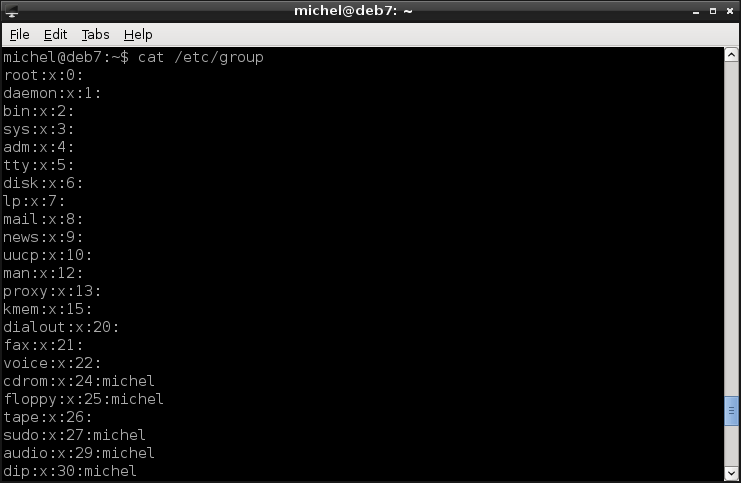
You’ll notice that the user list is empty for some groups. But a group without users doesn’t really make sense, does it? These groups actually do contain users but unfortunately the information about which user belonging to what group is split across the /etc/group and /etc/passwd files. Check again /etc/passwd.
cat /etc/passwd
After the UID, there’s another number. That’s the GID of the user’s main group (login group). So each user is member of at least one group. This login group is given by the GID in /etc/passwd. If the user is part of other groups, its user name is listed in /etc/group, at the respective group’s line. For login users, the main group has usually the same name as the user.
6.5.1. Exercises
- Name 5 system users.
- State all groups (name and GID) you belong to.
- Name 3 non-system users and all groups they belong to.
- Find the group with the most users
- Find the user with the most groups
- What is the UID of user sync?
- What is the GID of nogroup?
- What is the GID of cdrom? What users are in that group?
6.6. Who else is there?
You’ve already seen the list of users. But which are currently logged in? Let’s find out quickly.
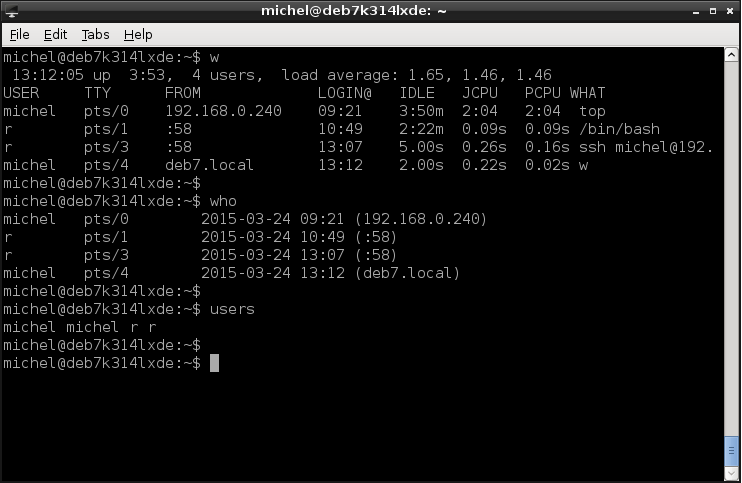
w
You see the user name, from what machine it’s logged in (:0 means from the graphical interface), how long it has been active and what command is executed at the time.
Alternatively, you can use the commands users or who. users shows you only the user names. If called without arguments, who gives a little less information but can show more details if you use parameters. To see everything, use who -a instead.
6.6.1. Exercises
- Open several terminals. You can open several terminal windows, tabs or use the Ctrl-Alt-FX keys.
- In the last, check who is logged in.
- Run top in one of the terminals and check the logged in users again. What did change?
6.7. Impersonation
When you log in, everything you do will be accredited to that user and you’re bound by her privileges. Sometimes you’re required to work with different privileges, e.g. when you configure the system you usually need root permission. The terminal offers an easy way to change the user without the need of logout. In fact, log in is still required but you can do it on any terminal. Try out the following commands. When prompted for a password, you need to type the root password of your machine. Ask someone if you don’t know it. You cannot manage a system without root privileges, so this tutorial relies on you having access to this information. There’s really no way learning this stuff without root access.
id
su
id
exit
id
You already know what id does, so let’s have a look at the su command. Without any name, it will open a new session within your existing terminal and log in as root user (we simply call this user root from now on, not to be confused with the root directory). Because of the login, you have to enter the password. You can log in as any user you know the password of, just write the name as parameter, e.g. su michel. You can confirm the user change by the output of the second id.
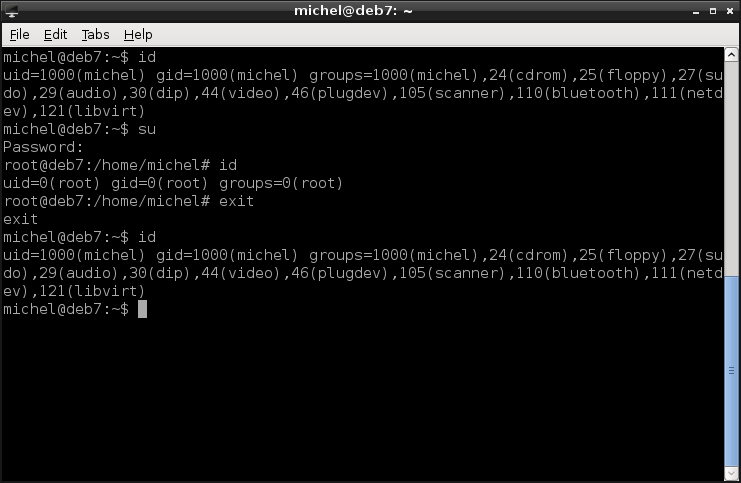
The su opens a new terminal, even if you don’t see the change. When you type exit, this new terminal is closed and you return to the original one. If you’d type exit a second time, the original terminal would be closed, as normal. The third id confirms that you’re back in the original terminal again.
Some systems have sudo installed. That’s a program which also changes the user but only for a single command. Check out the following two lines. This time, when asked for a password, type your normal user password (not the root’s!).
id
sudo id
id
You’ll get the same information as before. The first id shows your normal user’s information. The second id is then executed as root. So that’s the same effect as running id inside the terminal opened with su. Since sudo only changes the user for one command, the third id again gives the same output as the first one.
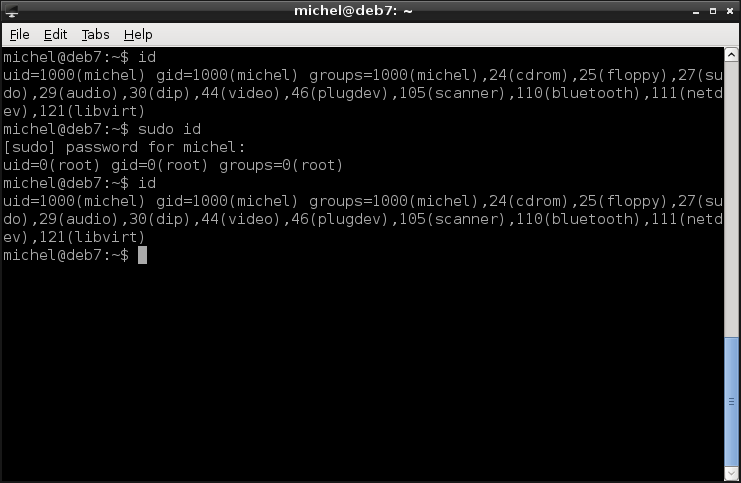
In this case, the exit from before is not required. If you want to run a single command as root, just put sudo in front of it. You’ll see several examples of this throughou this tutorial.
Because you’ll need root privileges for quite some commands, sudo is a neat helper. But it’s not installed on every system and its configuration may vary. For example, it can be active for some commands only and allows different password options. Often, not all users are allowed to use sudo, just like not all users know the root password.
It’s basically a tool to avoid too many root logins. Since root is almighty, it is also dangerous - mistakes will not be forgiven. Every command will be executed without question. With sudo you work as ordinary user but can easily run some commands as root. So, if you only need to run a couple of commands with root privileges, use sudo. If you need to work as root for longer time, you can use su.
6.7.1. Exercises
- Use cat to show the file /etc/shadow
- Again show /etc/shadow with cat but run the command via sudo this time.
- log in as root
- Use cat to show the file /etc/shadow
- Close the root terminal and go back to the original one.
6.8. The good, the bad, the ugly password
Picking a good password is quite difficult. This problem does not only affect Linux but any access-restricted area. Like any other operating system, many web pages but also your bank account. There are many guides how to choose a password and many systems define rules of their own (so many characters, at least one number, ...) [2].
Here are some common mistakes [3]:
- Short passwords: The shorter, the easier to break.
- Personal data: Birth dates, names, names of relatives and so on are very easily guessable.
- Dictionary words: When I try to break a password, I first try dictionary words. Then, I’d continue with small variations, e.g. in case and additional numbers.
- Password numbering: Just putting a number at the end of the password doesn’t really increase security
- Keyboard patterns: Easy to remember and easy to break.
- Password reuse: Having the same password on several accounts gives away all your accounts if a single one is compromised. This is often the case for web pages, and it’s practically guaranteed that one of them is broken eventually.
Here are some methods which seem to work:
- Think of a phrase and a pattern to pick letters. The password will be somewhat random, very long and you’ll still remember it easily.
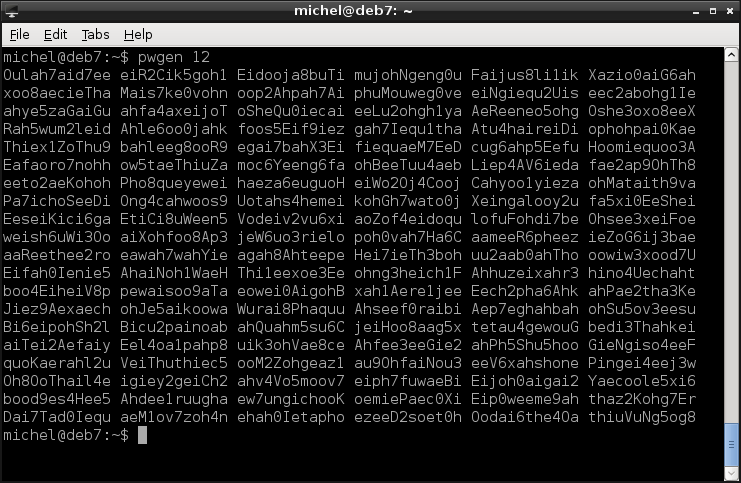
- Use a password generator like pwgen. It creates passwords which are not really random but random enough and easy to remember. You can select the password length (default is 8 characters) and various other parameters. A cool thing about this tool is that it prints a table of 100 passwords from which you can pick one, so you’re even safe if other people are watching you.
- Always create a new, random password each time you need one. Store them using a password manager (like keepassx) and a strong password. You only have to remember a single strong password (so make this very strong and don’t write it down), but still have the benefit of strong random passwords without avoid password reuse. And its better than writing passwords down since you still need a password (writing passwords down is ok if you lock the list away).
- Combine these methods.
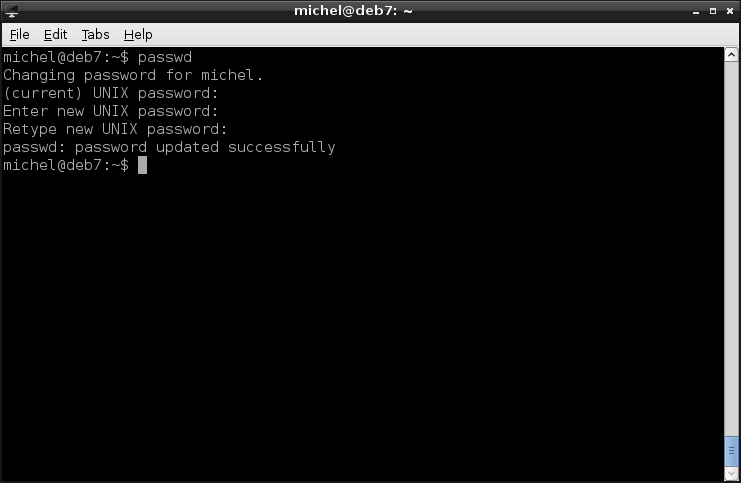
So, let’s say you’ve thought intensely about this problem and picked a brilliant and uncrackable password. How do you set it for your account? Simply type
passwd
and follow the directions. Normally, you’ll be asked for your current password. And you can only set the password for your own account.
If you execute the command as root, you can append the login name as parameter to change the password of that account. And you don’t even need to know about the old password. Root can do everything without questions asked! In fact, as a sysadmin you must be able to change other user’s passwords, as they forget regularly. As an example, you can try it with the following command. Replace <LOGIN> with your login name.
sudo passwd <LOGIN>
Where are the passwords stored, you wonder? You’ve seen the placeholder in /etc/passwd but not yet the actual password. The file /etc/password can be read (not written, though) by any user on the system. So storing passwords there is a bad idea. In ancient times this was done, that’s why you still see the placeholder. But the actual password was moved to /etc/shadow. You can look at it with root privileges.
sudo cat /etc/shadow
So there, in the second field that’s the password. You can’t read it? Well, of course the password is not stored as plain text [4].
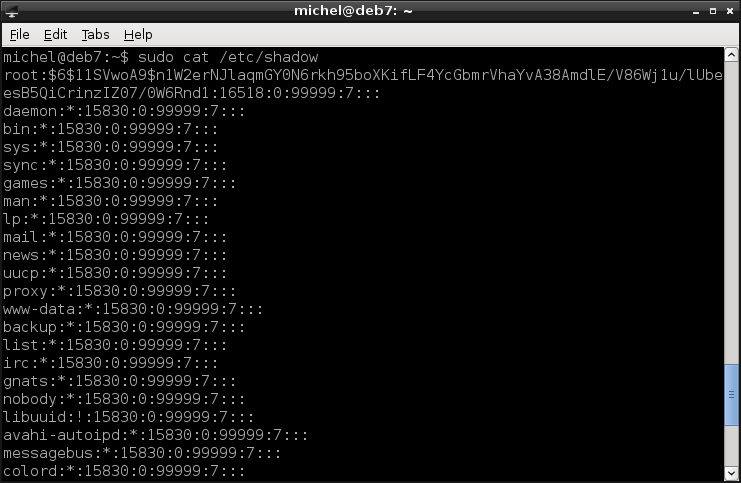
Instead, a so-called hash function is used to encrypt the password. This is a one-way function, so you can compute the hash value of a password but not the password from the hash value. For example, consider the sum of digits. You can easily compute the sum for any number given. But from the result cannot get your original number back. So the password checking goes like this: When you set your password, its hash is computed and stored. When you log in, the hash of whatever password you provided is calculated and compared to the stored one. If they don’t match, your password was wrong and access is denied [5] [6].
One more word about /etc/shadow: The bang (!) and asterisk (*) you might see in the password’s place means that no password is valid for the account. So this user cannot log in via password (but for example running commands via sudo is still possible).
6.8.1. Exercises
- Think of a good password.
- Think of another good password.
- Think of yet another good password.
- Try to memorize all three passwords.
- Change your user password to the first new one.
- Replace two bad passwords with the other new ones.
6.9. Can’t touch this
I assume you’re not logged in as root. If you are, get the hell out of there, you shouldn’t work as root - especially don’t do this tutorial as root! OK, so let’s try something.
ls -l
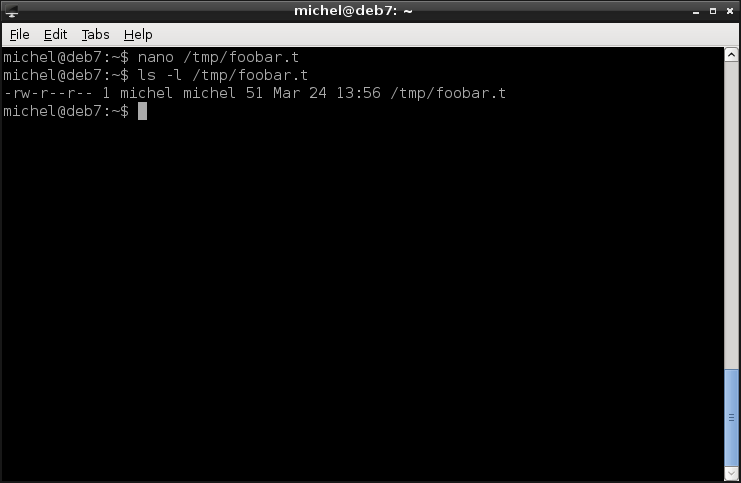
You should see some files, list a directory with content. Now we’re interested in the first three columns of ls. They show access permission. Let’s first focus on the second and third column: That’s simply a user and group name. It shows you the owner of the file or directory. Every file and every folder has an owner. This is usually the user which created the file in the first place. You can verify this easily.
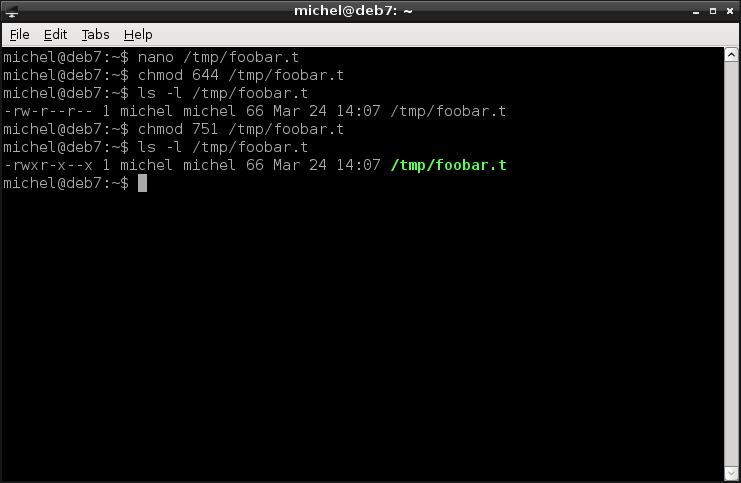
nano /tmp/foobar.t
ls -l /tmp/foobar.t
You see that this file is now owned by you and your default group. The owner has a special role, because she can set the file permissions and therefore define who can access the file or directory and what other users can do with it.
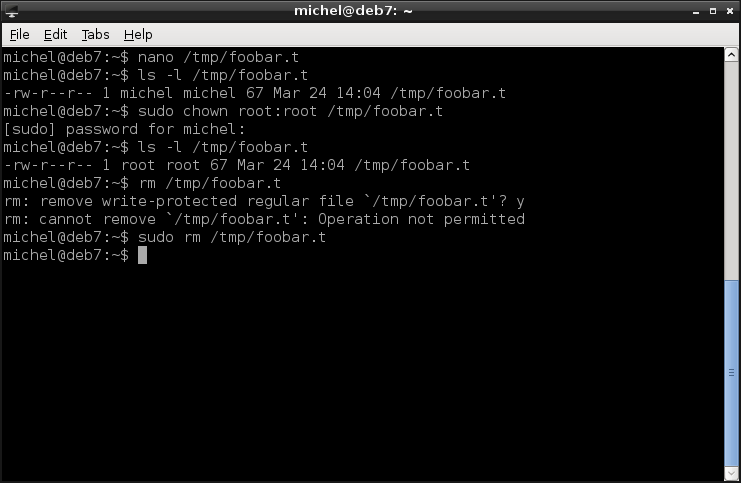
You can change the owning user and group like so
sudo chown root:root /tmp/foobar.t
ls -l /tmp/foobar.t
This changes the ownership of /tmp/foobar.t to user root and group root. The user comes in front of the colon (:), the group after. The chown command allows to set the user and group individually or leave as is. See man chown for details. You need root permissions to set the ownership (user and group) of a file, so you’ll have to do it with sudo.
You can now try to edit it again. But as you changed the owner, writing the file will probably be denied. As well as removing:
rm /tmp/foobar.t
You can only do so as root.
sudo rm /tmp/foobar.t
In case you only want to change either (user or group) of the two ownerships, there’s two simplified version of chown:
sudo chown root /tmp/foobar.t
sudo chown :root /tmp/foobar.t
The first changes only the owner, the second one only the group. Note the colon in the second example!
So how can you modify access permissions? We distinguish three kinds of permissions that can be set.
| number | letter | permission | |
|---|---|---|---|
| file | directory | ||
| 4 | r | read | list contents |
| 2 | w | write | add and remove files |
| 1 | x | execute | use in cd, access files (read/write, add/remove) |
Each of these permissions you can set for either the owning user, the owning group and others, non-owning users. So there’s a total of 9 flags per file. These are shown in the first column of ls -l: The letters of the granted permissions are listed for user, group and others, in this order.
You have two ways to change the permissions of a file you own. Both use the command chmod, an abbreviation for change mode. Mode is what we call the entirety of access privileges.
Before trying the example, re-create the file you removed before. Just add some text, as before.
nano /tmp/foobar.t
The more versatile way uses digites to set the permissionsYou put three digits, for user, group and others, in this order. Each digit is the sum of the permissions you want to grant. So, 7 means all rights (read + write + execute) granted, 0 removes them all. For example the mode
chmod 644 /tmp/foobar.t
ls -l /tmp/foobar.t
grants read and write privileges to the owner, read privileges for all others.
You can experiment with the mode and check what you did with ls -l. Let’s show another example:
chmod 751 /tmp/foobar.t
ls -l /tmp/foobar.t
This one allows everything to the owner. Members of the owning group can still read and execute the file but unrelated users can only run it.
The more comfortable way to set the mode is via the letters. You write u (user), g (group), o (others) or a (all) to specify to whom your change is applied (if none is given, a is implied). Then comes a + or - sign to add or remove privileges. The = is also allowed to set the privileges to exactly what is specified. The actual privileges come last and are encoded with the respective letters r, w and x. Look at the examples:
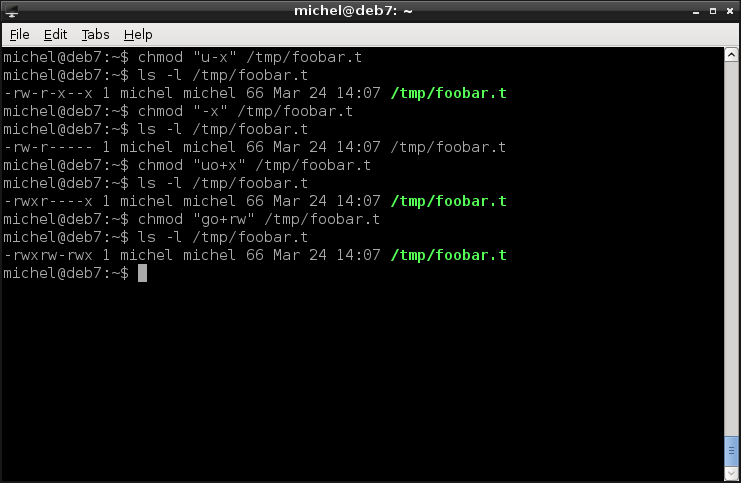
chmod "u-x" /tmp/foobar.t
ls -l /tmp/foobar.t

chmod "-x" /tmp/foobar.t
ls -l /tmp/foobar.t

chmod "uo+x" /tmp/foobar.t
ls -l /tmp/foobar.t

chmod "go+rw" /tmp/foobar.t
ls -l /tmp/foobar.t
The first command removes the user’s execute rights. The second one denies execution for everyone, user, group and others. The third then grants execute permissions to the user and others (but leaves the group untouched). Finally, the fourth command grants read and write permission to the group and others.
One final word, sometimes you want to change the mode for a whole directory and all of its subdirectories. As already seen in other commands, you can use the -R option to do so.
chmod -R "=rw" /tmp/foobar.t
OK, this example doesn’t make much sense because /tmp/foobar.t is a file and not a directory. But you’ve seen the syntax and will probably get the point.
6.9.1. Exercises
Create the file /tmp/foobar.t, write some lines with nano.
Set the mode of /tmp/foobar.t. Use the digit system:
- readable by everyone
- writable by the user and group
- executable by user and others
- no rights for noone
- readable by user, writable by group, executable by others
- readable by user and others, writable by group, executable by everyone
- all rights for everyone
- all rights for user, readable for group/others
- readable and writable by user and group, readable by others
- all rights for user, readable and executable by everyone
Set the mode of /tmp/foobar.t. Use the letter system:
- readable by everyone
- writable by the user and group
- executable by user and others
- no rights for noone
- readable by user, writable by group, executable by others
- readable by user and others, writable by group, executable by everyone
- all rights for everyone
- all rights for user, readable for group/others
- readable and writable by user and group, readable by others
- all rights for user, readable and executable by everyone
Write the mode (digits or letters) to end up with the following ls output.
- -rw-r–r–
- -rwxr-xr-x
- drwxrw-r-x
- -r–rwxr–
- dr–r–r–
- drw——-
- ——-rwx
- –w-rwxr-x
- –w-r-xrw-
- drwxrwxrwx
Assume the of /tmp/example is 673. What of the following can you do?
- Put a file in the directory as user
- Delete a file as group
- Rename/move a file as other
- Edit the file as group
- Edit the file as user
- List the directory as other
- Rename the directory as group
- Put a file in the directory as group
- List the directory as user
- Delete a file as other
Give a command to set the owner of /tmp/example to the user root
Can you change the ownership of a file as a user? Which user can? Give a reason!
Can you change permissions of every file on your system? Of what files can you do so? Give a reason!
Give a command to set the owning group of /tmp/exaple to the group nobody.
6.10. I fight for the user
Finally, you’ll learn how to manage users and groups. Meaning how to add, change and remove them from your system.
Because you might need some groups defined when creating users, let’s start with group management. That one is also quite easy. We’ll create, change and delete a group for demonstration.
sudo groupadd example
less /etc/group

sudo groupmod -n example2 example
less /etc/group

sudo groupdel example2
less /etc/group
The first command, groupadd creates a new group called example. You’ll see the new group in /etc/group. Then, the group is renamed to example2. Again, you see the change in the group file. There’s not much you can do to modify a group. Mostly, you can change the name or GID. Finally, the group is removed again. Your group file looks as in the beginning. Simple enough, isn’t it?
Now comes the user management. You have three similar commands to create, change and remove users. But there are many more options.
First, let’s create a user.
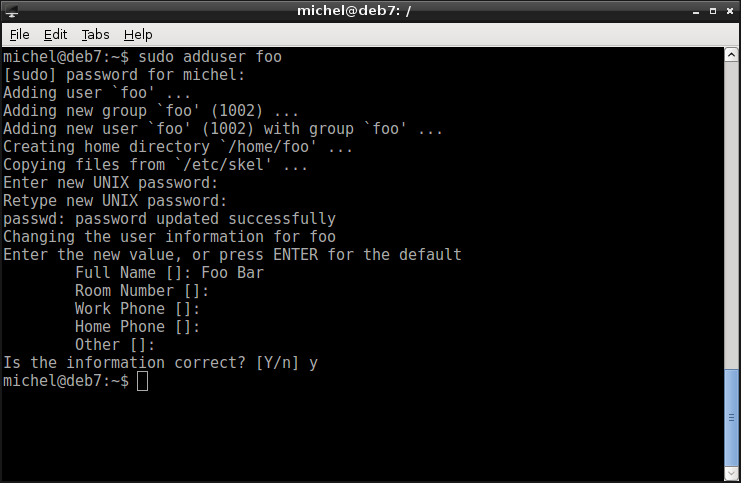
sudo adduser foo
This command creates an user called foo. adduser picks reasonable defaults for creating user, such as creating the home directory /home/foo. And adding a group foo for the user’s main group. It also makes you pick a password, so that the user can actually log in. With this we get a basic and usable user account.
Note
Besides the convenient adduser, you could also create a new user via useradd. The reason we prefer adduser is because it picks reasonable defaults, while in useradd you’d have to specify a lot of arguments for the same effect. Internally, adduser makes use of useradd by running it, with the default settings found in /etc/adduser.conf. So instead of resorting to useradd, you can change that file to match your requirements and still use adduser.
For example, to create a create a user foo with a main group of the same name and a home directory, you’d run sudo useradd -U -m foo. In that case, you’d also have to set a password with passwd before you can log in.
If you want to try it out, log into the new account with
su foo
id
exit
Now, let’s modify the account. Let’s say you want to add it to some groups.
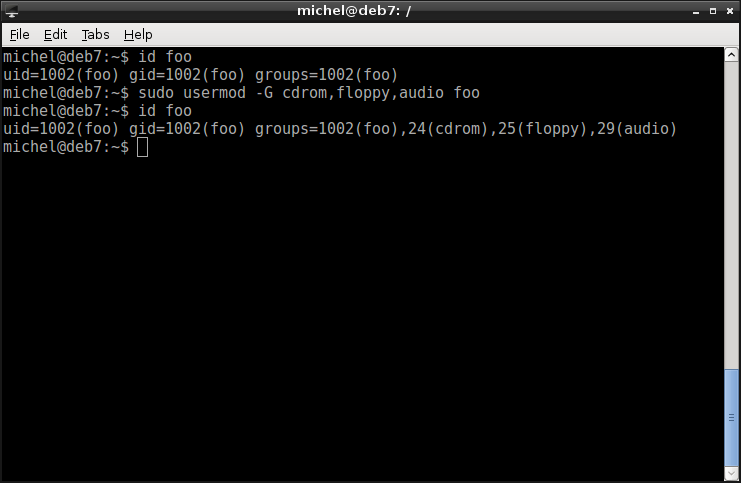
id foo
sudo usermod -G cdrom,floppy,audio foo
id foo
The group file shows you that the user was indeed added to these groups. With usermod you can change the same options as you defined with useradd in the first place. Often they even use the same argument names.
Note
For the specific task to add a user to one group, you can use adduser USER GROUP instead.
You’ve played around enough with the new user, so let’s remove it. Like with groups, this is done with userdel. The -r flag removes the home as well.
sudo userdel -r foo
less /etc/passwd
And it’s gone. Not that hard, was it? You should however be careful with user management. Especially, don’t start a user killing frenzy and remove users you don’t use. Anything with a UID below 1000 is a system user and was probably created by some program you installed.
6.10.1. Exercises
Group management
- Create a group hacksors
- Add your user to the group hacksors
- Check your current groups (via command). What do you observe?
- Re-Login (using su) with your current user account.
- Check your current groups (via command). What do you observe?
- Discuss the observations with a collegue or a teacher.
- Remove your user from the group hacksors
- Delete the group hacksors
User management
- Create a new user called ron, with a home and main group ron
- Set a password for ron
- Log in as ron
- Try to see the shadow. Use sudo
- Log out.
- Add the user to the group sudo
- Log in as ron
- Try to see the shadow. Use sudo
- Find out what ron‘s main group is
- Log out
- Delete ron‘s main group. What do you observe?
- Delete the user ron,
6.11. Summary
You’ve reclaimed your identity and experienced the past. You can now log in, even on ancient and primitive systems. You’ll find your collegues user accounts and can team up with them. Or act in their turn. Your password’s quality has increased and you’ll never ever again use a silly or easy password. You also know how to change it and how it’s stored. On your own system, you can manage your users and grant them the permissions you want.
6.11.1. Exercises
- Read the man page of /etc/shadow (hint: the argument is simply shadow)
- Find out how you can disable an account.
- List your processes with ps -ef and observe the first row. How is this related to this chapter?
- Why can /etc/shadow only be read by root? Why isn’t this the case for /etc/passwd?
- How can you prevent users from renaming a file?
- For how many accounts can you safely use the same password?
- Is it possible to lock yourself out of your computer?
- What’s the UID root user?
- Why shouldn’t you work as root? When should you?
- Why can different users run the same program at the same time?
- What is the UID? What do we use it for? Where is it listed?
- What is the GID? What do we use it for? Where is it listed?
- Name 2 ways to find out your user name
- What’s the command to use sudo do work as non-root user?
- State two differences between su and sudo
6.12. Cheatsheet
- whoami
- id [USERNAME]
- groups [USERNAME]
- w [OPTIONS]
- who [OPTIONS] [-a]
- users [OPTIONS]
- su USER
- sudo [-s] COMMAND
- pwgen [OPTIONS] [LENGTH]
- passwd [LOGIN]
- ls [-l]
- chown [OPTIONS] [-R] OWNER:[GROUP] FILE
- chmod [OPTIONS] [-R] MODE FILE
- groupadd [OPTIONS] GROUP
- groupmod [OPTIONS] GROUP
- groupdel [OPTIONS] GROUP
- adduser LOGIN
- usermod [OPTIONS] LOGIN
- userdel [OPTIONS] [-r] LOGIN
| [1] | Ever heard of SELinux or Grsecurity? These are systems which allow a much more fine grained access control than the standard Linux file-based permissions. If you’re interested, go read XXX. They won’t be discussed here. |
| [2] | In fact, if you don’t design your rules very carefully you might actually make the problem worse. For example, a password with 7 random characters and 1 number is less secure than a password with 8 characters. That’s because you have more possibilities for a random character (23 letters * 2 (case) + 10 numbers) than just for a number. Well, in theory at least. In practice however, most passwords are similarly bad, no matter of your password rules, because people tend to pick the same passwords over and over again. If you must include a number, you’ll probably just add one to the end, likely it’s your year of birth. |
| [3] | If a login mechanism is properly implemented, the only sure way to crack a password is by trying out every one. You’ll have to try ‘a’, ‘b’, ‘c’, ..., ‘z’, ‘aa’, ‘ab’, ‘ac’, ... which is kind of boring but a computer doesn’t mind and is pretty fast doing it. The longer the password, the more possible passwords there are, so the task becomes harder. However, usually users are bad at picking password, so you don’t go through all possibilities, as above. Instead, you try the most common passwords first. The list shows how most users pick their password and therefore which passwords will be tried first. If your password is completely random and long enough, it is practically impossible to break it, because it takes too long even on the fastest computers. But you’d have difficulty to remember it. |
| [4] | Try to break the password. Don’t worry, the password was already changed. I’ll even get you started: john |
| [5] | The tricky part about a hash function is, that the hash value should be distinct for each password. Otherwise two different passwords produce the same hash and you can therefore log in with a wrong password. We call this a collision. For example, for the sum of digits function it’s quite easy to produce collisions:  . Collisions may occur but a proper hash function should guarantee that it’s extremely unlikely. Then, it’s as hard to find the real password as any colliding one. . Collisions may occur but a proper hash function should guarantee that it’s extremely unlikely. Then, it’s as hard to find the real password as any colliding one. |
| [6] | This technique is not only used on Linux. Any login mechanism should use it, in fact. Especially web services. When you create a new account, do a little experiment. After account creating, try to reset the password. If you get to see your original password somewhere in the process, they store it in plain text. So maybe you better pick a password you don’t already use in other places - which is a good idea anyways. If you use the same password for several accounts, an attacker can get the password from any of them to have access to all the others as well. And it’s practically guaranteed that one of of ten web services you use has a security hole which will be exploited. This happens daily and even big and trustworthy companies are sometimes hacked. |