7. Storage
Nobody’s ever going to use more than 64KB
7.1. Review
You’re an expert when it comes to the unix file tree. You know how to navigate, list, copy, create, delete and view files. And the same for directories. You know your hardware, that you have a hard disk inside your computer. You know how storage is related to memory and what you use it for. You’re aware of commands and its parameters. You know how to use the terminal efficiently.
7.1.1. Test question
- What’s the purpose of the directory /dev? How is it special?
- How do you copy a file?
- How can you run a single command as root?
- How do you recognize an absolute path? How a relative path? What’s the difference?
- What’s the name of the topmost directory?
- How do you find out the disk usage of a file?
- Why do you need a hard disk besides the main memory?
7.1.2. Introduction
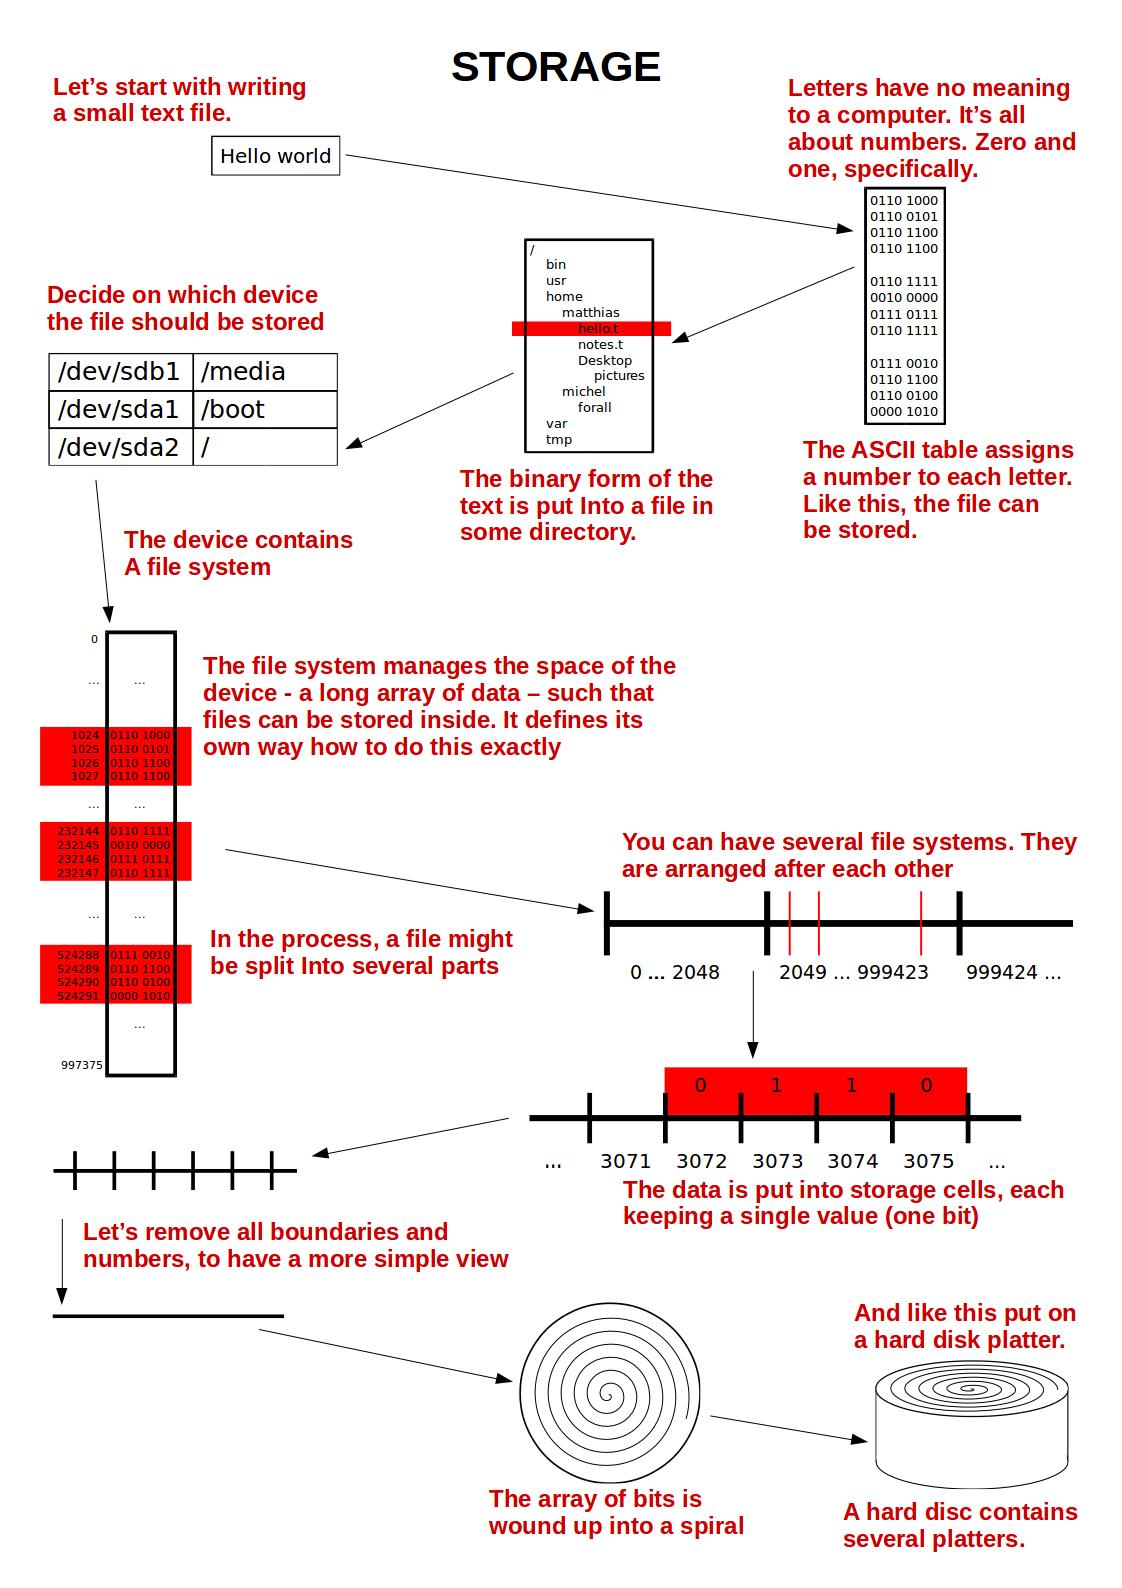
Let’s take a step back. So far, you started an already installed operating system on an already assembled computer. You’ve learnt about the importance of storage and how it really defines computing. In this chapter, you’ll learn about how the storage is managed, how data is stored at all and how this is normally hidden from you.
To get you started, here’s an overview image. Consult it while reading this chapter!
7.2. The hard disk
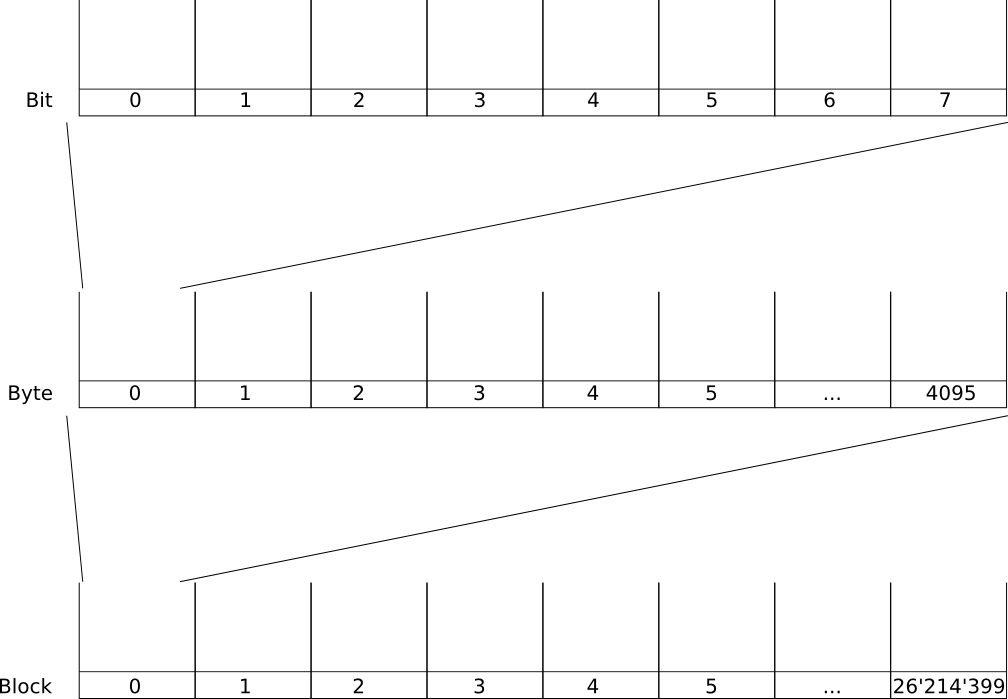
Here, we really start at the basics. We don’t even know files and folders yet. We just start off with a hard disk. This is basically a huge list of memory cells. Each cell can store a single bit, so either 0 or 1. On ancient times this was a bit more complicated (you still see traces of Heads, Sectors, Tracks and Cylinders) but for our description this mental image is sufficient.
So, a long list of memory cells. This list is divided into blocks of a certain size, often 4K. Usually, we don’t think in bits but in groups of 8 bits, which is 1 byte. So if the block size is 4K bytes, we mean  .
.
In computers, units are commonly interpreted as multiplies of 1024. The reason for this lies in the binary representation of data [1]. In the table below, the units and conversions are listed.
| Unit | symbol | exponent | factor | bytes | Kilobytes | Megabytes | Gigabytes | Terabytes |
|---|---|---|---|---|---|---|---|---|
| byte | B | 0 |  |
1 B | ||||
| Kilobyte | KB | 1 |  |
1‘024 B | ||||
| Megabyte | MB | 2 |  |
1‘048‘576 B | 1‘024 KB | |||
| Gigabyte | GB | 3 |  |
1‘073‘741‘824 B | 1‘048‘576 KB | 1‘024 MB | ||
| Terabyte | TB | 4 |  |
1‘099‘511‘627‘776 B | 1‘073‘741‘824 KB | 1‘048‘576 MB | 1‘024 GB | |
| Petabyte | PB | 5 |  |
1‘125‘899‘906‘842‘624 B | 1‘099‘511‘627‘776 KB | 1‘073‘741‘824 MB | 1‘048‘576 GB | 1‘024 TB |
Here’s an image to show our view of a memory. The example disk has a capacity of 100 GB, arranged in 4 KB blocks. As common in computers, numbering begins with 0 instead of 1 [2].
Warning
Hard disk manufacturers often don’t specify the disk capacity in the units listed here. They use normal multiples of 1000 (like in the SI system), so  . So the disk size you get is less than what you’d expect.
Some more background information: The HDD (Hard Disk Drive) actually contains multiple spinning hard metallic disks. The name was given in contrast to the floppy disk (FDD, Floppy Disk Drive) where the disc was flexible. Nowadays, there’s different ways to store data. The HDD approach is still widely used but other means have emerged. For example SSD (Solid State Disk), made transistors from semiconducting materials, a technology similar to the one used in main memory.
7.3. Hey dude, where’s my disk?
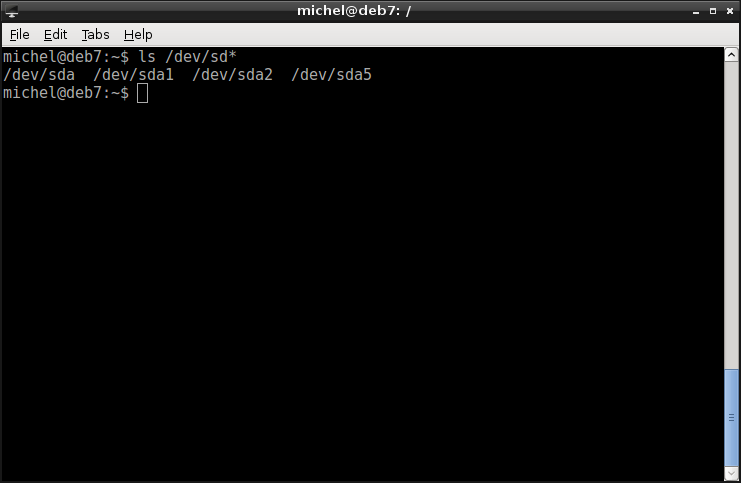
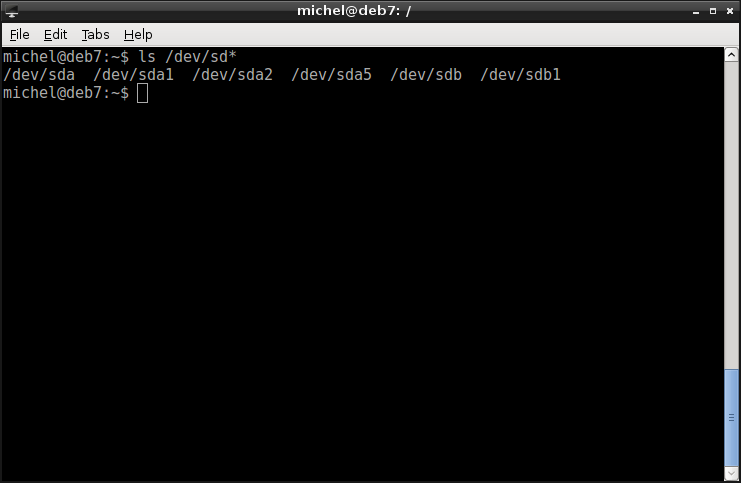
Let’s have a closer look at the devices directory /dev, introduced earlier. If you list its contents, you see lots of strangely named files. We’re only interested in some of them. For every disk attached to your computer, a file is created. Check them out like so
ls /dev/sd*
Note
Write the command as given, even if it looks strange. If you want to get more details about this syntax, read the chapter about Text manipulation.
Dependent on your setup, you’ll see hda, hdb, hdc, ..., sda, sdb, sdc, .... Older systems use the hd prefix, newer systems changed to sd. I’ll assume that you see latter one. The last letter (a, b, c, ...) represents the hard disk. sda is the first disk, sdb the second one, sdc the third and so on.
So the file(s) you see represent the hard disk. Recall the picture of bits and blocks above. Any such device is called block device. That’s because they allow to pick any one block for reading or writing.
So /dev/sda is not an ordinary file. If you attempt to read or write from this file, you’d read and write directly to the respective disk. So, you probably wouldn’t open it in a text editor and don’t edit the file directly. However, handling block devices in this way gives the advantage that you can use file-based commands. For example, you can clone hard disk easily by copying the device file. Later in this chapter you’ll learn how to.
7.4. Partitions
The disk is split into partitions. So this is a further seperation after the blocks you’ve already seen. The partitions allow you to dedicate some part of your disk to some specific purpose. For example, you can set up a partition for the operating system and one for your personal data. Or you can have two partitions, each containing a different operating systems [3].
You can have up to 4 so-called primary partitions per disk. Because this is sometimes not enough, you can add one extended partition which contains a practically unlimited number of logical partitions. The extended partition also counts towards the limit of 4 primary partitions.
Note
Here, it’s assumed that your hard disk is /dev/sda. If this is not the case, you’ll have to change all the paths in the examples.
Note
Block devices allow reading any part of the hard disk. This would allow any user to read data of others. This is why you can only read (or write) /dev/sd* as root. Here, sudo is used for this purpose.
Let’s have a look at the partition table of your machine. As you’re already fond of the terminal, you’ll enjoy the minimalistic fdisk.
sudo fdisk -l /dev/sda
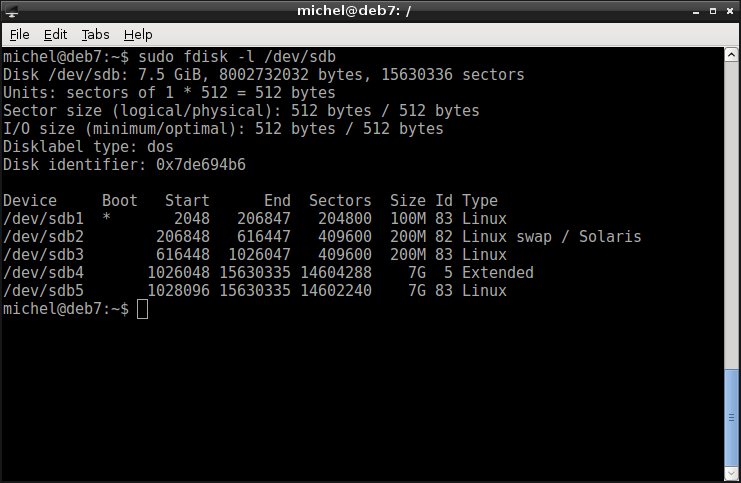
After the disk properties, you’ll see some partitions. The details on top are not extremely interesting right now (they might matter for some tasks, though), except for the disk size: It is great to quickly identify which disk hides behind which device file /dev/sd* - this is not always trivial to know.
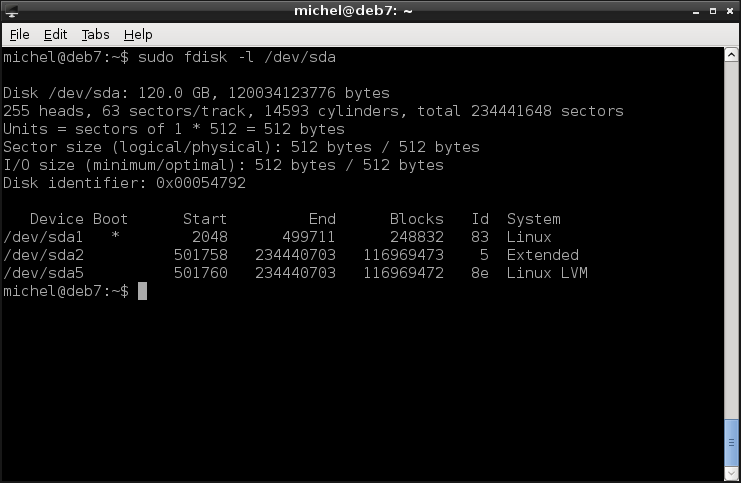
In the partitions section, you first see the Device column: Not only the disk itself, but also its partitions are mapped to files in /dev! Let’s check them out.
ls /dev/sda*
You again see the same files as shown by fdisk. The file naming is quite easy. The file name starts with the hard disk (e.g. /dev/sda), then the partition number is appended, e.g. /dev/sda1 for the first partition on the first disk, /dev/sdb3 for the third partition of the second disk. If you see a partition number 5, that would be the first logical partition inside the extended partition (remember that you can only have 4 primary ones?). In the example, the following files are available:
/dev/sda
/dev/sda1
/dev/sda2
/dev/sda5
Ok, so we were saying that in fdisk, you see the partitions with the Device path. Then, there’s a Boot column. This is a flag which can be either on or off. It basically tells you if there’s a startable operating system on that partition. Most often, only one partition is marked bootable, as you only have one operating system. The next three columns tell you the size of the partition, in the number of blocks (check the Units to calculate the sizes in bytes). The last two columns, Id and System, show you the type of the partition. It roughly states what file system (we’ll speak about this later) you put there. Extended means that this is the extended partition, so there’s no real data expected there.
So, let’s experiment a bit. We’ll create an example partition table, as you would probably do on a new installation. Have a usb flash disk read, so you can go through the whole process. Don’t plug it in yet! Be careful with the instructions, though. Make sure to select the right device, otherwise you could easily damage your system. For example, check its size, as described above! You’ll also need root privileges in this case, so execute cfdisk using sudo.
First, list your devices
ls /dev/sd*
Next, plug in your flash disk. Again list the devices and observe the difference.
In my case, the device /dev/sdb was added (and maybe some others like /dev/sdb1, /dev/sdb2, ...). That’s probably my flash disk. Check its size to make sure!
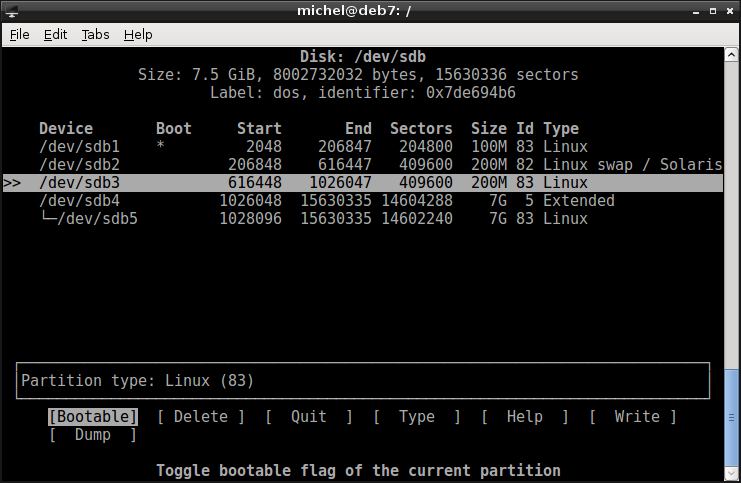
Alright, let’s create a partition scheme. Instead of fdisk, we’ll use a more graphical tool. Root privileges are required.
sudo cfdisk /dev/sdb
In cfdisk you can move with the cursor keys. Up/Down selects partitions and free space. Left/Right changes the menu selection. You select a menu with enter.
Start by creating the first partition. Make it primary and set the size to 10MB. Then, make it Bootable. After this partition, create a second one (use the Down key), also primary and size 15MB. Create a third primary partition, again 15MB large. Finally, create a logical partition with the rest of the available space. You see that the size of the partitions is not exactly what you entered. That’s because the partition boundaries have to be aligned with the block size (or some factor of it). Because our file is very small, this effect is quite visible. But doing it on a 1 TB disk, it doesn’t matter much.
Go back to the first partition. Select type. You see a large list of types. Maybe you have to press enter to get to the next page where you enter the type. The first partition should have type Linux. Enter the number and confirm with enter to return to the main menu. Set the type of the second partition to Linux swap / Solaris. For the type of the third and fourth partition, select Linux again. You save the changes via selecting Write. Afterwards, you can Quit.
Why this setup? The first partition holds the Linux kernel. This is partition we use for starting the system. It must be marked bootable and it should be the first partition. Only a couple of megabytes are actually required. 100MB is sufficient in most cases, often a reserve is added, but the partition is usually smaller than 300 MB. The second partition will contain the swap file system. Swap is used as extension to your main memory. If at some point you’d run out of main memory, parts of it can be copied over to the swap space. The alternative (if you really run out of memory and swap) is to kill a process. A good rule of thumb is to create as much swap as you have memory. The third partition will hold the main parts of the system. It should be around 20GB or larger. The fourth partition holds your data. This is usually where you need the most space, so we’ll assign all remaining disk space.
Let’s quickly recheck if all went well:
sudo fdisk -l /dev/sdb
Note
Often, the seperation between the third (system) and fourth (data) partitions is omitted and data is stored alongside the main system. This way, the disk space is better distributed between system and data, as none of the two parts is restricted to a fixed size. The benefit of the seperation is that if you reinstall your system, you don’t need to backup anything, you can just reuse the data partition as is.
7.4.1. Exercises
- What’s the difference between an extended and a logical partition?
- What’s the difference between an extended and a primary partition?
- What’s the difference between a logica and a primary partition?
- Given the path /dev/sdf8. Which is the device number? Which the partition number? What’s the partition type (primary, extended, logical)?
- When invoking cfdisk, why do you use /dev/sda instead of /dev/sda1?
- Use fdisk to read the partition table of your hard disk.
- Use the output of fdisk to compute your first partition’s size in MB.
7.5. File systems
So, you know about a disk and have it split up in several partitions. So far so good. But eventually you’d like to store some files there. The file system provides the missing link. In general, a file system describes a certain way how files and directories are arranged and stored. This is no simple task and various solutions to this problem are possible. So far, we only have some huge chunks of memory. The partition makes these chunks a bit smaller but doesn’t impose any structure on it. The file system specifies how exactly data is to be read and written into this vast space, so that we can have files and directories.
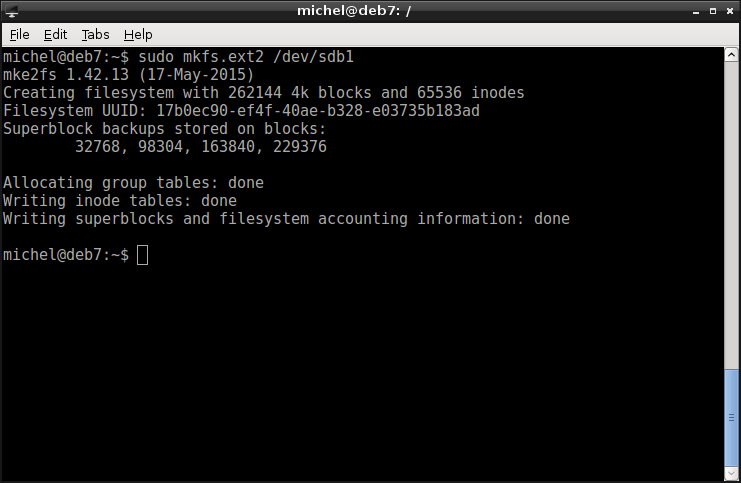
OK, so let’s start with the first partition. Remember, this is the boot partition which holds the files for system startup. We will create a relatively simple file system. This is because we don’t need anything fancy and simple means better support. So we choose the extended file system (version 2 or ext2 for short) and create it like so.
sudo mkfs.ext2 /dev/sdb1
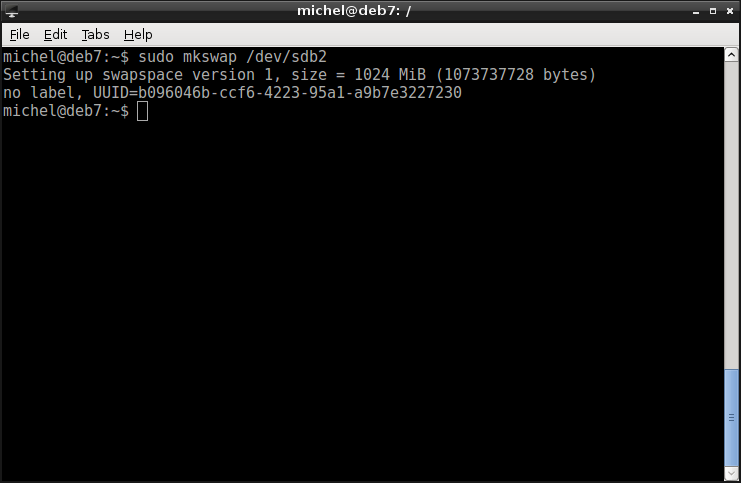
You’ve already learnt about the purpose of swap. To repeat, it’s to extend your main memory. You create the swap file system with a simple command.
sudo mkswap /dev/sdb2
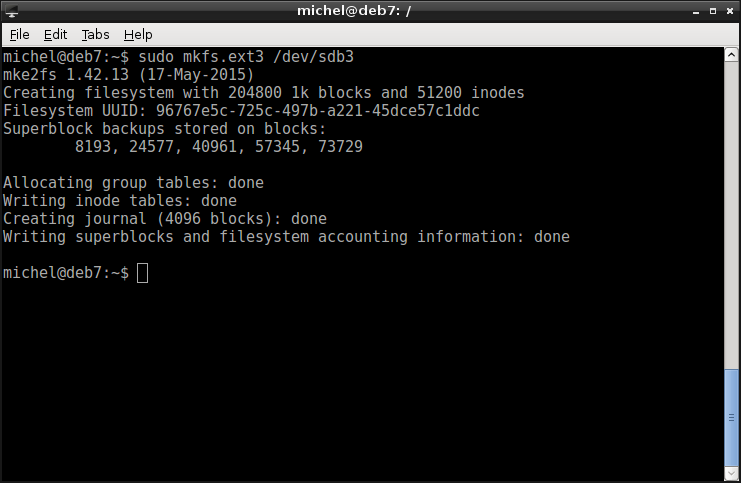
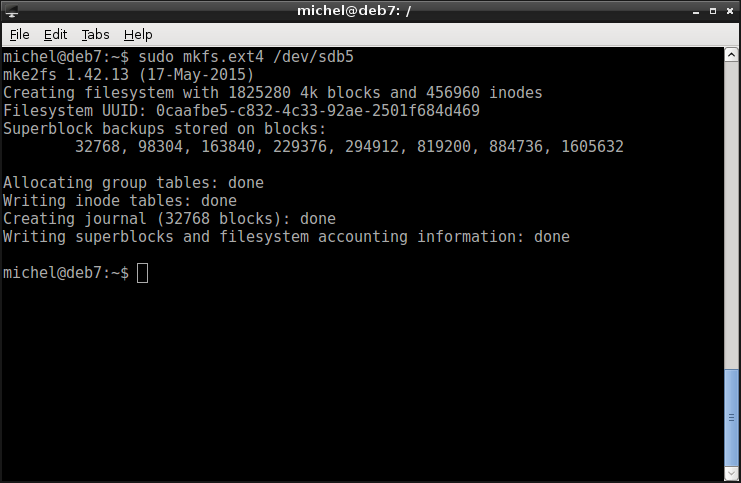
So far so good, the system and data parts are still missing. We use the extended file system again, but now later versions. The differene between the versions is that more safety against sudden shutdown (e.g. power loss) was added. For exercise’s sake, let’s create ext3 on the system partition and ext4 on the data partition.
sudo mkfs.ext3 /dev/sdb3
sudo mkfs.ext4 /dev/sdb5
If you’ve followed the instructions as you’re supposed to, the data partition is logical. The first four devices (loop0p1 to loop0p4) hold the primary partitions. Then come the logical ones. So the missing loop0p4 is the extended partition, which we don’t use directly. Instead, we continue with loop0p5, the first logical one.
Note
You could also create an extended file system with the command mk2fs [-j] [-t FSTYPE] DEVICE. Just set the FSTYPE to ext2, ext3 or ext4, as you like.
For the file system, the extended is pretty standard on Linux. But you have a choice, in case you miss some feature. The table below shows a few common ones. It’s also quite interesting to read about those, it’s not too complicated and shows some fundamental problems with file systems [4].
| File system | Description |
|---|---|
| FAT | Old windows file system. Stands for File Allocation Table. Uses a table to specify which blocks belong to which file. Is still widely used on portable media like USB storage. |
| NTFS | Current windows file system. The name means New Technology File System. It’s found on all windows systems. You can read and write it from Linux (some restrictions may apply) but don’t normally install a Linux system on it. If you spot it, it’s likeli you’re looking at a Windows installation. |
| extended | The most commonly used file system on Linux. Exists in versions 2, 3, 4. It’s very robust and well tested and the default file system on Debian-based and many other Linux distributions. If you have no good reason to do otherwise, you’ll normally pick the latest extended file system. |
| ReiserFS | Alternative to the extended file system. Common on some Linux distributions. |
| XFS | Another alternative to the extended file system. Found on some Linux systems. Can have significantly better performance than extended when working with multiple disks. |
| ZFS | A modern file system. It integrates many features like pools of storage devices, RAID and snapshots. For other file systems, these normally have to be provided by external software (e.g. LVM). |
7.5.1. Exercises
Do the following:
- Create a file (somefile.img) with the dd.
dd if=/dev/zero of=/tmp/somefile.img bs=50M count=1
- Run the command
mkfs.ext2 /tmp/somefile.img
What just happened? What’s the meaning of this?
Read the wikipedia page about the extended file system. In your own words, what’s an inode?
Why did you require root privileges in the file systems part but not when creating the partition table?
Why did we choose ext2 for the boot partition?
How would you create an ext3 file system on your first disk/partition (don’t actually run the command!)?
7.6. Mounting
So, you’ve already partitioned the disk and created some file systems. Now it’s time for the last step: Mounting. Let’s start with a command you already know.
df -h
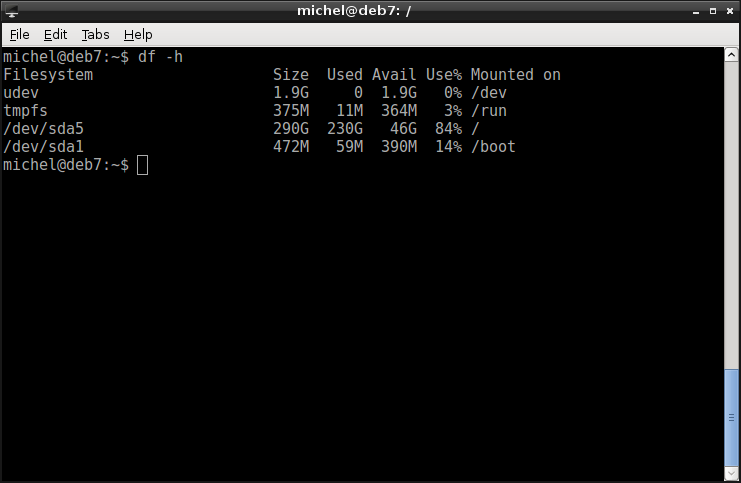
We used the command before, to get information about disk usage. That’s its main purpose but we can abuse the command a little. Besides disk usage it also shows you which path will be stored on which device. Check out the rightmost column, where it says Mounted on. You should recognize some of the paths, alongside the clutter. As an example, look out for the root directory. On the same line, but on the very left, there’s a path to a device. As you know by now, that would be a partition.
The procedure is as follows: having a path in question, check df for the best matching mountpoint and read what it says in the device column. So df shows you a mapping between a path in your file tree and a device. In other words, it tells you on which device a file will be stored if you put it in that directory.
So many words, but mounting was still not explained!? Alright, let’s say you plug in a USB flash disk. You partition it and put a file system on it. But how do you now access it? We cannot write into /dev/sdb1 directly, we cannot use it like a directory and put a file into it (maybe you tried already, you’ll only see error messages). No, we have to do it in the same way we saw before. By creating a mapping from a path to the device. Now, we’re talking mouting. Because that’s what mounting essentially is, we create and remove mappings from a directory to a device. Anything you put into that directory will be stored on said device. In the exact same manner you’ve learned already.
So, let’s go to the practical work. The directory through which we put files onto the device is called the mount point. It can be any directory in your current file tree. Let’s just try this with one of the file systems you’ve created recently.
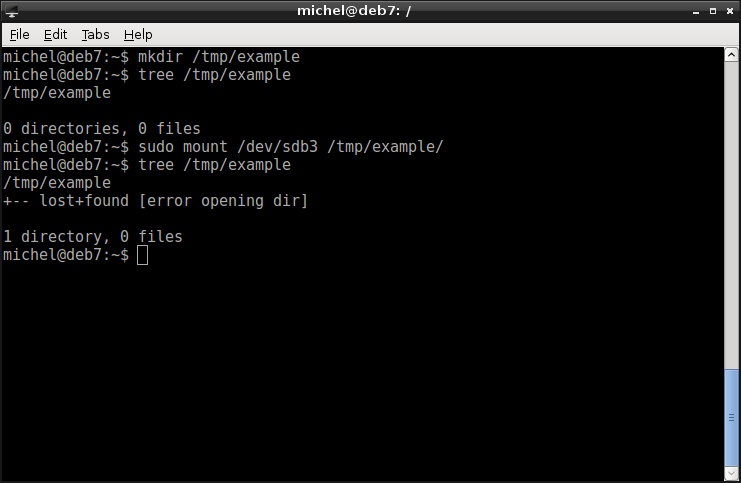
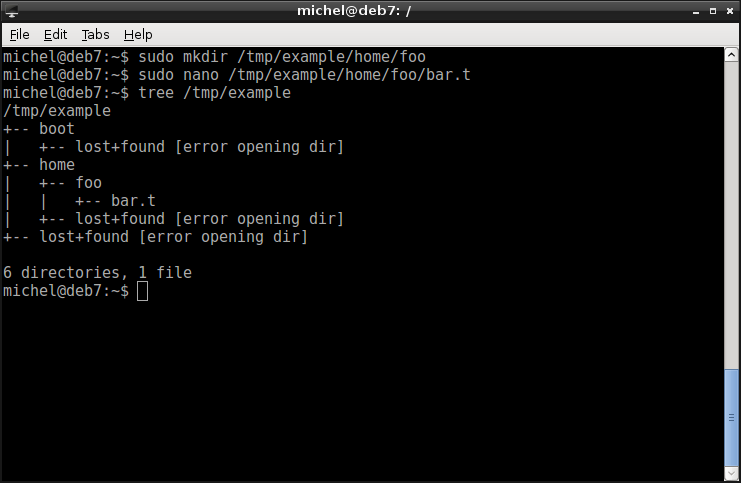
mkdir /tmp/example
tree /tmp/example
sudo mount /dev/sdb3 /tmp/example/
tree /tmp/example
First, we create the directory /tmp/example. This will be our mount point. Then, the file system is mounted with the mount command. This command now binds the device into the mountpoint. Because we work with devices, root privileges are required. To look at the directory structure, we’re using the new command tree. It works similar as ls but also goes into directories and gives you nice ascii-art output. From its output you can see that indeed the contents of /tmp/example have changed. The lost+found directory you observe is always created on the ext file system, but normally shouldn’t contain any data.
Do you remember the df command from before? Let’s try this one again.
df -h
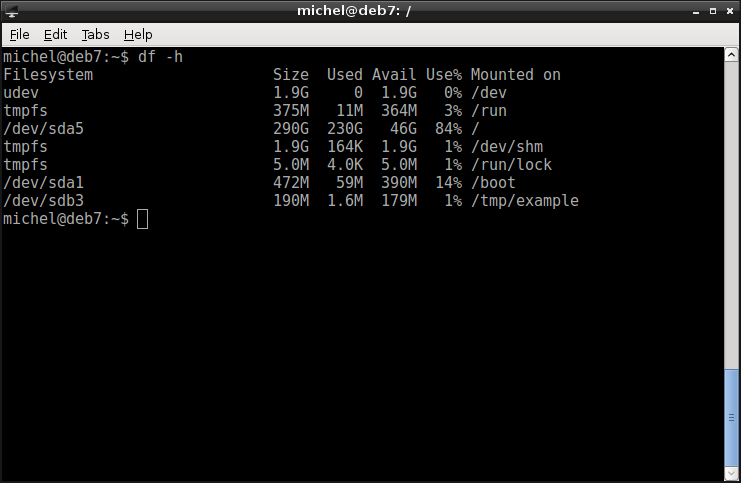
Now, again have a look at the rightmost column. Where it says Mounted on. You now know that that’s the mount point. Look at the far left column, called Filesystem. Again, that’s the device of the underlying file system. Somewhere, the mount point /tmp/example we’ve just used should now appear.
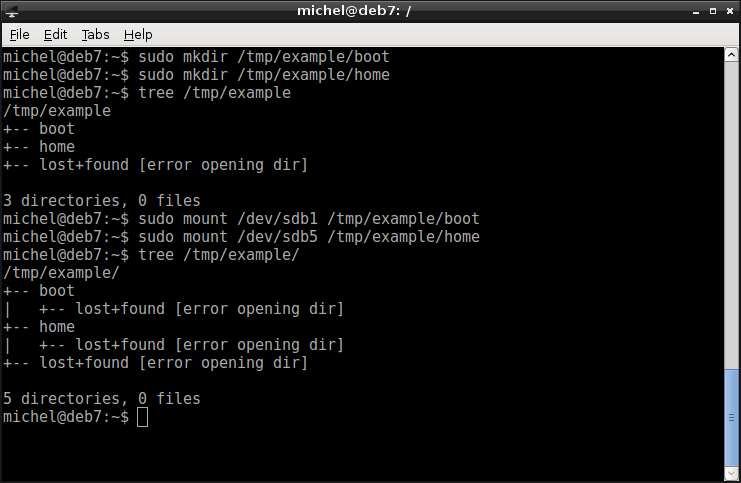
Let’s continue with the example file systems we’ve created. So we said that /dev/sdb3 would be the system partition and we’ve created a file system. We’ve just mounted this, so let’s continue. /dev/sdb1 was our boot partition, so let’s create a boot directory and mount it there. We do the same with our data partition and the home folder. To create directories
sudo mkdir /tmp/example/boot /tmp/example/home
tree /tmp/example
sudo mount /dev/sdb1 /tmp/example/boot
sudo mount /dev/sdb5 /tmp/example/home
tree /tmp/example
Again, you see that from the output of ls that the directory contents change after the mount.
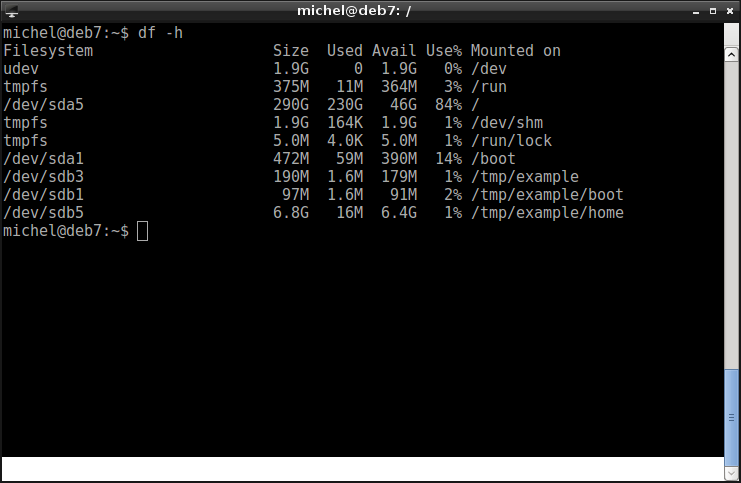
Let’s verify with df.
df -h
OK, that’s nice but now let’s put some file there. Create a home directory for the user foo and add a file. Just write some text and save it.
sudo mkdir /tmp/example/home/foo
sudo nano /tmp/example/home/foo/bar.t
tree /tmp/example
You should see some directories and the file bar.t.
So you mounted a file system, how about the reverse process? Surely, we can also eject file systems from our file tree. The command for this is called umount, a little counter-intuitive (I’d call it unmount), but that’s how it is. You’ll get used to it.
sudo umount /tmp/example/home
sudo umount /tmp/example/boot
sudo umount /tmp/example
tree /tmp/example
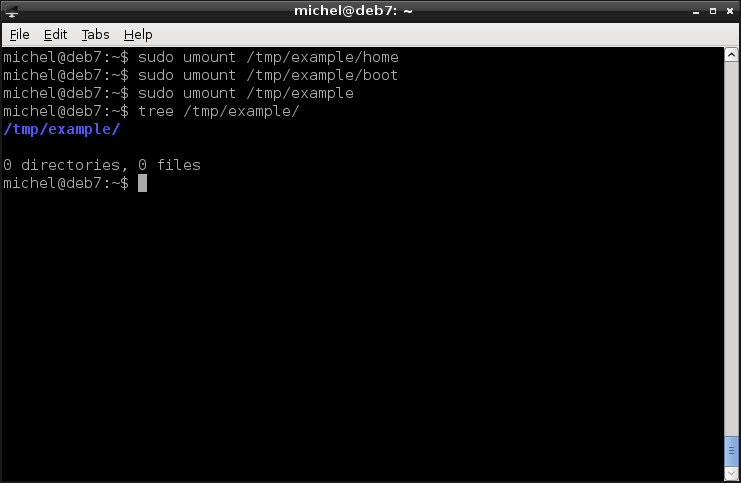
As for mount, root privileges are required. After the three umount commands, the /tmp/example directory is empty again. Mounting means that you take a device and put it at some location. All files and directories within the mounted file system are then available under this location. umount reverses this. Which of course changes your current file tree. Directories which were stored on the flash disk are no longer available after the umount. On the other hand, the file system you mount may not be empty (as it were in the example). New directories and files will appear in your mount point as soon as you mount a device there.
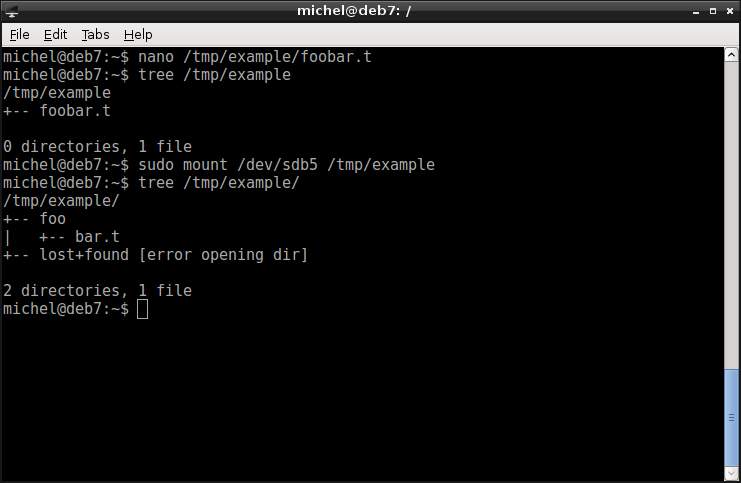
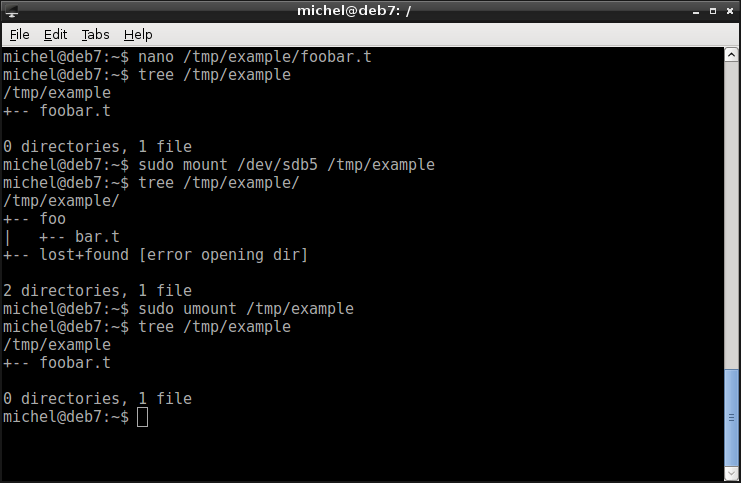
Just for the fun of it, let’s now again put a file there. Write some text again and save the file. You should see it in the tree.
nano /tmp/example/foobar.t
tree /tmp/example
Unlike before, let’s now mount the data directory directly into /tmp/example.
tree /tmp/example
sudo mount /dev/sdb5 /tmp/example
tree /tmp/example
You can observe two effects:
- The file foobar.t has vanished
- The home directory foo and the file foo/bar.t now exist in /tmp/example.
Let’s explain what happened. There’s a file system in /tmp/disk.img5 of the type ext4. This file system has an internal file tree. On its topmost level, there’s the foo directory we created before. Inside the foo folder, we placed a file called bar.t. What was that about the topmost level? Well, it’s basically all about relative paths. In this case relative to the mount point. We’ve mounted the file system in /tmp/example/home and created the directory /tmp/example/home/foo. So, relative to its mount point, the directory we created is /foo. If we now mount the same file system at a different mount point - /tmp/example - the path is again relative to that directory. Meaning, we now see the exact same file at /tmp/example/foo/bar.t.
So, why don’t we see the foobar.t file anymore? Well, that part of the file tree was just replaced with the one of /tmp/disk.img5. But the file was not removed, we can easily bring it back by unmounting.
sudo umount /tmp/example
tree /tmp/example
Et voila, the magic trick is complete as we brought the vanished file back.
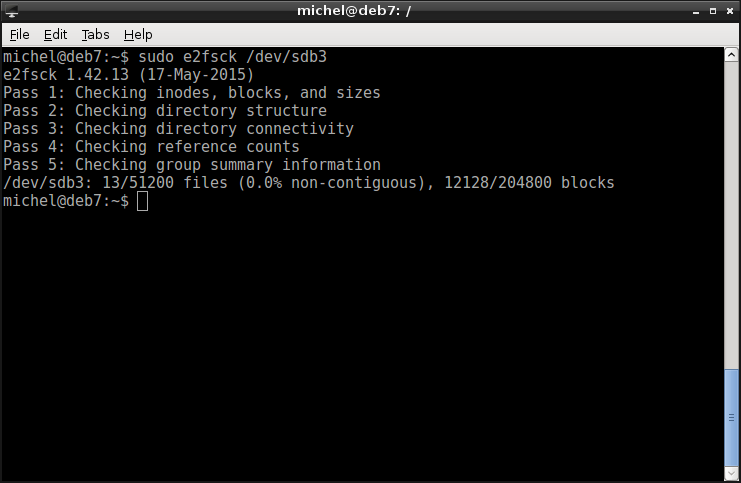
Before finishing, there’s one more tool. Sometimes, data gets corrupted. For example if you cut the power suddenly and the computer stops while writing a file. Although modern file systems do their best to avoid data loss, it may happen sometimes. In case of the extended file system, you can then run a quick check.
sudo e2fsck -f /dev/sdb3
This program runs some checks on the file system and tries to repair errors, if any found. In our case, it’s hopefully clean, -f makes it run the checks none the less. If any error is found, e2fsck attempts to fix it and would put any restored file into the lost+found folder.
7.6.1. Until death do us part
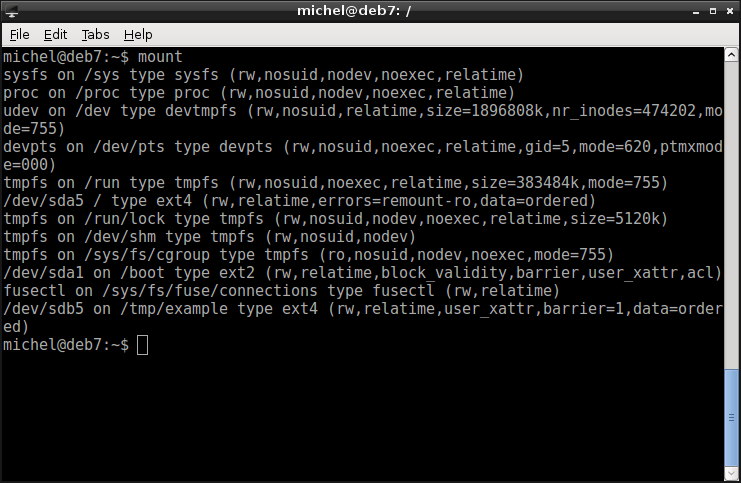
Again, have a look at the mounted file systems. This time, we don’t use df but another already well-known command.
mount
Yes, that’s right, mount without parameters shows you all mount points. As with df you see a lot of clutter but we’re going to ignore this. Look for an entry where it says ‘/something/something on / type ...’. Remember the system partition we’ve created before (and also a file system on it)? It wasn’t created in a special way or anything. The only thing which distinguishes the system partition is that it’s mounted in /. Of course, this has to be done automatically by the operating system. Without having / mounted, you also couldn’t access the mount program!
For this reason, there’s a file /etc/fstab in which we can define which devices to mount and where. It’s basically a table with the same information you can give to mount. The columns are the following:
- file system: which device holds the file system, e.g. /dev/sda3.
- mount point: where to mount to, e.g. /.
- type: file system type, e.g. ext3.
- options: file system options (comma seperated). Use defaults. Maybe use defaults,noauto instead, if you don’t want the device to be mounted upon boot but still are too lazy to type the mount command every time.
- flags: flags for dump and fsck. Unless you know what they do, use 0 0.
So, by adding a line in this file you can make your mount known to the operating system. This has the effect that it is automatically mounted when the system starts (unless the noauto option is set). It also allows you to use mount with only the mount point as parameter. Note however that in case of automount, the system possibly won’t start if the device does not exist or the syntax in /etc/fstab is wrong. So better check it before your next reboot!

7.6.2. Exercises
- Let’s say you have /home on a sperate partition. From the file system’s perspective, what’s the path of the file /home/myself/data/super-duper-dideli/awesome?
- Can you mount the same partition twice (at a different location)?
- What’s the device path of your root file system? Check it in /etc/fstab.
- How can you limit the depth of tree?
- How can you mount a file system read-only?
7.7. More filesystem voodoo
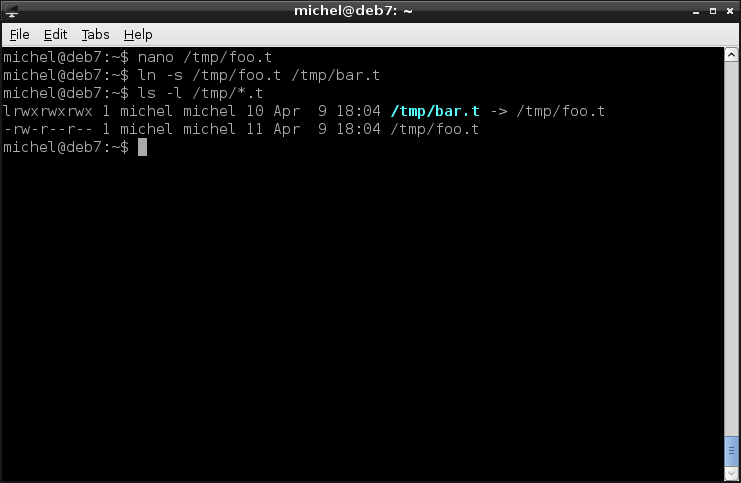
There’s one more way to bend the file tree: Links. Links let you point from one location in the file tree to another.
nano /tmp/foo.t
ln -s /tmp/foo.t /tmp/bar.t
You have two options for linking. Hard links and symbolic links (symlinks). Symlinks work on the file tree level, so they use a path for referencing to the real file. Hard links on the other hand use file system properties to make two different locations in the file tree point to the same file. A symlink is created if the option -s is present. Otherwise the source is hard linked.
The difference between the two is huge. After you created a link, the file is reachable from two paths. If you did a hard link, you cannot tell which one was the original and which one is the link. In fact, this difference does not exist at all. However, this is not the case for a symlink. There, one path is the actual file and the other is a reference to the original path.
If you move the original file, the symlink becomes invalid. Trying to open the symlink will lead to an error (No such file or directory). The same happens if you remove the original file. Dependent on the situation, this can either be desired or lead to errors. Desired because you can easily replace the original file without having to change the link. In the case of hardlinks, both operations (moving, removing) have no effect on the other path - as there’s no difference between original and linked file. A hard-linked file is only removed after every reference to it (links and original file) was deleted.
Both, hard links and symlinks have to be supported by the file system (e.g. ext does but FAT doesn’t support linking). But hard links may further not cross file system borders, as they work on the file system level. For symlinks, this is not an issue. Also, symlinking to a directory isn’t a problem, while the same may not be possible with hard links.
How do you know if a file is a link? Symlinks you can easily see with ls, if the -l argument is provided. For hard links, there’s no such easy way [5].
ls -l /tmp/*.t
7.7.1. 301: Permanent redirect
For symlinks, you can use both, relative and absolute paths for the target. But beware the difference! The link will point to exactly that path. Let’s say, you have a directory with different sofware versions. To quickly find the latest one, you let a symlink [6] called current point to the latest version.
current -> ubuntu-14.04.iso
ubuntu-11.04.iso
ubuntu-12.04.iso
ubuntu-13.04.iso
ubuntu-14.04.iso
ubuntu-15.04.iso
ubuntu-16.04.iso
Let’s say for some reason you move this directory. If you created your symlink via an absolute path /path/to/some/directory/ubuntu-14.04.iso, it will become invalid because the path has changed. If, however, you chose to use a relative path (ubuntu-14.04.iso), the link will still work due to the fact that the relative location of the files did not change (since they are in the same directory).
7.7.2. Exercises
Create the file /tmp/foobar.t. Write a couple of lines in there.
Change the directory to /. Create the following links (use the paths exactly)
- (symlink) /tmp/foobar.t -> /tmp/foo.s
- (symlink) foobar.t -> /tmp/bar.s
- (hardlink) /tmp/foobar.t -> /tmp/foo.h
- (hardlink) foobar.t -> /tmp/bar.s
- (hardlink) /tmp/foo.s -> foofoo.h
- (symlink) /tmp/foo.h -> foofoo.s
Copy the file /tmp/foo.s to /tmp/copyfoo.s
Copy the file /tmp/bar.h to /tmp/copybar.h
Have a look at the files with ls /tmp/*.t /tmp/*.s /tmp/*.h
Create the directory /tmp/manylinks
Move all created files into the directory /tmp/manylinks.
Which links do still work?
Edit /tmp/manylinks/foobar.t. Which files will have the same changes?
Remove /tmp/manylinks/foobar.t. Which links do still work?
7.8. Disk cloning
Here comes the long promised documentation of the already shown dd command. There’s actually little magic involved but it’s a very versatile tool. You’ll mainly use it for these reasons:
- Cloning devices
- Extracting parts of a file (or device)
- Creating sparse files
Cloning devices is easy, so let’s first have a look at this one. Let’s say, you have two partitions /dev/sdaX and /dev/sdbY of the same size. You want to copy all data from the first to the second one. Easily done, just type
dd if=/dev/sdaX of=/dev/sdbY
Now that might take some time but with dd you can speed up things. It lets you control how many bytes are read and written in one turn with the bs argument. Let’s set it to 4 MB and do the same copy again.
dd if=/dev/sdaX of=/dev/sdbY bs=4M
So, dd is a tool to copy data block wise. You can set the input block size and output block size (or both together, that’s what bs does). You can also specify the number of blocks to copy (count) and how many blocks to omit (skip for input, seek for output). We can use this feature to extract parts of a file. Even cooler, we can use this to extract parts of a block device. For example, the first partition of your hard disk.
First, we have to find out the boundaries of the first parition. You can use fdisk for that.
sudo fdisk -l /dev/sda
In the header, you see the Units. In the partition table, get the Start and End of the first partition. In my case, the three numbers are:
| fdisk | value | dd |
|---|---|---|
| Units | 512 | bs |
| Start | 2048 | skip |
| End: | 499711 | count |
Because the Start and End values are reported in Units, we can use the Units as our block size bs and then directly have the other values define the copy range. We use the skip parameter to omit the first couple of blocks (before the partition starts) and the count parameter to define the end. Here’s the example:
sudo dd if=/dev/sda of=/tmp/sda1.img bs=512 skip=2048 count=499711
Now, you can mount /tmp/sda1.img, check if this works and if it really holds the same data as your first partition (probably /boot).
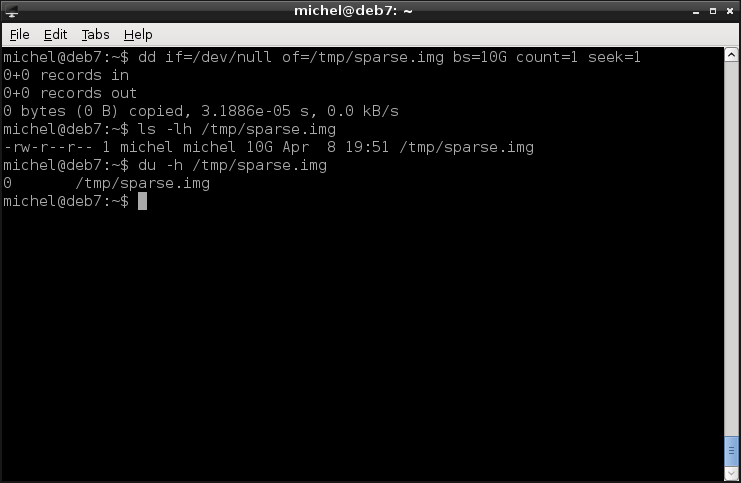
What’s a sparse file, you wonder? Well, sometimes you’ll have to create a large file - let’s say 10GB. But you’ll probably only use a small portion of it, at least for now. Then you could use a sparse file. A sparse file is created with a specific size (10GB) but the space is not really used yet. The file is empty, so to speak, which is different from all zero. While every program thinks your file is 10GB large, it only uses as much space on the disk as data was actually written. Let’s check this out!
dd if=/dev/null of=/tmp/sparse.img bs=10G count=1 seek=1
ls -lh /tmp/sparse.img
du -h /tmp/sparse.img
Now, that’s very interesting! ls reports the file size being 10G while du says the file requires no space at all. Well, that’s exactly what was described before and what you’d expect. You could now, for example, create an ext2 file system in that file and check the disk usage and file size. You could then even mount the image, write some data, and check the size again.
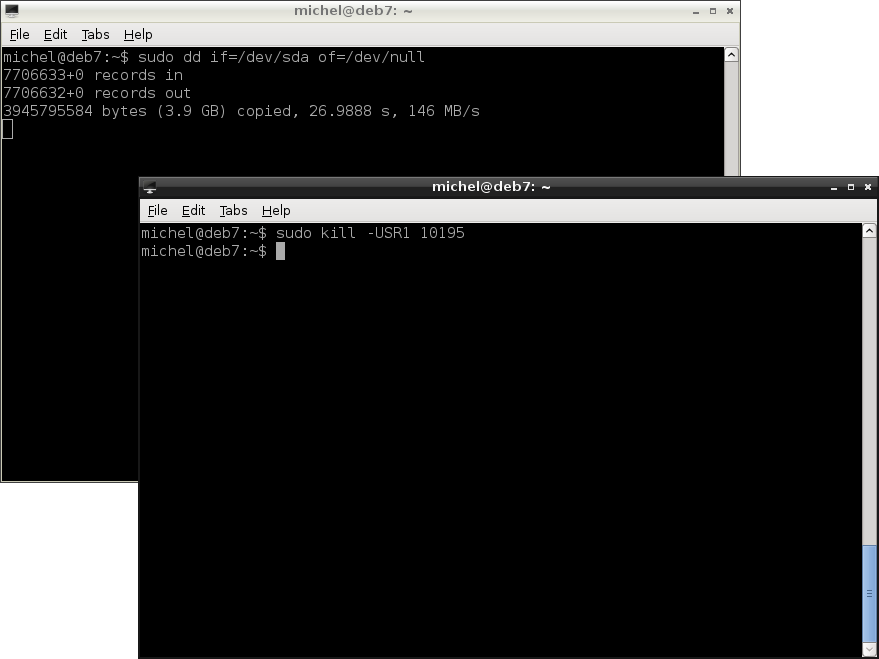
Let’s just show one more trick, then call it a day. Since you use dd for large copy operations, you’d like to know every once in a while how far you are and how fast the file is copied. Of course you can do that, although it’s a little cumbersome. Start your copy using dd first. Then get the PID of your dd process.
ps -ef
Now comes the magic. You can use kill to send notifications around. Actually, when you use kill before, you send a notification to the process that it should (please) shut down. Most programms respect this wish, but they are allowed to react in an individual way. So, with kill, we can also send other notifications. In this case, we’ll use -USR1. Don’t forget this parameter, otherwise you’ll terminate your dd process and copy operation. In the command below, replace the <PID> with the PID of your actual dd process.
kill -USR1 <PID>
Is dd still running? If not, didn’t you read the warning? Why didn’t you type exactly as told to? You should actually see the progress and speed, as shown here:
7.8.1. An image is worth a thousand words
Alright, now let’s get freaky. The term block device was already introduced. It’s any device made up of a continuous sequence of blocks. Which is also the case for files. Implying that we can work with files just as with hard disks!
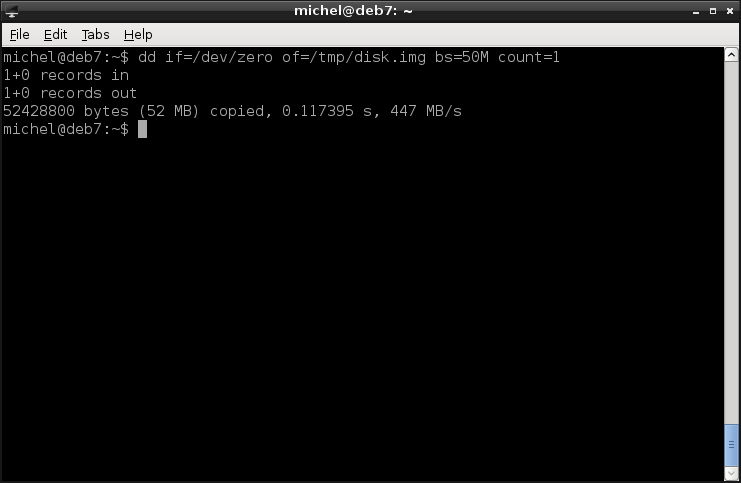
Maybe an example will clear things up. First, we create a 50MB large file, containing only zeros. This will be our disk image.
dd if=/dev/zero of=/tmp/disk.img bs=50M count=1
Now let’s handle this file as if it were a disk at /dev/sdb. You can create partitions inside!
/sbin/cfdisk /tmp/disk.img
Note
The command is still cfdisk. But root privileges are not required (as we work with a file, not a disk), and the command cfdisk is only automatically found for the root user. If you work as non-root, you’ll probably have to use the full program path /sbin/cfdisk instead.
You can re-create the example partitioning scheme from before, just with the disk image in stead of /dev/sdb.
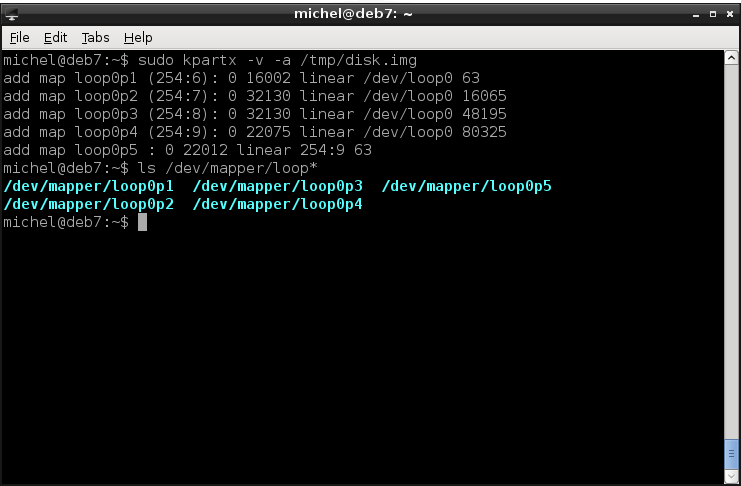
The next step then was creating a file system inside the partitions. For that you used the respective partition device files, like /dev/sdb1. But now, we don’t have them (yet). We’ll have to make the operating system generate those file first. You can do this with kpartx. It creates block device files in /dev/mapper for all the partitions in our disk image. It follows the same logic as with a real hard disk but the files will be called loop0pX instead of sdaXY.
Note
kpartx is not a standard tool and possibly not installed on your system. If the command isn’t found, try to install it or ask your system administrator or a teacher.
ls /dev/mapper/loop*
sudo kpartx -v -a /tmp/disk.img
ls /dev/mapper/loop*
Because kpartx creates devices in /dev, you need root privileges again. If you partition a real block device (say /dev/sdf) with the scheme above, you’d see the files /dev/sdf1, /dev/sdf2, /dev/sdf3, /dev/sdf4 and /dev/sdf5. So now we replace those with whatever we were given in /dev/mapper/loopXpY.
For example, let’s create a file system inside our new device and mount it - it’s really the same as before, only the paths have changed! Let’s start with the file system. I assume, you’ve created two partitions
mkfs.ext3 /dev/mapper/loop0p2
mkfs.ext2 /dev/mapper/loop0p1
If you have not deleted the /tmp/example structure (but preferrably nothing mounted there), you can use it again to mount the image’s partitions.
mount -o loop /dev/mapper/loop0p3 /tmp/example
mkdir /tmp/example/boot
mount -o loop /dev/mapper/loop0p1 /tmp/example/boot

nano /tmp/example/foo.t
nano /tmp/example/boot/bar.t

tree /tmp/example
And once you’ve seen enough, unmount just normally.
umount /mnt/boot
umount /mnt
Before we can cleanup and go home, we have to remove the partition device mappings in /dev/mapper (remember, those we created with kpartx). We’ve already unmounted the partitions in the previous command example.
sudo kpartx -d /tmp/disk.img
A nice property of having the hard disk image in a file is that to get rid of it, you can simply delete the file.
rm /tmp/disk.img

Poof and gone.
Note
You can also create a file (as before with dd) and then create a file system directly inside, without partitioning. Again, the reasoning is because it’s a block device. The same goes for actual disks, in fact - you can just as well create a file system on /dev/sdb, without partitioning - if you don’t need to subdivide the disk, at least.
7.9. Summary
In this chapter you’ve learnt how disks are seen by the computer. How they are addressed and divided. How you place files and how they are linked to your file tree. You’ve seen how you identify your devices, how to read from them and how to write to them. You’ve learnt more about the file tree, about its special files and how you can twist and turn your file tree. You now master low-level file operations and can deal with files and disks the like.
7.9.1. Exercises
- Why would you use several partitions on your system? What’s the benefit? What’s the disadvantage?
- Is it possible to have a file system without having a partition?
- How many bytes is one MB? Why is it not one million?
- State two reasons why you need partitions.
- What is a block? Why do we need blocks? What do we use them for?
- Why do you need a file system? What is its role?
- For which mount point is the path in your file tree identical to the local view of the underlying file system?
- How can you send a signal to a process? What signals are there? Which one hides behind -9?
- What’s the main difference between dd and cp?
- Does it make sense to partition main memory (in the same way as the hard disk)?
- Why do you need the root user when working with files in /dev/, e.g. /dev/sda?
- Name two purposes to use df
7.10. Cheatsheet
- fdisk [-l] DEVICE
- cfdisk DEVICE
- mkfs.ext2 DEVICE
- mkfs.ext3 DEVICE
- mkfs.ext4 DEVICE
- mk2fs [-j] [-t FSTYPE] DEVICE
- mount [OPTIONS] [-t TYPE] [-o FSOPTIONS] DEVICE MOUNTPOINT
- umount MOUNTPOINT
- e2fsck [-f] DEVICE
- mount
- ln [OPTIONS] [-s] TARGET LINK_NAME
- dd if=FILE of=FILE bs=SIZE
- dd if=FILE of=FILE bs=SIZE skip=START count=END
- dd if=FILE of=FILE bs=SIZE count=1 seek=1
- kill -USR1 PID
| [1] |  . . |
| [2] | Mathematically, 0 is the first number of a decade. That’s also why the binary number system uses 0, 1, not 1, 2. |
| [3] | This would be the case in a dual boot setup. |
| [4] | You’ll find good descriptions about FAT and ext on the Wikipedia. |
| [5] | There are ways to find out, though. But you have to understand how the file system works. If you’re interested, research about inode and maybe the stat command. |
| [6] | This is actually often done on mirrors hosting Linux distributions. See XXX as an example. |