3. Pimp your terminal powers
On our way to become a sysadmin, are we?
3.1. Review
You already know what the file tree is, how data is organized on it and how you address a file or a directory. You know what a relative and an absolute path is and can distinguish them. In the terminal, you can freely navigate through the file tree and know how to find out your current location.
3.1.1. Test questions
- Name a way to find out your current directory.
- What’s the difference between an absolute and a relative path? How do you tell them appart?
- How can you look into a directory?
3.1.2. Introduction
In the last chapter, you’ve seen the terminal. It was sure nice playing around a bit with the file system and jumping from one directory to another. I’m sure you could occupy yourself easily for days doing nothing else. But I’d like to advance, know a little more and really get all the terminal’s benefits. The terminal offers way more than just navigating the file system. Heck, even the file manager can do this and that’s a lousy tool. So, let’s get to the bottom of this.
Shortly, you’ll master some new commands, new key combinations and know some tricks on the terminal. You’ll better understand what you are doing and how to find out new things for yourself.
3.2. More fun with the terminal
So what should we do besides moving up and down and sideways the file tree? Since we’re already dealing with files and directories, it would be nice to look at the contents of a file. Do you wonder how much free memory you currently have? Check with the following command.
cat /proc/meminfo
And that’s what you might see:
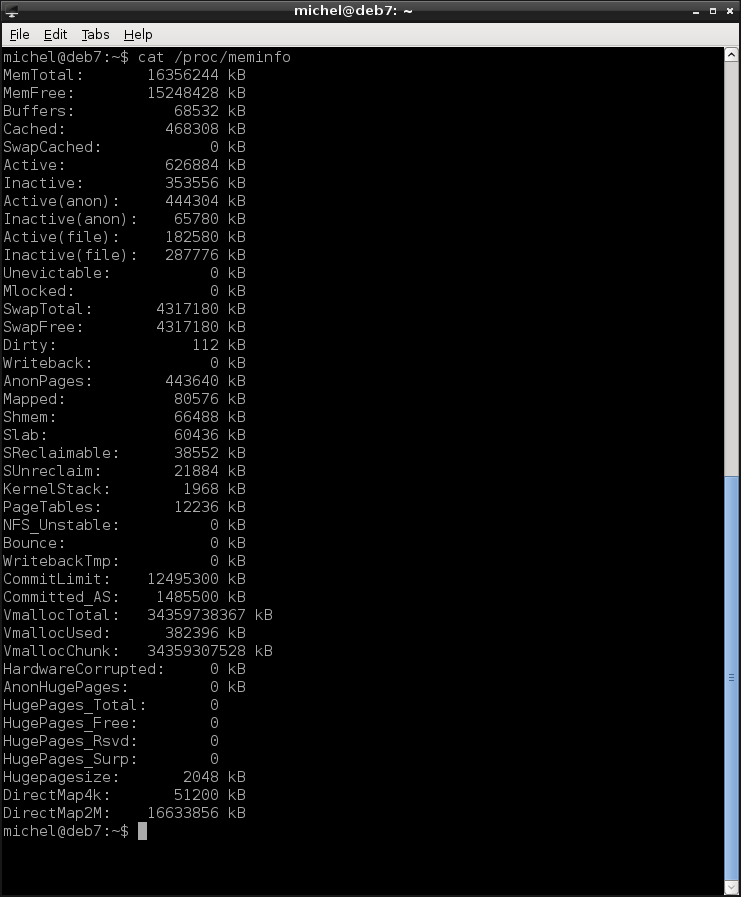
The top two numbers are the most interesting, they show you how much memory there is (MemTotal) and how much of it is currently unused (MemFree). Your terminal is probably too small to show the top lines, so you have to scroll up a bit. Did you just switch to the mouse for that? Alas! Of course, there’s a key to do that: Try Shift-PgUp (or Page Up, usually next to the Home key). You might have figured that Shift-PgDown scrolls you down again.
Back to the command: cat simply prints the contents of a file to the console. Not enough exercise? Well, maybe you’re also interested in your CPU configuration:
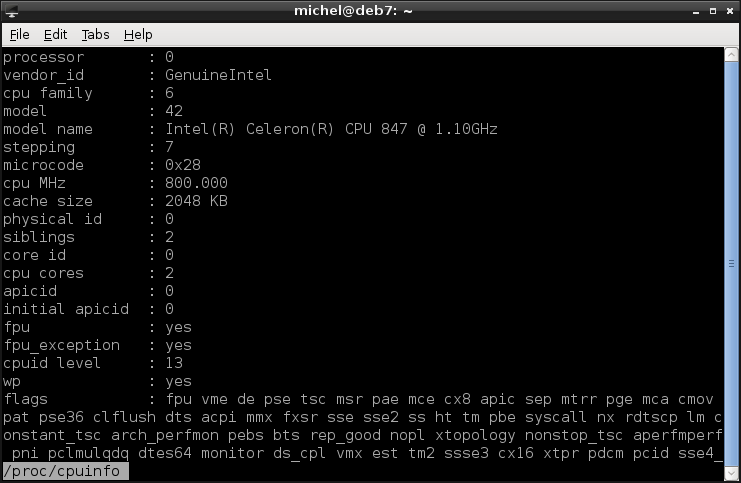
cat /proc/cpuinfo
The two files meminfo and cpuinfo are normal text files (as an exercise you can list the files of the /proc directory). The operating system updates them automatically with recent system information.
This way of viewing files is often very handy but sometimes we don’t want the terminal to be cluttered with files we’ve looked at. Especially if the files are large. So, let’s use a tool with a little more functionality instead. Still, we’re interested in /proc/cpuinfo but this time, use less instead of cat.
less /proc/cpuinfo
In the less file viewer, you can use the Up/Down arrow keys for scrolling. To return to the command line, press q. Here’s a list of keys you can use
| Symbol | Key | Effect |
|---|---|---|
| Up | Scroll up, towards the beginning. | |
| Down | Scroll down, towards the end. | |
| Left | Scroll to the left (line beginning). | |
| Right | Scroll to the right (line end). | |
| Home | Scroll all the way up to the top. | |
| End | Scroll all the way down to the end. | |
| k | Scroll up, towards the beginning. | |
| j | Scroll down, towards the end. | |
| Q | Quit the less file viewer. | |
| / | Search. Afterwards you can go through the results with n (next) and N (previous). |
3.2.1. Exercises
Open /proc/meminfo in less.
Write some lines of text with Leafpad and save it to /tmp/foo.t.
- In the terminal, navigate to /tmp
- Use cat to display your text file.
- Use less to view your text file.
Open /home/michel in less.
Display /home/michel with cat.
Write some lines of text with Writer and save it to /tmp/bar.odt.
- In the terminal, navigate to your writer document.
- Use less to view your writer file.
- Can you read the text you’ve written in Writer? Discuss what you see with a collegue or a teacher.
Navigate to /proc
- View the file /proc/uptime via cat
- View the file /proc/version via cat
- View the file cmdline in less
3.3. Fun with Flags
Recall some examples from the first chapter.
ls
ls /
ls /home/michel/forall
In the first case, the working directory contents are shown. In the second and third case, the directories / and /home/michel/forall are listed, respectively.
You see that the first part, ls, is always the same but the second part changes. With all three versions, you do the same (listing a directory) but in a slightly different way (different directory). So the first part gives you what you do, while the second part tells you how exactly it is done. From now on, we’re a bit more exact about terminology and only call the part until the first whitespace the command. In this case, ls is the command. The command is usually a word, but may contain dashes (-) or numbers.
Everything that comes after the command, we call the arguments. In the example above, there’s only one argument but there might be several. With arguments we can slightly modify the behaviour of the command. Like in the example, we can specify which directory we want to be listed.
Each command may have its own way of how arguments have to be written exactly (below you’ll learn how to find out). But in most cases it works very similarly. Very often you can identify an argument on the single or double dash (-), like in the example below:
ls -l --human-readable
ls -l --human-readable /
Usually, arguments are seperated by whitespace. For this reason you have to be careful with whitespaces in file names.
Very often, you can use a long and a short version of an argument. Both do the same but the long version is more verbose and therefor easier to understand if you don’t know the command by heart. For example, you can use --human-readable to make file sizes more readable. However, writing this every time is just too much work. So you can put -h instead, which has the same effect but is way shorter.
Also, some commands allow you to write the short (single letter) arguments together, without whitespaces and a single leading dash (-). For example, the following two notations do exactly the same:
ls -l -a -h /home/michel/forall
ls -lah /home/michel/forall
3.3.1. Exercises
In the list below, what is the command and what an argument? How many arguments are there?
- ls /home/michel/forall
- ls -l -h /home/michel
- pwd
- cd /tmp
- less -a -c --dumb /proc/meminfo
- cat -e --number /proc/cpuinfo
- pwd --physical
- cat -E --show-nonprinting -T -b /proc/version
- pwd -P
- ls -l --human-readable /home/michel
Write the short arguments together.
- All commands from exercise 1
- pwd -L -P --help
- cat -e --show-all -n -u /proc/version
- ls --author -b -C -F
- less -B -C -c /proc/meminfo
- ls -i -l -L -m /
3.4. Getting help
All unix systems come with a built-in help system. Nobody really knows all the commands and all the parameters by heart. So if you struggle with remembering what a command does, that’s normal and pretty much the same for anyone else. Because of this, there’s the help system. It’s called man (manual) and very easy to use. Just put the command you’re interested in after man. Let’s say you need to know the specifics of the ls command. To see the help, type
man ls
To reflect the previous section, here man is the command and ls its argument. This command displays the description of ls in the already known less text viewer. As you have previously learnt, you can scroll up and down and exit if you want (what was the key again?? Ah, right, q). As before, you end up at the command line when quitting less.
Because of the command’s name, these help texts are often called man page. Let’s have a closer look at the information contained in the man page. You should see something like this:
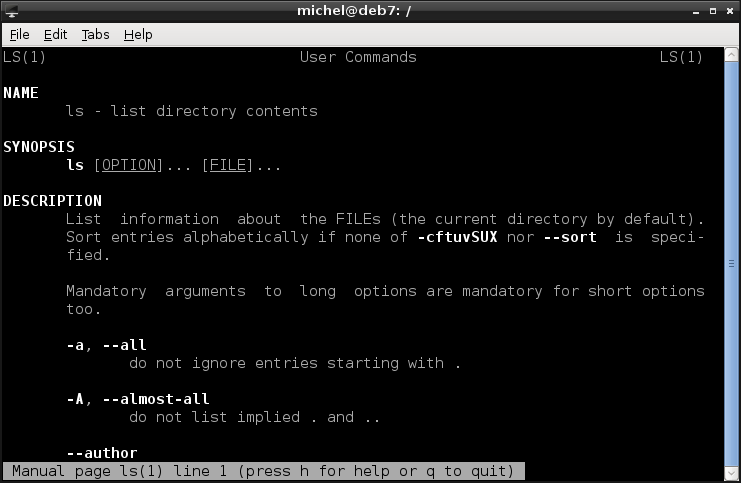
The information stated here is a bit cryptic at first. But you’ll get used to it soon enough. Obviously you see some sections (NAME, SYNOPSIS, DESCRIPTION, ...). These are like chapters which organize the file.
The NAME section states the name and a phrase, describing what the command does.
You get a very brief summary of how to write the command in the SYNOPSIS section. It shows you what arguments are accepted and in what order you can put them. This is mainly useful if you have already an idea about an argument but not how to write it exactly. Underlined words are placeholders and expected to be replaced. Stuff in brackets ([, ]) is optional. So you can put a file after ls but don’t have to. In the former case, you should replace FILE by the actual path, e.g. /home.
Note
Have you already observed the command summary on the side? That’s a reference for you to quickly see what command is used in the text. It uses a similar format as the man page. Uppercase text is to be replaced and brackets ([, ]) is optional.
Finally, let’s look at the DESCRIPTION section. It describes all the options the command knows in detail. First, the argument is stated, then comes the description of what it does. Yes, you’ll actually have to read this. Again, we’re in a text-based environment, so you’ll have to read a lot.
Some arguments may have values. For example you’ll find --sort=WORD in the man page. The part after the equals (=) is a placeholder where you have to put a value, usually given in the description. In this case, the description mentions size, so you put it in the place of WORD. This gives you the command ls --sort=size. For some commands, the equals (=) sign is omitted, you just put a whitespace instead. Do do it as the man page tells you.
Tip: Sometimes, the arguments --help (very often) and -h (sometimes) also display a short summary of the arguments and the synopsis.
3.4.1. Exercises
Read the man page of cat
Consult the man page of ls and read the description of the following arguments:
- -l
- --all
- --human-readable
- -a
- -o
Consult the man page of pwd and read the description of the following arguments:
- -P
- --help
Consult the man page of cat and read the description of the following arguments:
- --number-nonblank
- -n
- --show-tabs
- -E
Consult the man page of less and read the description of the following arguments:
- -S
- -i
- --clear-screen
- -I
Read the man page of leafpad
3.5. Ain’t nobody got time for that
Probably you’ll make quite some mistakes when typing. Not to insult or underestimate you, but everyone does. Unfortunately, the terminal is very sensitive to that. And I mean very, very sensitive. A single letter can decide between you getting paid or fired. So you absolutely want to make as few mistakes as possible. Because this is a serious issue (and computer guys are lazy), there’s some help.
Let’s try the following:
ls /proc/cpuinfo
You’ve probably just typed the line letter-by-letter as it’s written here. Produce the line again but type it slightly different. Just type ls /pr

Then press the TAB key. The command line should automatically complete to ls /proc/.

Now type another c character, then TAB twice. You should see some names, including cpuinfo, on a new line in the terminal.

Continue typing cpuinfo, but after every letter, press the TAB key. Already after the p character the word should autocomplete to cpuinfo.
What just happened? Well, this mechanism is called tab completion. It helps you typing the correct paths by autocompleting it for you. And it works like this: If you press the TAB key, the path is completed as far as possible. If there’s several options (like in the example after the c), they are shown to you when you press the TAB key a second time.
This mechanism helps you in two ways: First, you type less because of the autocompletion. Second, it guards against typing mistakes. I’ll show you how: type
ls /proc/cpx
and press the TAB key twice. Do you see anything? No? Yep, that’s right. The first TAB press would have completed the path for you, if it existed. The second TAB press shows you the options you have. So it works exactly as expected: The path cannot be completed and you’re also out of options. Meaning the path does not exist.

3.5.1. Exercises
Navigate to the paths below. Use tab completion as often as possible, after every letter. Use tab twice if there are several options.
- /home/michel/forall/students/webproject_2015
- /home/michel/forall/templates
- /proc/meminfo
- /usr/share/dpkg
- /proc/sys/net/ipv4/route
Use cat to print the following files. Use tab completion when writing the paths.
- /proc/meminfo
- /etc/apt/sources.list
- /usr/share/doc/bash/FAQ
- /usr/share/dpkg
After having typed /usr/share/li, what are your options?
List the file /usr/bin/basket. Use tab completion after every letter. Does the file exist? How did you find out? What are the most closely related alternatives?
3.6. I’m more lazy than that!
OK, that’s probably true for you and me as well. You now have typed some commands. Press the Up key. Wow! You get the last command you’ve typed back. Well, what worked once might work just again, so press the Up key again. Et voila, you get an even older command. In fact, you can do this for quite some time. The Up and Down arrow keys allow you to go backwards and forwards in your command history. That’s the collection of all commands you’ve ever typed. So you can have a look at what you’ve typed before and repeat it. To return to the empty prompt, press the ultimate abortion key combo: Ctrl-c.
3.7. Summary
You now know how you can view text files in the terminal. Either directly or in a simple text viewer. You’ve also learnt that not all files are readable this way. You are aware how you write commands and its variations in the terminal and what their meaning is. If you’re stuck, you know how to use the help system to get more information. Using tab completion, you already type fast and reliable.
3.7.1. Exercises
- How can you seperate the command from its arguments?
- Does every argument start with a dash (-)?
- What’s the difference between the short and long version of an argument?
- What does man man do?
- How many times do you have to press tab if you want to see your options?
- How do you scroll on the terminal? How do you scroll in less?
- How do you know from tab completion that a path doesn’t exist?
3.8. Keyboard cheat sheet
| Symbol | Key | Effect |
|---|---|---|
| Left | The cursor moves one letter to the left. | |
| Right | The cursor moves one letter to the right. | |
| Home | The cursor jumps to the beginning of the line. | |
| End | The cursor jumps to the end of the line. | |
| Backspace | The letter left to the cursor is deleted. | |
| Delete | The letter under the cursor (inside the box) is deleted. | |
| Enter | Execute the command line. | |
| Ctrl + c | Abort anything and everything. | |
| Ctrl + Left | Move the curser to the left of the current word | |
| Ctrl + Right | Move the cursor to the right of the current word | |
| Shift + PgUp | Scroll up | |
| Shift + PgDown | Scroll down | |
| Ctrl + d | Exit the terminal | |
| Up | Go back in the command history (bring previous commands to the command line). | |
| Down | Go forward in the command history | |
| Tab | Autocomplete the current word |
3.9. Terminal Cheat Sheet
| Command | Example | Description |
|---|---|---|
| ls | ls / | List directory contents. |
| pwd | pwd | Show the working directory. |
| cd | cd / | Change directory. |
| exit | exit | Close the terminal. |
| cat | cat /proc/version | Display file contents on the terminal. |
| less | less /proc/cpuinfo | A simple and small text viewer. |
3.10. Cheatsheet
- cat FILE
- less FILE
- ls [-l] [-h] [PATH]
- man COMMAND