8. Startup
Rise and shine
8.1. Review
You’ve heard about files already and know perfectly well how to handle them in the terminal. You know how programs are represented in the computer, how they are started, stopped, managed in general. You have learnt about how the hard disk is set up. You’ve been introduced to the file tree and can bend it to your will. You know about the relation between CPU, hard disk and the main memory and what each of these components does exactly.
8.1.1. Test questions
- How many times does the kernel run?
- How do you recognize a kernel process?
- In your own words, how is data arranged on the hard disk?
- How do you list all running programs?
- What’s the difference between a program and a process?
- Where is the kernel stored?
- How can you copy disks with dd?
- Name three tasks of the kernel
8.2. Bootrstrapping
Picture the operating system as a program. You need this program to run all other programs. Meaning to organize its files and resources and start a new process. So far so good. But if you need a program to start a program, how is the first program started? Welcome to the world of bootstrapping.
Let’s start with the story of Baron Munchhausen. One day, like many others, he was inspecting his lands. Because he ran out of fuel, he rode on horseback instead. His loyal servants greeted him as he rode by [1] and everyone waved in astonishment, as this was a rare sight. In fact, the Baron didn’t know his own lands very well and so it happend that he rode straight into a swamp. The horse struggled to get out but just sank deeper and deeper. Until at some point, merely the Baron’s outstreched arm reached out of the perilous damp.
An ordinary man would have panicked, of course. But the Baron remembered the friendly letters on the back of his favourite book: DON’T PANIC. He kept his cool and with the one remaining arm, he reached down and grabbed his own bootstraps. With a strength only found in the noblest of houses, he pulled out himself and - of course - his horse. Back on the safe shore he shook of all the dirt and rode on, unstained and unbroken. His subjects applauded until exhaustion upon his return and a holden maid was laid before him.
Unforunately, Baron Munchhausen was an infamous liar [2] and just as himself, we have to play a little magic trick (not to insult his heiness) to make bootstrapping work.
In general, bootstrapping describes any process where we have to have its result in order to start it. Like, you have to have a program to start another program, but then how did you start the first one? Remember the kernel? This is the program which starts all others. And must at some point be started itself. But how? That’s what you’re going to learn.
Like any program, the kernel is a set of instructions to be executed by the CPU. The CPU then automatically finds out how it has to go through the instructions, i.e. how to proceed after one instruction was executed. The CPU interacts directly with the main memory. So, in order to start the OS, we first have to copy the kernel from the hard disk to the main memory. Then, we make the CPU execute the kernel’s first instruction.
Still, the problem remains, how to get the kernel from the hard disk into the memory. Both tasks - reading from the hard disk as well as writing into main memory - are usually handled by the kernel. In this case, we help ourself out with a very small program, called the bootloader. It can read a file (because that’s what the kernel is) from the hard disk and write it into the memory. And then point the CPU to it.
That’s nice and all but how does the bootloader gets started? Basically, we still face the same problem as before. Damn it! But, DON’T PANIC, the problem is actually smaller. Reading the kernel is a bit tricky, because you’d have to know which one (there might be several options) and how to read it from the file system. So we resolve these issues by putting the bootloader in a specific format at a special place on the hard disk. The first 446 bytes of each hard disk (or any other bootable block device for that matter) are the so-called master boot record (MBR). There, we put the bootloader.
So, what we need now is only yet another starting program that can read the MBR and start the program which is there. Because the location and size of the bootloader is fixed and well known, it’s not that hard to read this part. Also, starting the CPU on a program is not really difficult. At least not for the program which manages all the hardware. That would be the BIOS (Basic Input-Output System).
Finally, we’ve reached the starting point. The BIOS is set up on the motherboard, stored on a chip of its own. It provides some very basic functionality, like identifying connected hardware. It is specific to the motherboard and thus put there by its manufacturer. So it’s already there before you even install an operating system. There, you also define a boot sequence, i.e. where and in what order it should look for a bootloader.
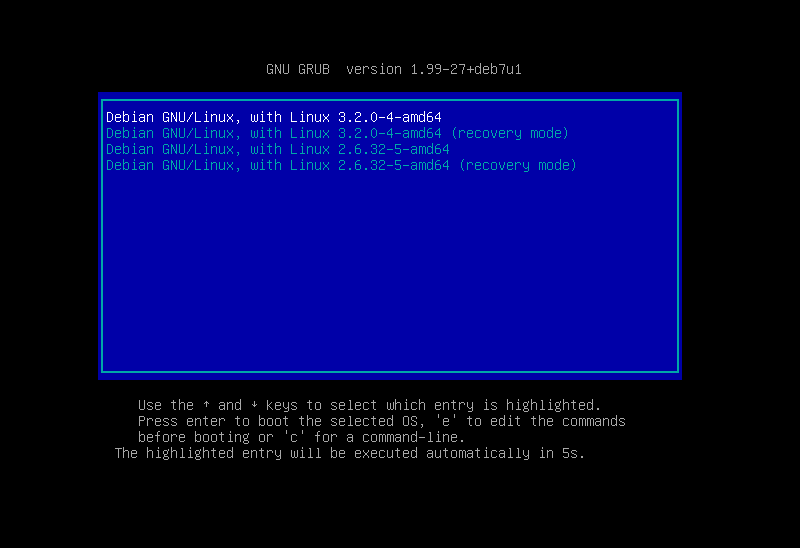
Let’s quickly go through all the booting in the right order. So, first the BIOS starts. It searches for your hard disks and identifies them. It also checks what CPU is there and prepares it to run programs. Then, it reads the bootloader from the first 446 bytes of the hard disk. The bootloader gets stored in main memory, then it points the CPU to the bootloader’s beginning. So the CPU starts executing the bootloader. The bootloader knows how to read the hard disk (e.g. how to read the ext2 file system), what kernels are there and which one should be started. It loads the selected kernel into main memory and again points the CPU to the kernel’s first instruction. From that moment on, the kernel takes over. It can now do whatever it wants and usually does. Like managing system resources, reading complex file structures or starting programs (also several simultaneously).
8.2.1. Exercises
- Where is the bootloader stored?
- Jump into a swamp, then pull yourself out again on your bootstrapps. What do you notice?
- Use dd to extract the master boot record of your disk. Store it to /tmp/mbr.bin
- Why do we require the Master Boot Record? Why don’t we load the kernel directly from the BIOS?
- Do an online research: What’s in the first 512 bytes of your hard disk?
8.3. Init
The kernel itself is not that interesting for a computer user. It surely allows lots of stuff but does only the basic thing on its own. For example, the kernel does not yet provide you with a terminal. That would be a seperate process. But with the kernel it’s a lot easier to start programs. The kernel itself only starts one program, though: init. On a productive system, that’s pretty unavoidable, a rescue system could also start a terminal instead. The init process then starts all the other system services, like device management (udev), mounts, networking, login terminals (getty) and also the graphical system. The reason for this is that this init system is much easier to configure (and change) than if you’d have to hack around with the kernel.
ps -fu root
Check out the first process in the list. Its PID is 1 and the name is init. So there you have it. Also pay attention to the PPID (Parent PID) column. This number is also a PID, not the one of the process though, but of the one which started it. Scroll down to see many processes automatically started by init (PPID 1). You can even get a list of all processes, arranged by their parents.
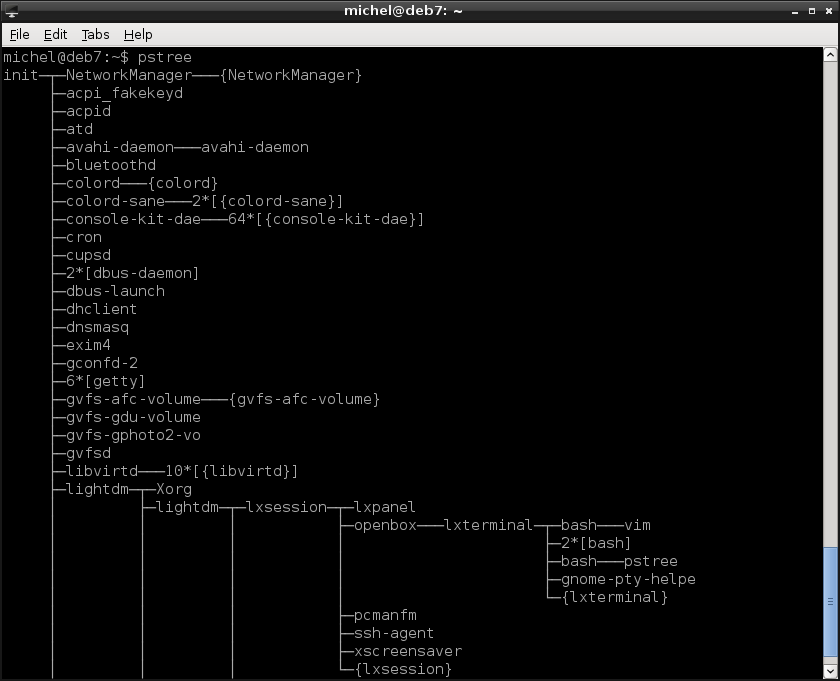
pstree
With this command you easily see which process started what others. init is on the top again. Do you find your current browser or terminal process?
8.4. Going live in 3.. 2.. 1..
Of course you can also start and stop system processes while your system is running. The old-school approach uses /etc/init.d for this. There you find a bunch of small scripts to manage your system daemons. In the simplest case each script is an alias for a command. But often the correct parameters have to be passed, so the script may be a little more complex. It also allows you not only to start a process but also to stop it (without resorting to kill) or check its status.
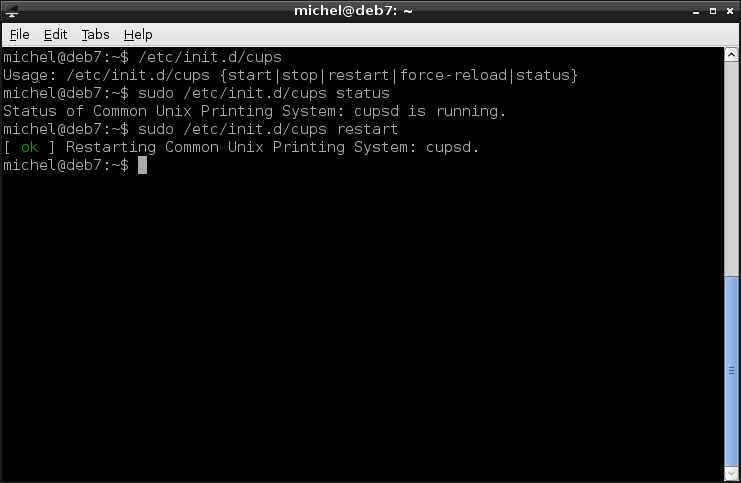
Let’s experiment a little with your printing system (I assume you’re not using it currently). Just running the script without arguments shows you the help.
/etc/init.d/cups
In this case you can start, stop or restart the process but also reload the config without interrupting the running processes. So let’s check if cups is currently running. In my case, it is.
sudo /etc/init.d/cups status
And now, maybe we’ve changed the config or the network structure or there’s another reason we need it to stop real quick. Let’s do that by adding the argument we’ve seen before.
sudo /etc/init.d/cups restart
This principle is the same for most of the scripts you find in /etc/init.d. Most distributions still provide this method but some offer a system specific alternative. For example on old debian-based distributions you should use the service command as follows:
service cups
service cups status
service cups restart
Most newer distributions (Debian, Ubuntu, Fedora, but not Gentoo) use a different command but similar syntax:
systemctl status cups
systemctl stop cups
systemctl start cups
On some systems, they replace the old-school /etc/init.d syntax, so the above examples might not work on your machine. With this new command you can also control which applications start at boot. Check out the following three arguments:
systemctl is-enabled cups
systemctl disable cups
systemctl enable cups
The first shows you if cups will be started automatically. The other two make cups start at boot time or prevent the same.
8.4.1. Exercises
- What’s the PPID of init? What other processes share the same PPID? What’s the meaning of this?
- What’s the status of dbus?
- Restart your cron service.
- What’s the meaning of runlevel 5?
8.5. Manipulate the boot sequence
At some point you’d want to install a new operating system. You grab an empty USB dongle (>= 1GB) and download an installer of your favourite Linux distribution. You insert the plug the stick into your computer to make an installation medium out of it.
Let’s assume you’ve downloaded the Gentoo Linux installation CD. You’d expect a CD image which would be a .iso file. Having the image in install-x86-minimal-20150407.iso you first have to make it bootable from USB. This is achieved with the isohybrid command. Then, you just copy the image over to the USB stick. First check that you have the correct device (sdX), e.g. have a look at the device size with fdisk. Then, you use the dd tool you know from the previous chapter to copy the image directly to the block device.
isohybrid install-x86-minimal-20150407.iso
dd if=install-x86-minimal-20150407.iso of=/dev/sdX
Note that you copy the whole disk, not a file system, and therefore you use sdX instead of sdXY. Once the copy is complete, eject the dongle.

You now have a small bootable Linux system on that USB dongle. It’s actually not that different from your running system, only how it’s packed onto the dongle. From the computer’s perspective there’s no difference between your USB dongle and a hard disk with an operating system installed. You just tell it to read the data from a different device.
We can use this fact to start a live system. Meaning that we start a fully usable Linux without the need of accessing the hard disk. Like this, we can use the hardware (even read the hard disk if we like) without leaving traces. This scenario is actually very common and extremely handy. Imagine you’ve somehow broken your system. For example you’ve deleted some files (/etc/fstab?) or something went wrong with the kernel (yes, that can happen). There’s many reasons why you end up in a situation where you cannot start your installed operating system anymore.
And here comes the live system. You can boot it and so have a more or less familiar environment. You can access the hardware normally, meaning you can also mount your hard disk partitions. And then copy files or manipulate them as you like. To fix whatever issue you’ve had and make your system bootable once more. In short, we have a rescue system.
So, to get all these goodies, what do we have to do? To make the computer boot from the USB dongle! I’m sure you recall all that text from above and know at what stage we’ll have to tap in.
The boot sequence is configured in the BIOS. So you can change it there. But it’s quite annoying for removable devices, as most BIOS are not really prepared for that. Maybe yours offers a way to select the boot device for a single startup. This doesn’t change the BIOS settings permanently and is usually easier to deal with.
Unfortunately, each BIOS uses different keys to enter its menues. Common are ESC, DEL, F1, F10 or F12. Usually, the BIOS shows you what key to press right after startup. Sometimes, there’s a key which brings you directly to the boot sequence, on others there’s a single key and you choose the boot media from the next menu. You’ll have to read what’s on the screen and you’ll have to be quick. The BIOS doesn’t wait very long (around 1 sec). If you didn’t catch it, you can easily reboot with the CTRL+ALT+DEL sequence and try your luck again.
Once you’ve found the menu (or changed the settings if you must) your live system starts. Also here, there’s often a timeout. If you don’t do anything for a couple of seconds, the installer will resort to boot from the hard disk. So keep your hands at the keyboard and your eyes fixed on the screen!
When the live system boots you can navigate through its menues to start it properly. E.g. the Xubuntu installer requires you to select a language, then Try Xubuntu without installing starts the live system. Proper live systems will probably boot directly, so that’s up to the image you’re using [3]. If you’re starting an installer or booting a live system doesn’t really matter to the computer. The approach is the same in both cases. Think of the installer as a program which is automatically started on boot.
8.5.1. Exercises
- Create a live system
- Find the key to enter your BIOS or change the boot sequence.
- Boot the live system
- Mount the root partition of your hard disk to /mnt
- Look at /mnt/home
- Look at /mnt/etc/shadow
- What do you note? How does this experiment affect security of your system?
8.6. Summary
You’ve learnt about one of the most prominent concepts in computers: bootstrapping. You’ve heard Baron Munchhausen’s tales but were not fooled by them. You understand what steps must be taken to make your operating system work. You know about the roles of the BIOS, bootloader, kernel and init process. You learnt how system processes can be started and stopped in a maintainer-friendly fashion. You can create a live system and also start it. You’ve seen how to read other’s data and rescue yours.
8.6.1. Exercises
- Read the wikipedia article about systemd.
- How can you read files of a Windows system without knowing the login password?
- Why is it not sufficient to set a BIOS password (i.e. prohibit boot sequence changes) to prevent such an attack?
- How can you prevent others reading your data? Search for an answer on the internet.
- Why does it matter in which order you start the programs?
- What’s the purpose of init?
- How is the kernel similar to a program? How is it different?
- How did we resolve the bootstrapping problem in the end?
- How does a dual-boot system work (two OS installed)? Search the term if you don’t know it! What changes do you have to make if you’ve already installed one OS?
- What is stored in the master boot record (MBR)?
8.7. Cheatsheet
| [1] | Although, there were not so much servants left loyal to him. That’s because the peasants decided they live in an anarcho-syndicalistic commune, with weekly turning executing officers. They chased out any king or other kind of authority and lived their lives as free man, with biweekly meetings. Except for the ones being repressed by Arthur, King of the Britons, of course. |
| [2] | And just like that, our little story is completely made up. Although a similar story of the Baron Munchhausen exists, the term bootstrapping seems unrelated to it. It’s the same concept, but according to wikipedia no reference to bootstraps is found in relation to Munchhausen. Instead, the term comes from the american phrase “to pull oneself up by one’s bootstraps”. |
| [3] | You might like grml at some point. |