11. Virtualization
The blue or the red pill?
11.1. Review
You have learnt much about what an operating system is and how it works. You are aware of the kernel’s tasks and how software interacts with hardware. You know how a program is represented and what’s its components. And how to locate them. You know the difference and similarities between disks and files.
11.1.1. Test questions
- What is a resource?
- How many kernels may be running simultaneously?
- What’s the kernel’s main tasks?
- How do you find out what files belong to a program?
- Name three essential components in your computer.
11.1.2. Introduction
There’s the possibility to simulate a computer with another computer. This is known as virtualization. There are many benefits of virtualization, let’s list a few:
- You can have several operating systems on one computer.
- You can run old programs.
- You can run programs made for other computers.
- You can do experiments without jeopardizing your working machine.
So far, we assumed that there’s exactly one operating system running on a computer (at the same time). By which we really mean a single kernel. Several kernels working on the same set of hardware is looking for trouble. Simiar to two objects - let’s say cars or noses - occupying the same point in space and time. For example, let’s say the two kernels write to the same location on the same hard disk. Of course, only one of the two writes will actually be effective. What’s worse is that since the two kernels don’t know of the other’s existence, they don’t realize the mess that was created. Pure chaos (but not the good kind) would be the result, essentially rendering the computer useless and probably damaging stored data.
So virtualization has to work around this issue. But first, let’s categorize what you can do and want. You have to decide on two fundamental questions. If you’re about to run the same operating system and if you’re ok with the hardware you have. Let’s look at this in a table.
| Guest OS | Hardware | |
|---|---|---|
| Same | Different | |
| Same | Pseudo | |
| Different | Para | Emulation |
Some terminology first. We use the term host to refer to the system which is set up on basis of the real hardware and starts then you turn on the computer. With the host, we control the other virtual machines. A guest system is a virtual one. One that can be started and stopped at will, without having another system to shut down as well. There’s exactly one host but an arbitrary number of guests.
11.2. Emulation
Sometimes, you have one set of hardware but a program only runs on another. It’s more common than you think, actually. For example, a program running on an ordinary computer, a desktop or a laptop for instance, would not work on your mobile phone. That’s because they use very different CPUs. Remember that a program is a set of instructions? Well, your CPU only understands some of them. So when the program is created, it is tailored to a specific kind of CPU and only uses instructions this one understands. And, in turn, cannot be run on different CPUs.
This is basically the worst case scenario. It means that we have to rebuild the hardware - in software. You basically have to write a program which behaves in exactly the same way your target CPU does. It is possible to do this but the problem is that this approach is very slow. In case of your phone it would probably work, since the desktop computer is multiple times faster than the phone. But emulating a desktop on another desktop? Forget it, not a chance. The positive side is that you can do this with every kind of hardware imaginable. And since you’re already changing the hardware you can run whatever system on it you want - perhaps your host system doesn’t even exist for the simulated platform. Also, running the same OS on the simulated platform doesn’t make sense - if that were possible you wouldn’t need to resort to emulation in the first place.
Due to the low performance, emulation is mainly used for development. Like in the example, if you want to write software for a mobile phone and test it on your development machine. It’s probably easier to do so than to test on the phone itself. Sometimes this is also used to bring ancient software back to life. In this case, the old hardware is usually slow enough not to be a problem for a recent system.
11.3. Paravirtualization
Let’s take one step towards efficiency. Instead of simulating hardware, we can redistribute the one we’re actually having. Or at least simulating hardware which is almost what we have so there’s only very little work. We kind of set up an extremely small operating system with a running kernel - the hypervisor. It controls the resource access, like who can do what and at what time. But that’s it, there’s no other functionality. So you split up your CPU, memory, storage and so on. To make this task easier, the split up is fixed. If you have a multicore CPU, you can assign that many cores to a guest. Let’s say you have 8 cores and 3 guests, you can distribute your cores on a 2-2-3 scheme. One core remains and is to be used by the host system [1]. Each guest gets exclusive access to its core but you cannot change the scheme as long as your guest is started. The same goes for memory, storage, USB ports, ...
Like this, you get multiple guests running on the same hardware. The main advantage of this method is that the guests are completely seperated and independent. They don’t know of the other’s existence (unless you let them known explicitly). Which implies that you can have a different operating system installed on each virtual machine. So you can have a Linux host and run virtual Windows guests. This is extremely nice if you need to switch your operating system for some small tasks but don’t intend to run heavy stuff. The guest will be quite usable and quick but it has its limits. For example graphical work using the graphics card will probably fail.
There are mainly two platforms for this kind of virtualization: KVM and XEN. On desktop systems KVM seems to be the preferred choice nowadays. A good alternative is Virtualbox. Any of those still requires some hardware support in order to run smoothly. Recent CPUs support virtualization explicitly and make it much, much faster.
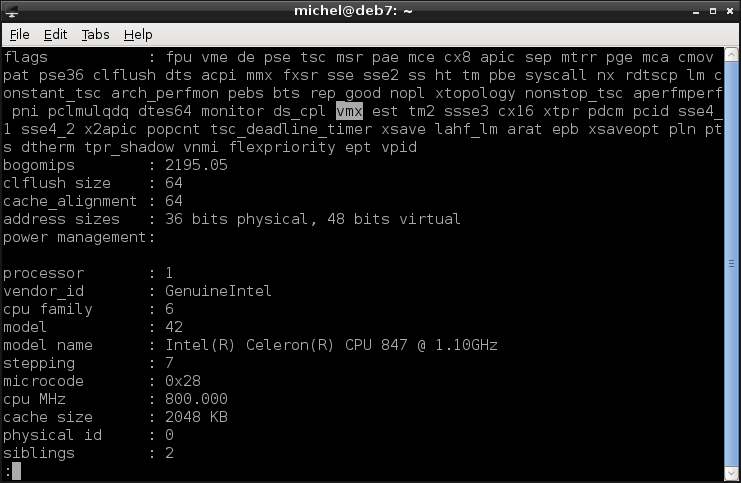
You can check if your CPU supports virtualization by looking at /proc/cpuinfo. There’s a flags key listing may cryptic words. Check if you find svm (AMD) or vmx (Intel) there (maybe search in less). If so, you have all the virtualization support you need. Otherwise, the paravirtualization will probably still be too inefficient (read: slow).
11.3.1. Exercises
Check if your machine has virtualization hardware support.
- If your machine doesn’t have virtualization support, find one which has.
- If you don’t have such a machine at hand, skip this exercise.
Download an installation image from here.
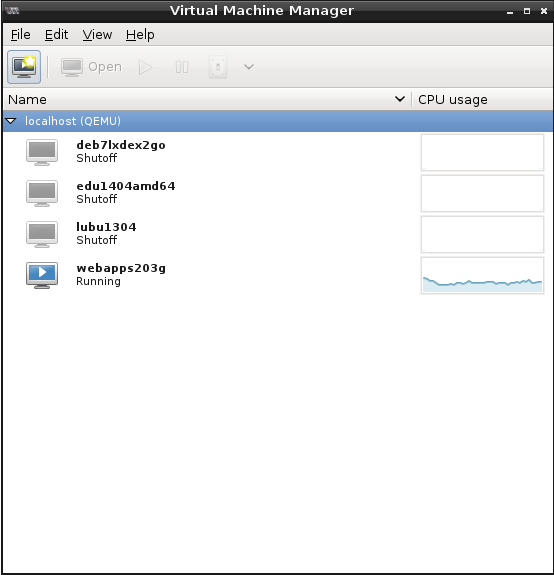
Start the Virtual machine manager.
Create a new virtual machine
- Select ‘Local installation media’
- Choose the image you’ve downloaded
- Create a disk on the computer’s hard drive. Pick the ‘raw’ image, if asked
- On the summary page, you see the path of the image file. Note it.
- When you finish the image, the machine starts automatically.
- When the machine starts, go through the installation process, until the disk partitioning. Create some partition scheme.
- After the partitioning you may continue or abort the installation as you like. When finished shut down the machine.
- Use fdisk to view your image file (probably at /var/lib/libvirt/images).
- Discuss ways to make an exact copy of your virtual machine with other students.
11.4. Pseudo-Virtualization
Often, we use virtualization to seperate two environments from each other. For example, your normal users accounts should not interfere with your web services. Each environment includes its own programs, users, network connections, services, and so on. But what, if the only difference is a single program? In this case, virtualizing a whole machine is much effort and very inefficient. You’d need to maintain yet another system and resources given to that machine cannot be used by other guests. The later argument is also valid on machines with little hardware to begin with.
In this case, it’s also possible to seperate a single application from your main system without the extra effort of paravirtualization. The idea is to clone the environment required by the application (but nothing more). The program is then run within this artificial sphere without being able to access the underlying system.
The idea is simple: You re-create the parts of the file tree required by your target program. Then you change the definition of the root directory for this program. Effectively, the program finds all the necessary files at the location it expects them - but in reality, it gets the file from your artificial environment. Meaning that the files your program sees may be different from the files of your actual system. That way, you achieve the required isolation.
This method originates in BSD and is called Jail there. On Linux, it was adapted and is available with the chroot command. Setting up the environment requires you to copy the program and all files it depends on. To make this a bit simpler, you can download the two scripts imprison and ldd-recursive and put them into the same directory. imprison.sh finds the required files for you and copies them into the new environment.
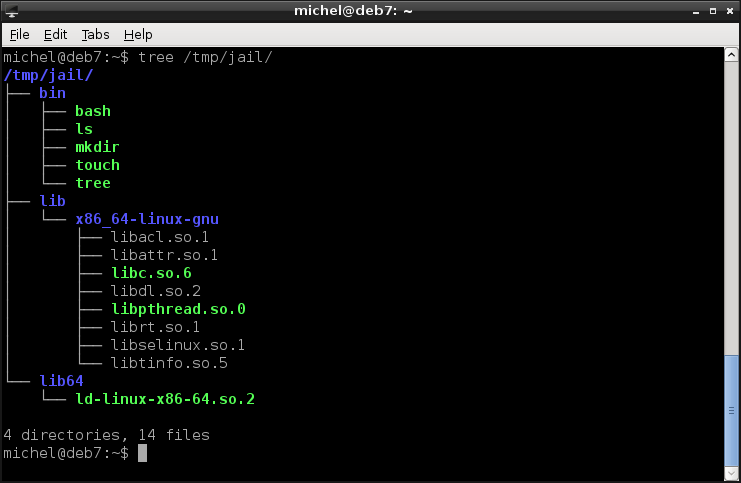
bash imprison.sh /tmp/jail /bin/bash /bin/ls /bin/mkdir /bin/touch /usr/bin/tree
tree /tmp/jail
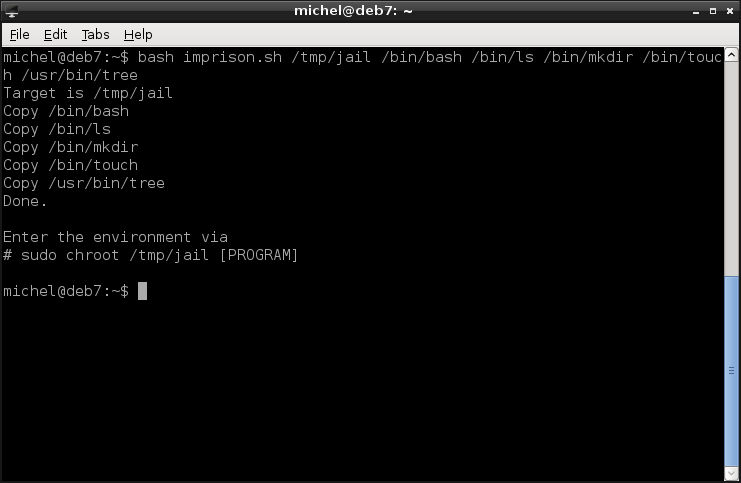
With tree you can - similar to ls - look at a directorie’s contents. But instead of listing only that directory, tree also shows what’s in its subfolders. You’ll see the copied programs (bash, ls, mkdir, touch, tree) and some extra files (the dependencies). Note that the directory structure is the same as on your normal system.
Note
If this didn’t work for you, download the chroot-environment. Unpack with tar -xzf chroot-environment.tgz -C /tmp/jail and continue normally.
If you see this structure, you can enter the environment.
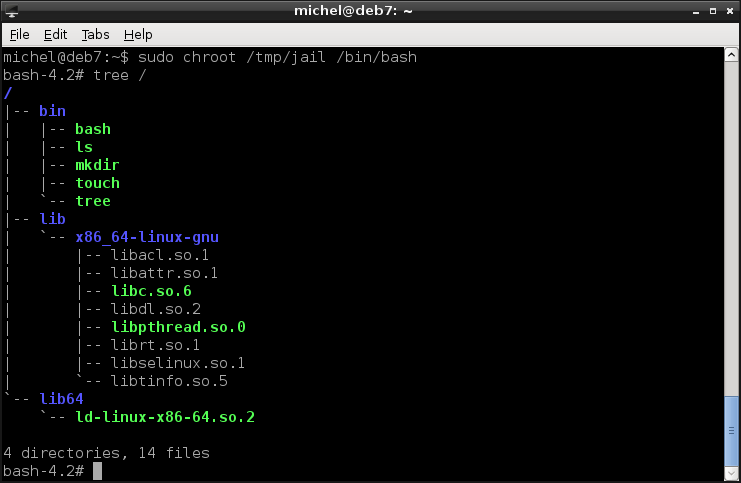
sudo chroot /tmp/jail /bin/bash
OK, so that was it. Not that spectacular, though. But let’s look around and use the commands you’ve copied in the new environment.
tree /
You see the same folders as before. But notice that now you’re listing the root directory instead of /tmp/jail!
So let’s do some changes. Again, notice what exact paths you modify.
mkdir /root
touch /root/foobar
rm /root/foobar
tree /
exit
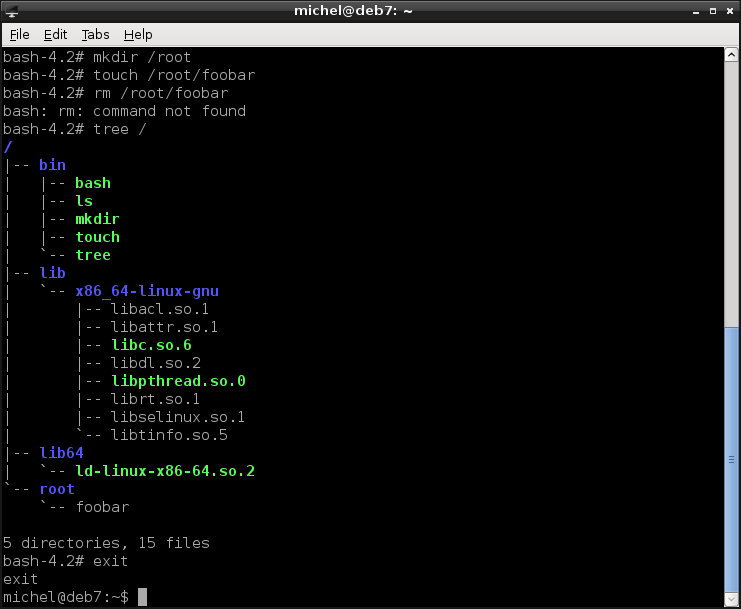
You already know all the commands, except for touch. We use it here to create an empty file, just for demonstration purposes. So you see that indeed you can use the commands, except for rm which we didn’t copy. In the output of tree you again see the contents of /tmp/jail - but now the top directory is the root!
With the last command (exit) you exited bash and are back in the original terminal again. So, let’s see our changes.
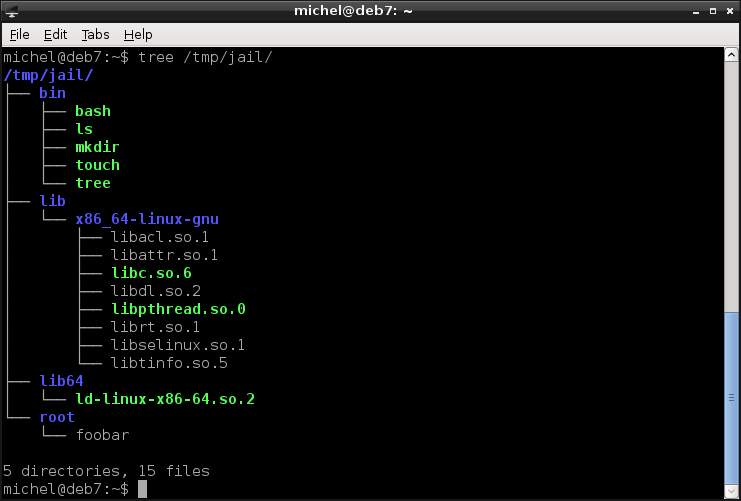
tree /tmp/jail
Indeed, the directory root and file root/foobar are now there, inside the /tmp/jail directory. But if you look at the commands which created them, you’ll see that they were created in the root directory. Well, the root directory within the chroot environment, which is the same as /tmp/jail (as you see in the chroot command line).
This example was a bit simple and the imprison.sh script will not work for more complex programs (you can try with nano for example). You can build more complex environments manually (if you know how to find out) or use helper tools, such as makejail.
With this method, you can change all files the program sees - but not the kernel. There’s still only one kernel for all of these environments. The kernel has to have chrooting enabled, so it is aware of what you’re doing and can block access to the outside system accordingly. None the less you have to be careful how the chroot environment is set up. For example, some programs require access to devices in /dev, which you also have to create somehow. If you now map /dev/sda into the new environment, you allow access to the whole system from within the isolated environment - probably not what you intended. Having the same kernel also implies that you cannot set up a different operating system. That would require another kernel to run, which we know we can only do with the hypervisor approach.
The main advantage of this method is that it’s relatively light-weight. Resources (e.g. memory) are shared and don’t need to be distributed in a fixed way. If the isolated program uses less memory than expected, other processes can use the rest. If it uses more, it’s also not a problem as long as you have enough memory in your machine.
This virtualization type is also widely used, most often to restrict user access and isolate programs from the rest of the system. So when this program gets attacked, it does not jeopardize the whole system. Recently new programs were developed, greatly simplifying this technique. For example, Docker uses this method to create portable environments for applications.
11.4.1. Exercises
Assume your jail lies in /home/michel/jail. From within the jail you write the file /home/michel/foobar. Where will this file be located from the global (outside of the jail) perspective?
Create a jail environment with the following commands:
- ls
- cat
- cp
- df
- less
- pwd
- touch
Place a (non-empty) file at any location in the jail.
Run each of the commands in the jail. Provide your file as argument, if the command requires one.
Name two ways how you can access the outside system from within the jail.
11.5. Conclusion
Emulation
- Write a program which simulates hardware in full detail
- We can simulate any kind of hardware, not only the one we have
- Very slow
- Examples: dosemu, gnuboy, vice
Paravirtualization
- Distribute actually available hardware between several virtual machines
- Machines are fully seperated and don’t know about the existence of other machines
- Very efficient
- Can run different operating system
- Examples: KVM, XEN, VirtualBox
Pseudo-Virtualization
- No srict distribution of resources
- Resources are shared
- No operating system different from host
- Can install and run programs in an isolated environment
- Can restrict programs and users to a single directory
- Examples: Wine, Chroot, BSD Jails, Docker
11.6. Summary
You now know the three major virtualization methods. You’re aware of the advantages and limitations of each one of them. You can decide which one to use in what situation. You’ve learnt how to set up a virtual environment and how it is seperated from the rest. You’ve learnt yet another technique of how to bend your file tree.
11.6.1. Exercises
- How many kernels may be running simultaneously?
- Why can’t you have a virtual environment with the same OS but different hardware?
- How is the host different from the guest?
- Give a reason why emulation is slow.
- Why is pseudo-virtualization more efficient than paravirtualization?
- Research on the internet what wine does. How is it related to the virtualization techniques explained here?
11.7. Cheatsheet
- tree [-L LEVEL] [DIRECTORY]
- chroot [OPTIONS] NEWROOT [COMMAND]
- touch [OPTIONS] FILE
| [1] | The host in this setup is not the hypervisor. Usually, you don’t notice the hypervisor because you’re not directly exposed to it. But you still need a system to control your virtual environment. That’s why one of the guest systems is dedicated as the managing system. From there you control and manage the other guests. This is the one we mean when talking about the host. |